10-15 English Speech-to-Text Sample Tutorial
After experiencing a wide range of “image recognition” features, from human detection and multi-feature detection to industrial safety and disaster prevention, this chapter will unlock another powerful capability of the NexVDO SDK : “audio processing.”
We will introduce a speech-to-text model trained specifically for the English language, allowing your software not only to “understand” images, but also to “understand” sound and instantly convert received real-time voice streams into text captions. This technology is very suitable for smart scenarios such as multinational video meeting records, real-time captions for English remote teaching, and automatic video subtitle generation.
Learning Objectives
Through this chapter, you will learn :
1. Configure and load a dedicated English speech-to-text model for audio analysis scenarios.
2. Understand the core workflow differences when switching from an “image data stream” to an “audio data stream,” and use the SDK’s built-in mechanism to render the image directly.
3. Learn how to register a dedicated AI callback function (QDEEP_REGISTER_OBJECT_DETECT_CALLBACK) in the program to obtain speech recognition results.
4. Extend the UI interface and update the recognized text in real time on a Qt label (QLabel).
Preparation
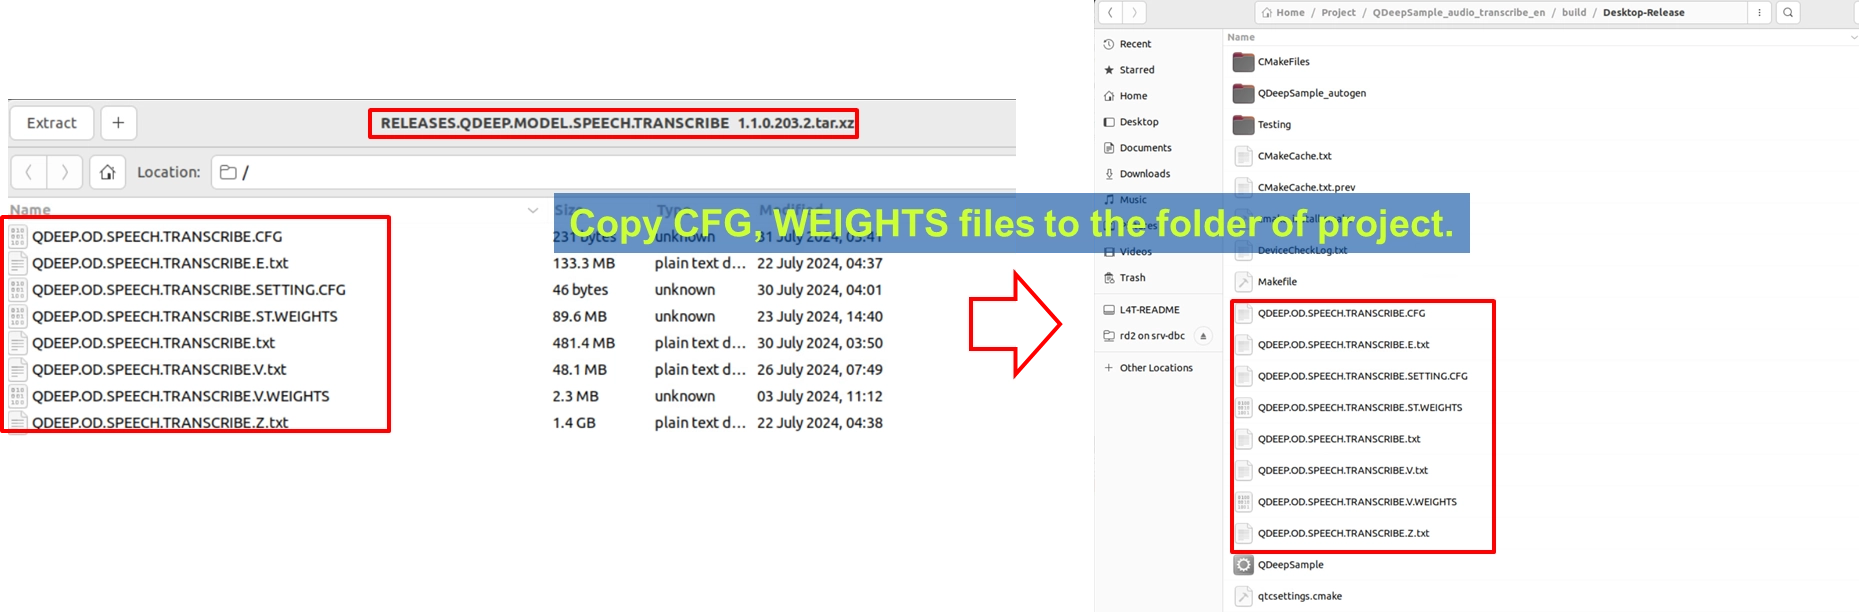
To give the AI English dictation capability, we must equip it with a “brain” focused on speech recognition. This model package contains multiple configuration files, weight files, and related text files, so there will be more files than usual.
1. Please locate the speech-to-text model archive. Its filename may include wording such as RELEASES.QDEEP.MODEL.SPEECH.TRANSCRIBE.
2. After extracting it, copy QDEEP.OD.SPEECH.TRANSCRIBE.CFG (the configuration file), all corresponding weight files (.WEIGHTS), and dictionary/text files (.txt, .SETTING.CFG) into the build output directory of your Qt project, at the same level as the executable file.
Core Concept : Workflow Conversion from “Image” to “Audio”
Before officially modifying the API, we must first clarify an extremely important core concept. Previously, we explained image processing, but this time we are explaining audio processing.
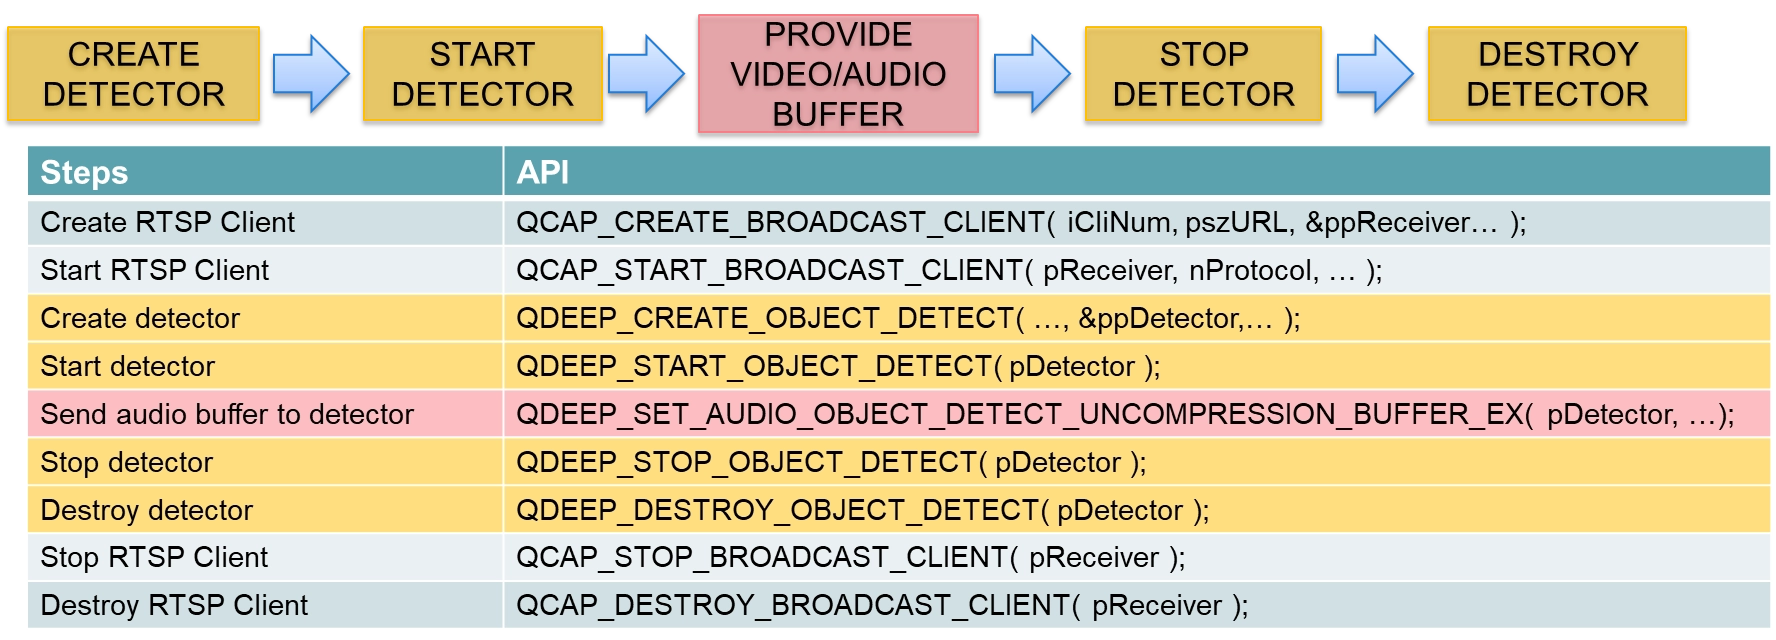
• Previous image workflow : We intercepted the decoded NV12 image data through on_video_decoder_broadcast_client_callback, then called QDEEP_SET_VIDEO_OBJECT_DETECT_UNCOMPRESSION_BUFFER to feed the image to the AI.
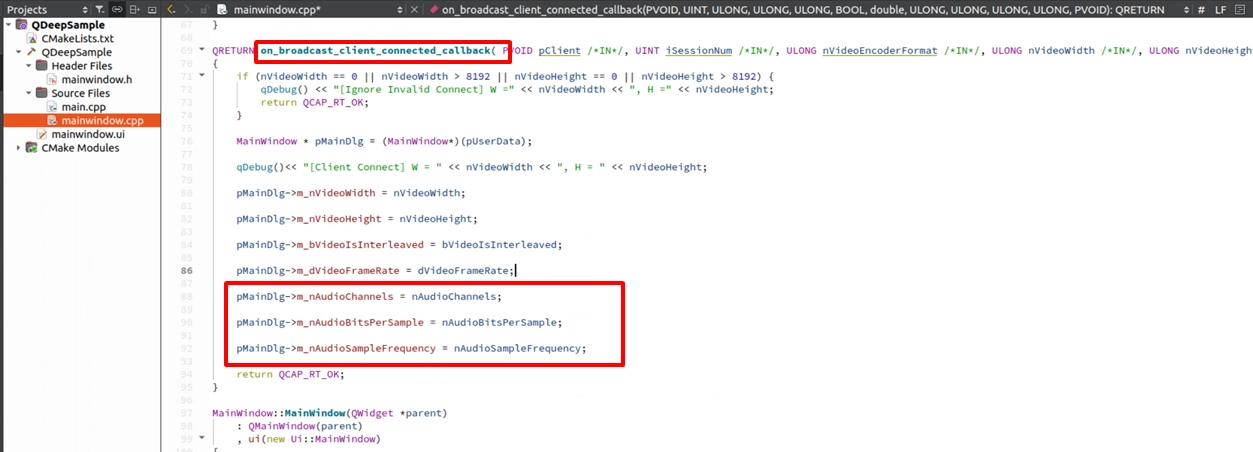
• New audio workflow : Since the model performs recognition on sound, the user must send “audio data” to the detector. Therefore, we must instead intercept clean PCM audio data from on_audio_decoder_broadcast_client_callback, which is responsible for receiving decoded audio. Then we use the new API designed specifically for audio (QDEEP_SET_AUDIO_...) to pass these sound features.
➤ For the receiver's audio callback function, you can review : 10-9 Face Recognition Sample Tutorial
How Should the Core API Be Changed?
After understanding the workflow differences, let’s look at the core APIs that need to be modified and added :
• Change of model configuration Enum : In QDEEP_CREATE_OBJECT_DETECT, change it to the dedicated QDEEP_OBJECT_DETECT_CONFIG_MODEL_SPEECH_TRANSCRIBE_EN.
• Register speech recognition results : We need to obtain recognition results through QDEEP_REGISTER_OBJECT_DETECT_CALLBACK.
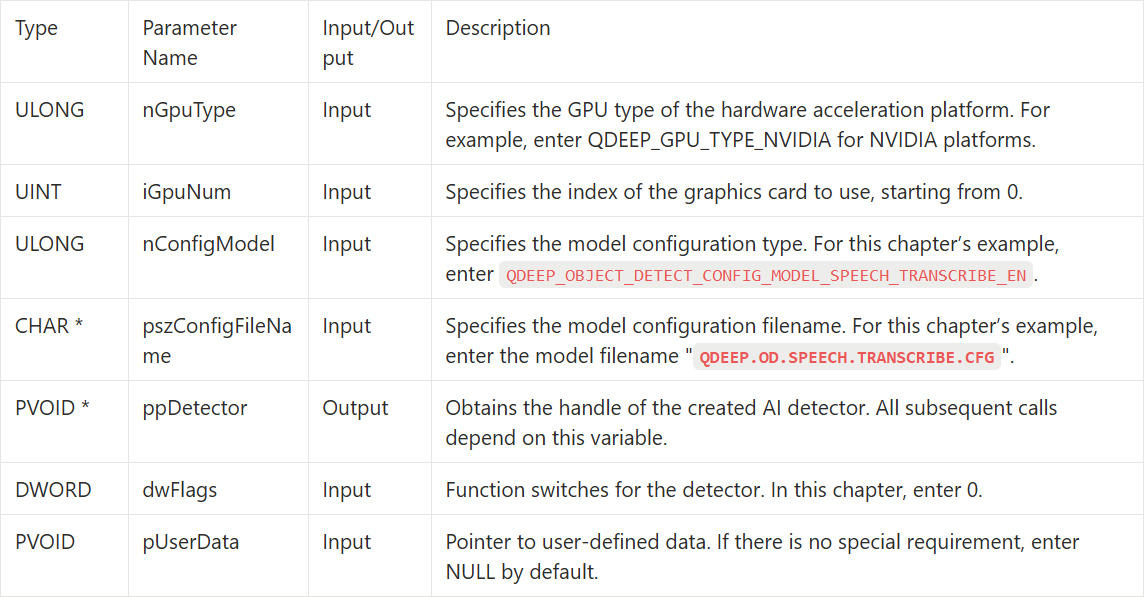
QDEEP_CREATE_OBJECT_DETECT
This is the most critical API for creating the AI engine and loading the “brain” (model). Users must initialize the detector through this API.
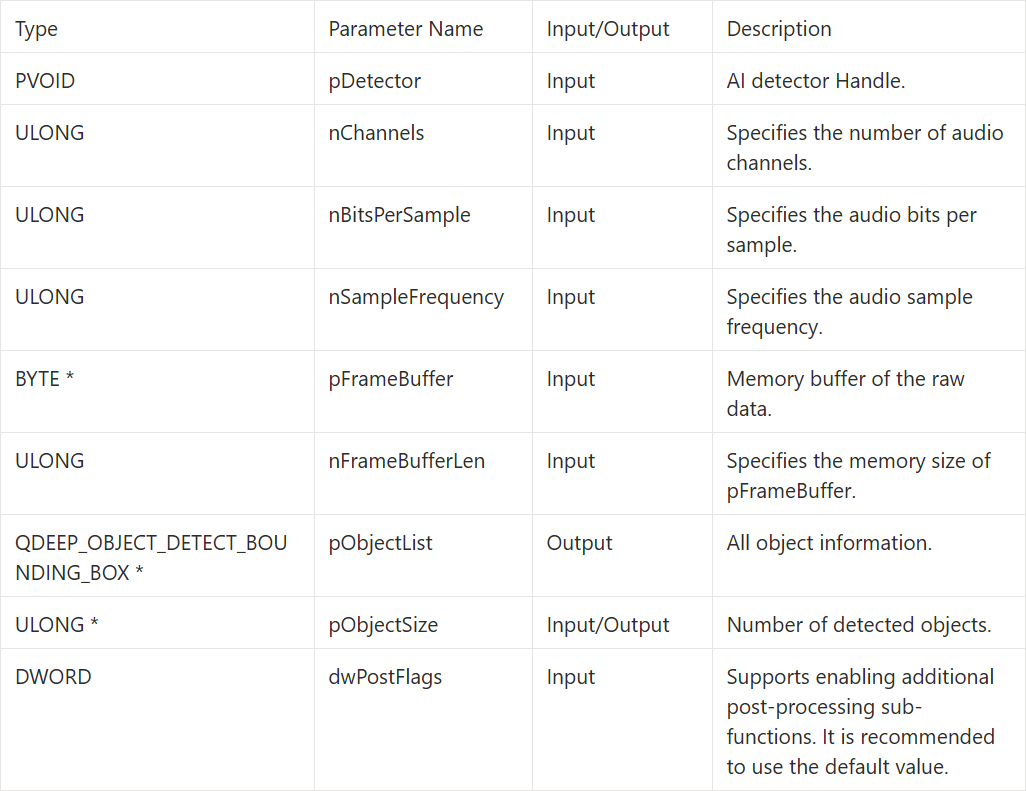
QDEEP_SET_AUDIO_OBJECT_DETECT_UNCOMPRESSION_BUFFER_EX
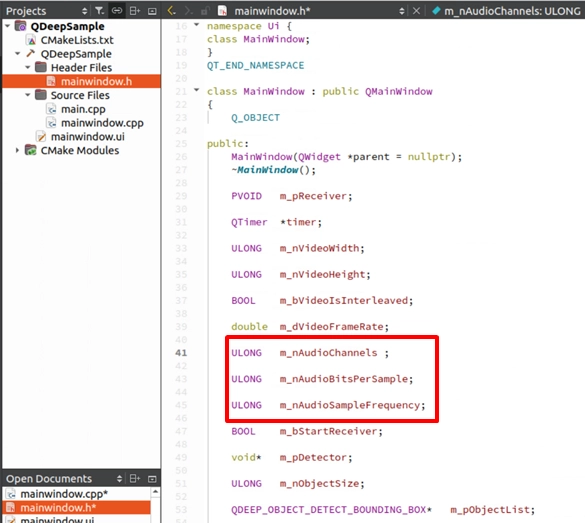
We need to call this API inside on_audio_decoder_broadcast_client_callback to continuously provide audio data to the AI detector. Compared with images, audio requires different physical parameters :
Data Callback : Obtaining Speech Recognition Results
• Registration API : QDEEP_REGISTER_OBJECT_DETECT_CALLBACK
• Trigger timing : When the AI engine finishes listening to a sentence and completes recognition, it actively passes the English sentence to us through this Callback.
• Returned information parameters (PF_OBJECT_DETECT_CALLBACK) :
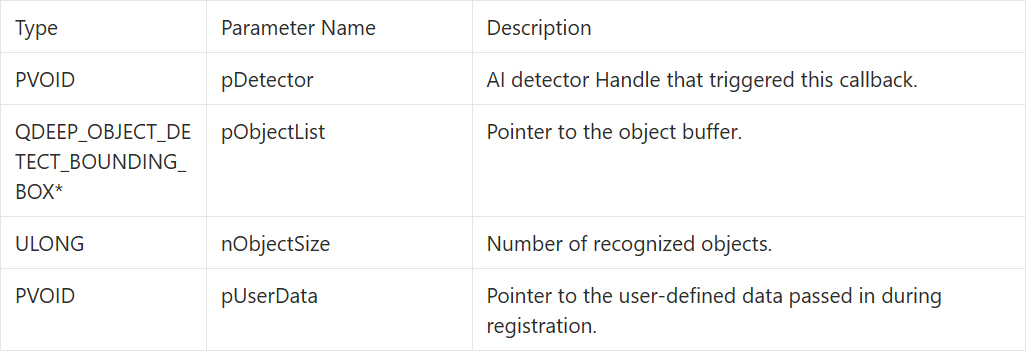
QDEEP_OBJECT_DETECT_BOUNDING_BOX Structure
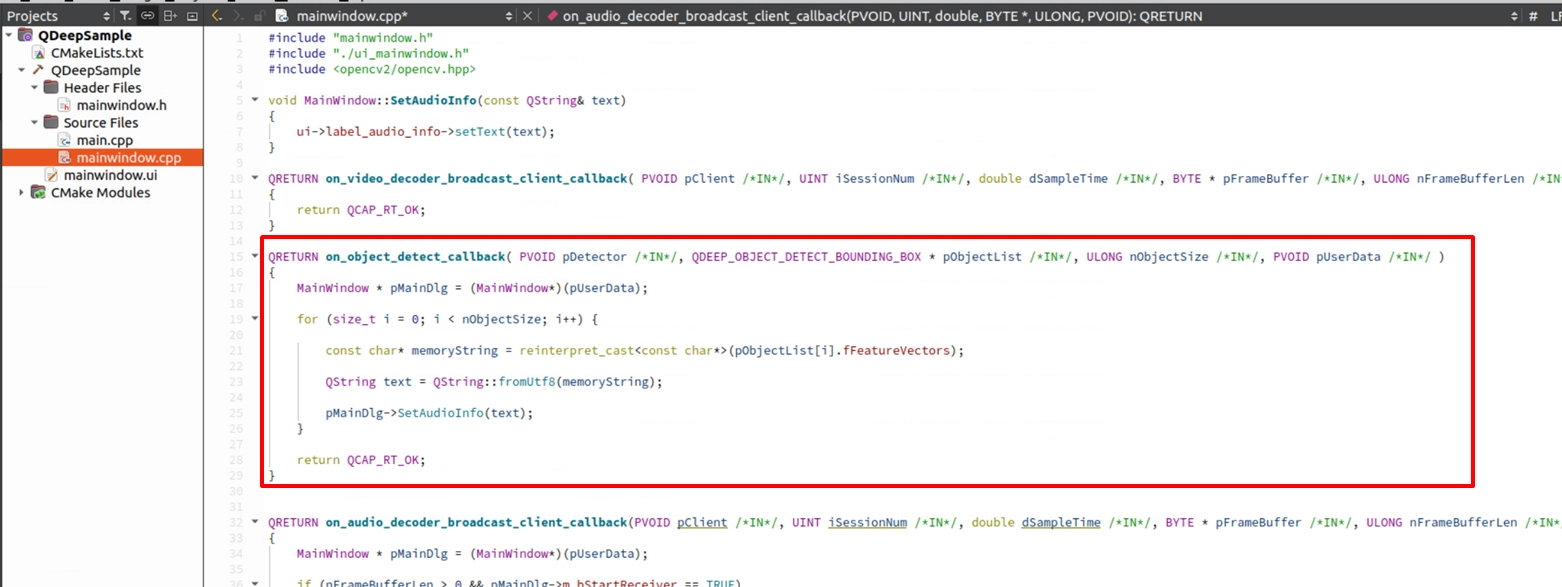
In the speech-to-text model, the SDK uses this field to carry speech recognition result-related data. The AI engine provides the speech recognition result through the fFeatureVectors parameter in this structure for us to extract.

Writing the Core Code
Open your project, and we will make the key adjustments.
Add a Subtitle Display Interface ( QLabel )
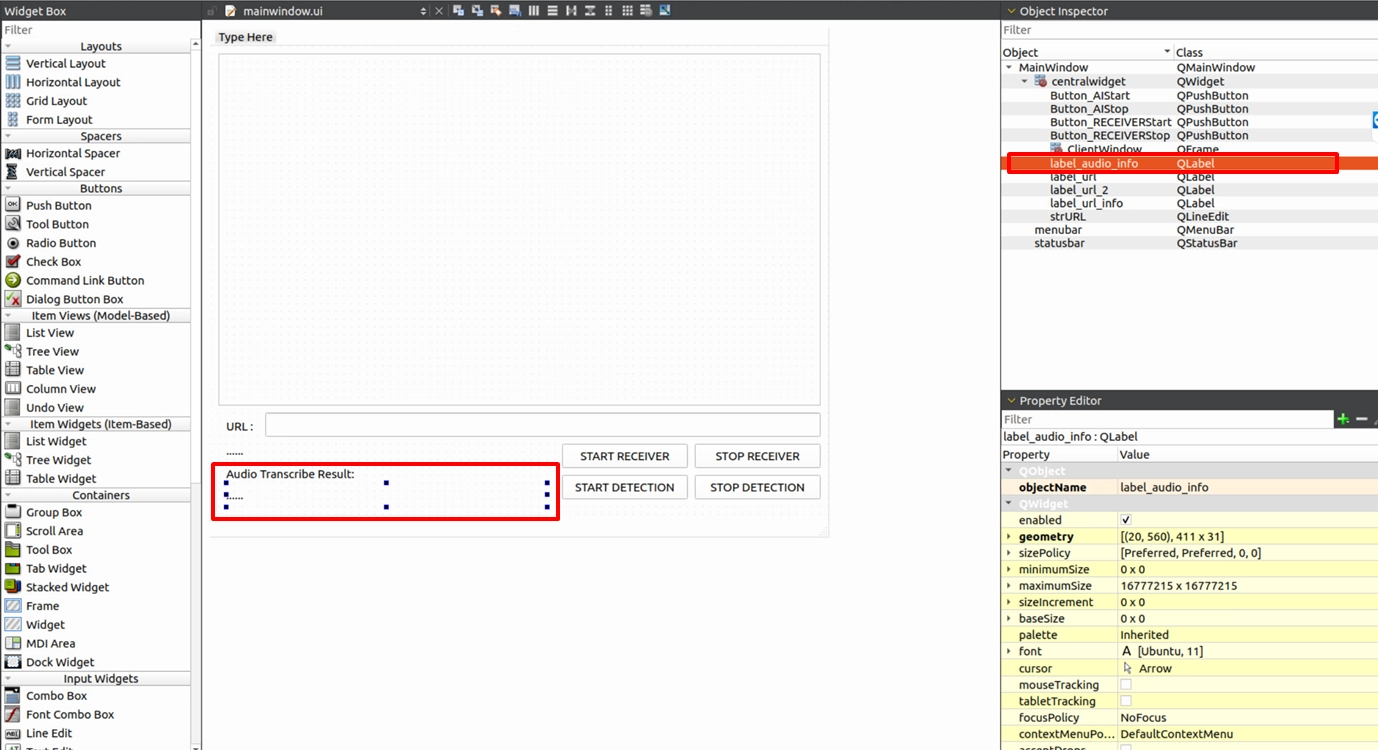
Because the result this time is "text subtitles", please open your mainwindow.ui, add a QLabel component at the bottom of the screen, and name it label_audio_info, which is specifically used to display the English results of the speech recognition.
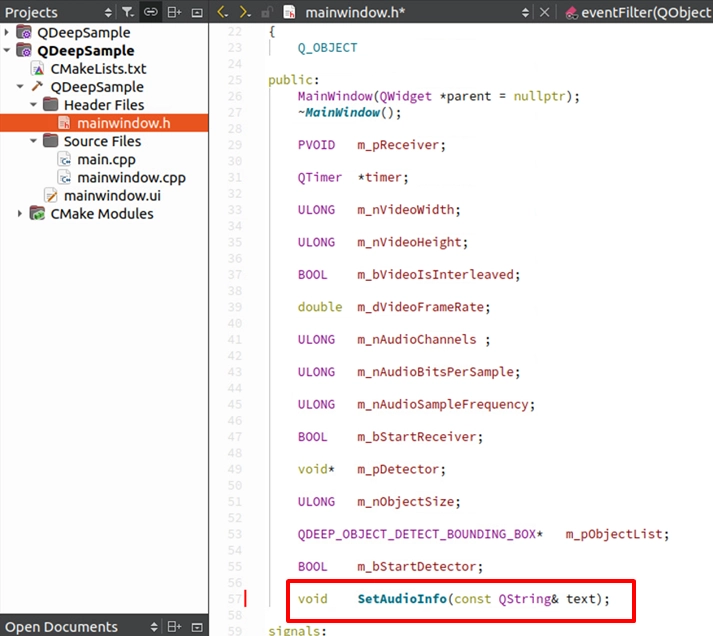
Next, to allow the global Callback to safely modify the UI, we need to declare a public dedicated function in mainwindow.h :
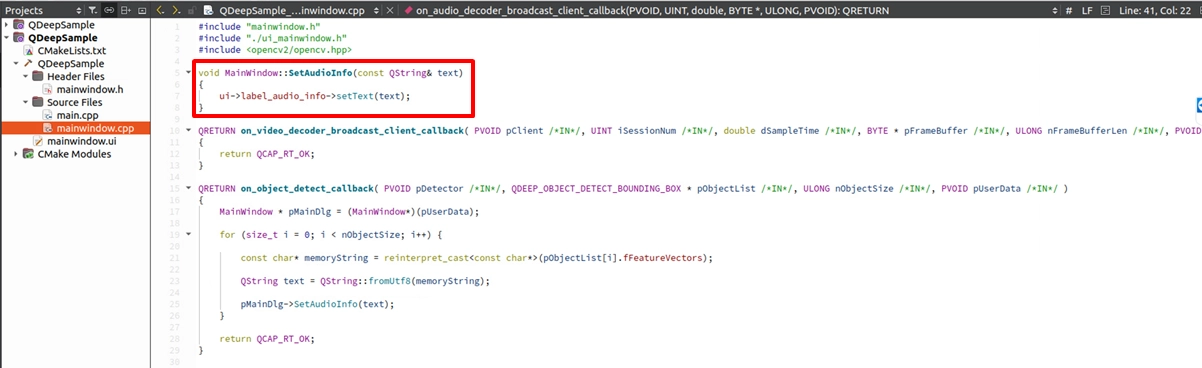
And implement it in mainwindow.cpp. The logic is very straightforward—simply set the received string to the label :
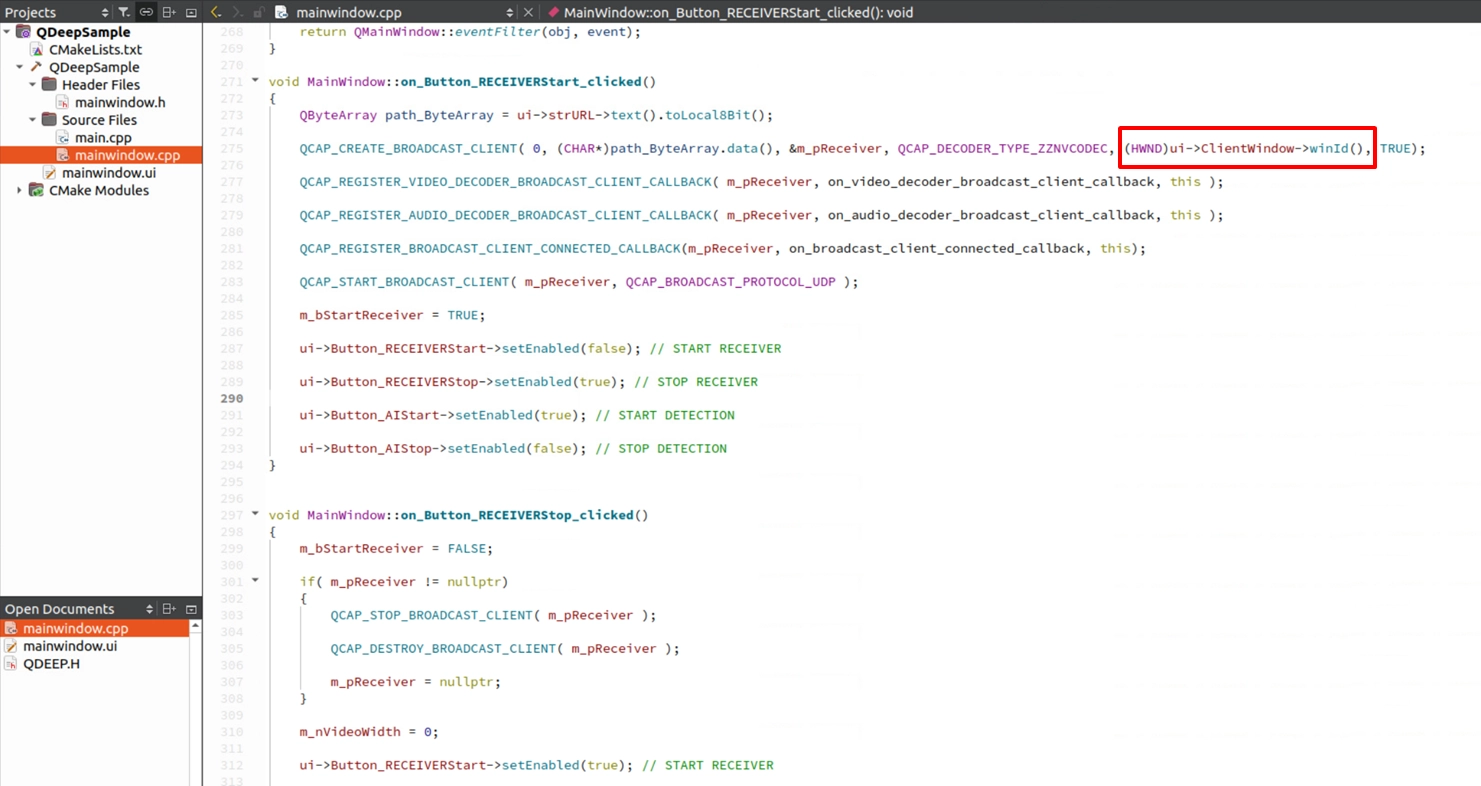
Bind SDK Native Image Rendering
In previous chapters, in order to draw AI tracking boxes on the image, we had to intercept the original image, convert it into OpenCV format (cv::Mat), and then draw it using QPainter. However, in this chapter, because we only perform recognition on “audio,” the image does not need any additional processing. Therefore, we can directly use the native function of the RTSP Client API to bind the UI display window to the SDK and let it automatically play the image for us. This will greatly simplify our code.
Declare Audio Information Variables
Model Loading and Callback Registration

Feed Audio in the Audio Callback
Find the on_audio_decoder_broadcast_client_callback function. Use QDEEP_SET_AUDIO_OBJECT_DETECT_UNCOMPRESSION_BUFFER_EX to feed the intercepted PCM audio data (pFrameBuffer), channel count, sample rate, and other parameters into the AI engine.Then, obtain the speech recognition result within the dedicated callback function and pass it to the QLabel for display. However, if the AI function is not enabled, label_audio_info will display the default string.

Extract the Recognition Result in the Callback and Update QLabel
Final Verification
Are you ready to welcome your first AI English dictation assistant? Now, click “Build and RUN” in the lower-left corner to run the project :
1. Enter the RTSP URL of a video that contains an “English human voice” audio track, and click START RECEIVER to start receiving the stream. At this point, the image will be automatically and smoothly drawn directly on the UI by the SDK.
2. Click START DETECTION to start the AI speech analysis engine.
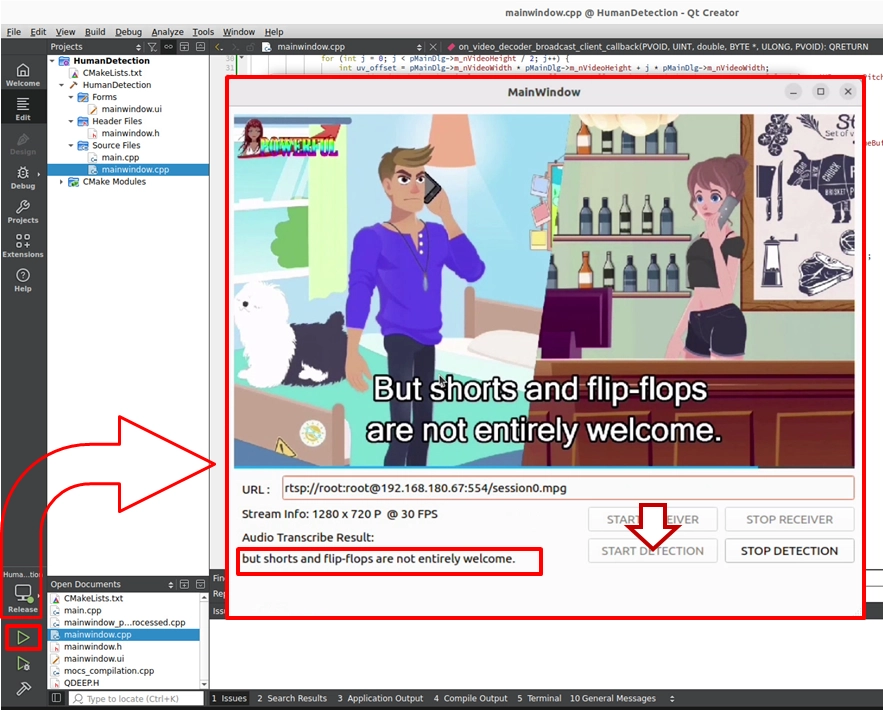
➤ Helpful reminder ( very important ) : When you first open the software, the interface may take a short moment to appear. During the first execution, the model must perform initialization configuration and load the large neural network weights and speech dictionary into the GPU. Once the software opens successfully, it means the AI brain is ready. Subsequent launches will no longer require this waiting time.
➤ Test result : When the person in the video starts speaking English, you will see a very smooth transcription experience. In the QLabel area at the bottom of the software interface, “Audio Transcribe Result:” will be displayed in real time, and the corresponding English subtitles will dynamically appear as the person speaks. For example, when the character in the video says : "But shorts and flip-flops are not entirely welcome.", the interface below will perfectly capture and accurately display this original English dialogue.