10-9 Face Recognition Sample Tutorial
In the previous chapters, we learned how to make AI detect “people, vehicles, fire, and even any object” in an image. But have you ever wondered : AI can tell us “there is a face here,” but can it tell us “who this face belongs to”?
This chapter takes you into one of the core application areas of image analysis : Face Recognition. We will introduce a powerful face recognition model that can not only locate faces, but also accurately extract facial keypoints, determine age and gender, and most importantly, extract each face's unique feature vector. Combined with the UI pop-up window we are about to implement, you will be able to build a VIP recognition system that lets you click on the screen to register a name and automatically welcome recognized guests.
Learning Objectives
Through this chapter, you will learn :
1. Major API parameter upgrade : Understand the practical meaning of the QDEEP_OBJECT_DETECT_FLAG_FULL flag.
2. Advanced structure parsing : Extract 5 facial landmark coordinates, age, and gender information from AI detection results.
3. A major OpenCV drawing upgrade : Use cv::circle to draw facial landmark points, and use cv::getTextSize to draw text labels with a perfectly fitted background.
4. Master feature comparison APIs and UI interaction : Implement mouse-click registration, and use QDEEP_GET_OBJECT_RECOGNITION_COMPARISON to calculate feature similarity and complete identity verification logic.
Preparation
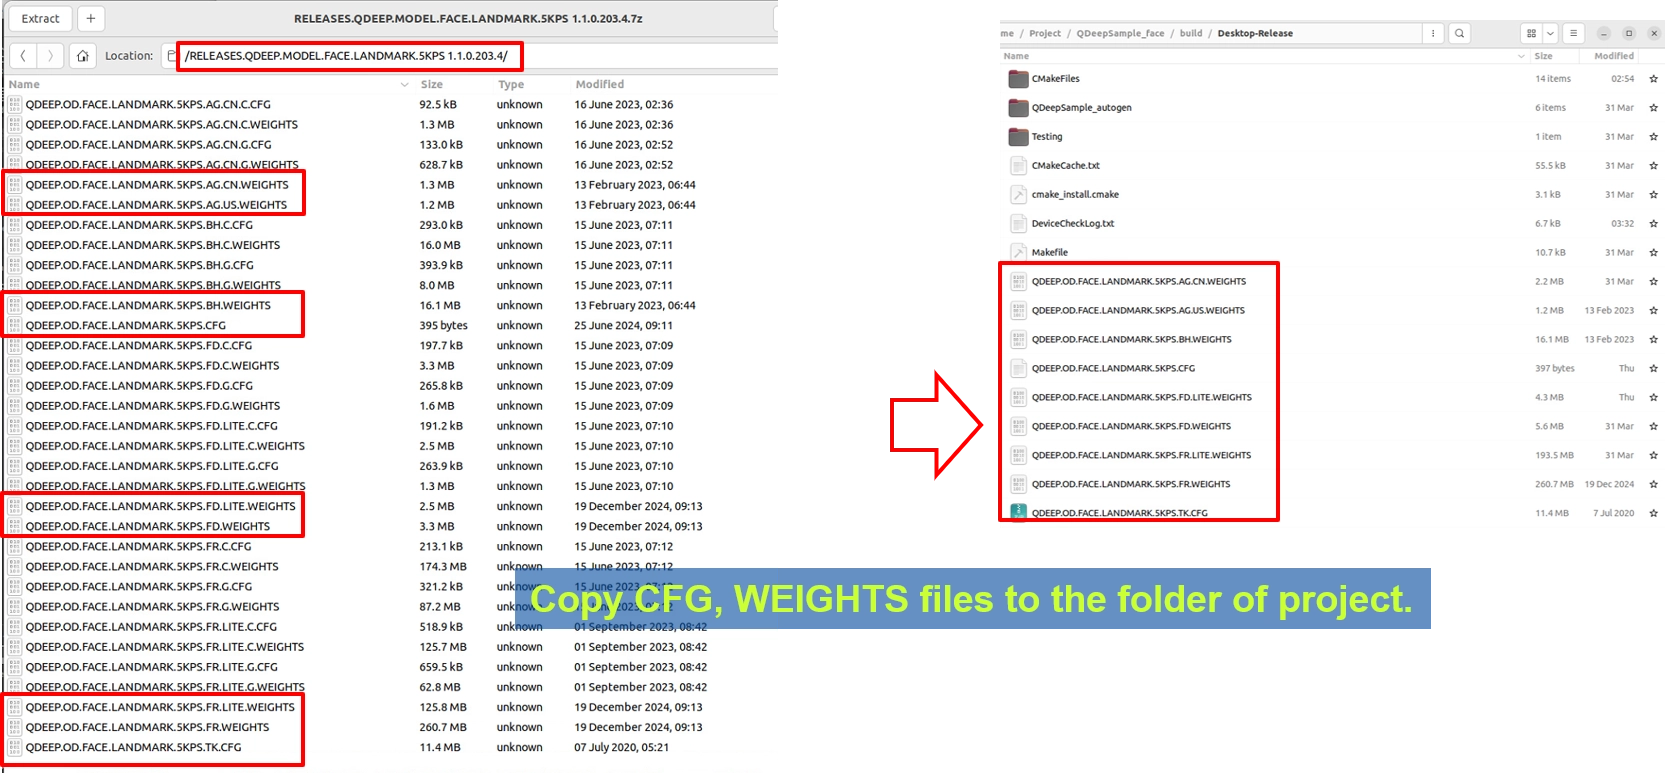
This model package is slightly different from previous ones because it combines multiple recognition weight files, so there will be more files. Find the Face Landmark 5KPS model archive, which may be named with FACE.LANDMARK.5KPS, extract it, and copy QDEEP.OD.FACE.LANDMARK.5KPS.CFG and all corresponding weight files into the build output directory of your Qt project.
How Should the Core API Be Modified?
This time, there are several details that are completely different from before when creating the detector :
• Change the model configuration type : In the third parameter of QDEEP_CREATE_OBJECT_DETECT, make sure to use the dedicated QDEEP_OBJECT_DETECT_CONFIG_MODEL_FACE_LANDMARK_5_KEYPOINTS.
• dwFlags parameter : Previously, we passed in trajectory tracking (_FLAG_TRAJECTORY_TRACKING). But this time, to make the AI not only draw boxes but also calculate feature vectors and facial landmarks, we must change the final parameter to QDEEP_OBJECT_DETECT_FLAG_FULL. This commands the engine to run at full power and return all sub-attributes.
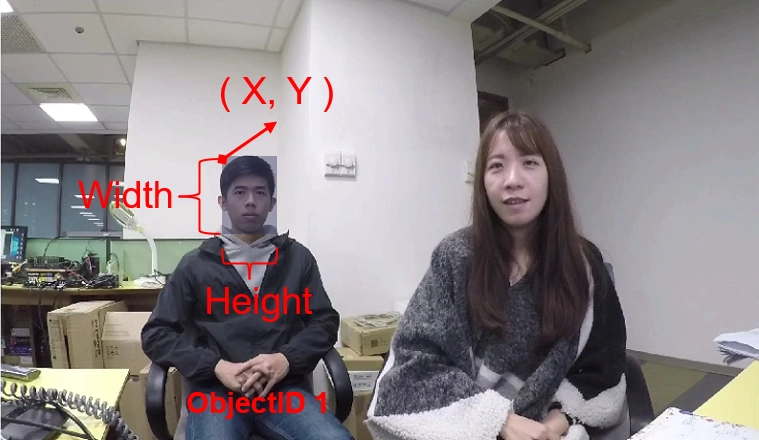
• Hidden treasures in the returned structure : Although we still use the QDEEP_OBJECT_DETECT_BOUNDING_BOX structure, with multiple features enabled through the dwFlags parameter, two hidden data fields are activated:
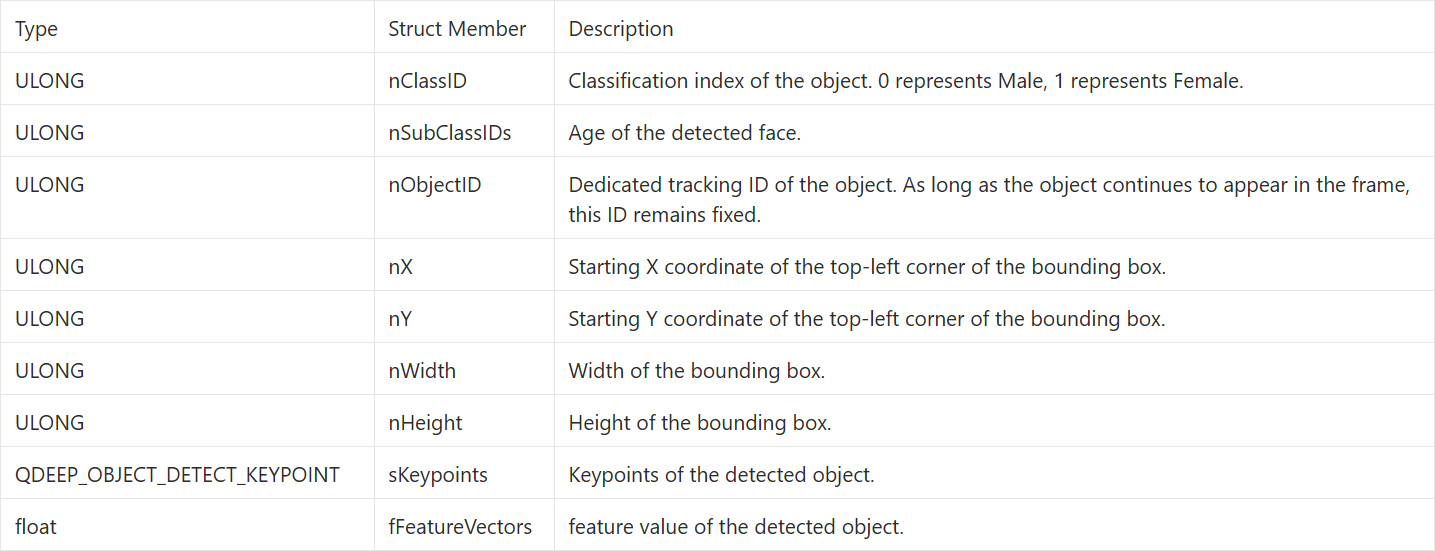
‧ nClassIDs : This array stores auxiliary attributes. In this model, it stores the gender predicted by AI.
‧ nSubClassIDs : This array stores auxiliary attributes. In this model, it stores the age predicted by AI.
‧ sKeypoints : This is an array containing the X and Y coordinates of the 5 facial keypoints : both eyes, nose, and mouth corners.
QDEEP_CREATE_OBJECT_DETECT
This is the key API for creating the AI engine and loading the model. Users must initialize the detector through this API.

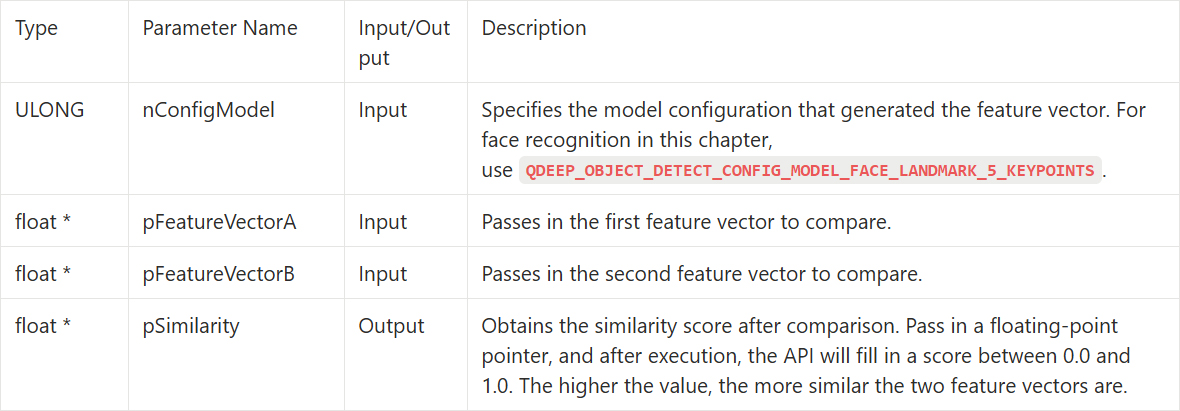
QDEEP_GET_OBJECT_RECOGNITION_COMPARISON
Pass two different feature vectors, such as a face captured in real time versus a face in the registered list, into this API. It will immediately return the similarity score between them.
QDEEP_OBJECT_DETECT_BOUNDING_BOX Structure

After switching to the face recognition model, the nClassID, nSubClassIDs, and sKeypoints returned by the AI engine through QDEEP_OBJECT_DETECT_BOUNDING_BOX will have new meanings.
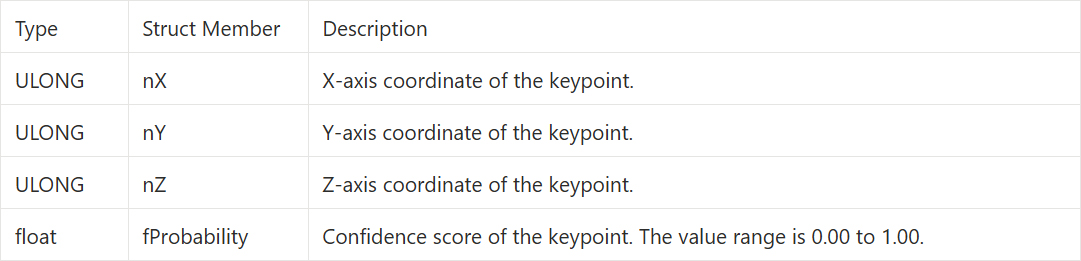
QDEEP_OBJECT_DETECT_KEYPOINT Structure
After enabling the full-power flag (FLAG_FULL), an array named sKeypoints[ QDEEP_MAX_KEYPOINY_SIZE ] is unlocked inside QDEEP_OBJECT_DETECT_BOUNDING_BOX. Each element in this array is a structure specifically used to describe a single feature point : QDEEP_OBJECT_DETECT_KEYPOINT.
It contains four highly valuable parameters, defined as follows :
Writing the Core Code
Open your project, and let's make the key code changes.
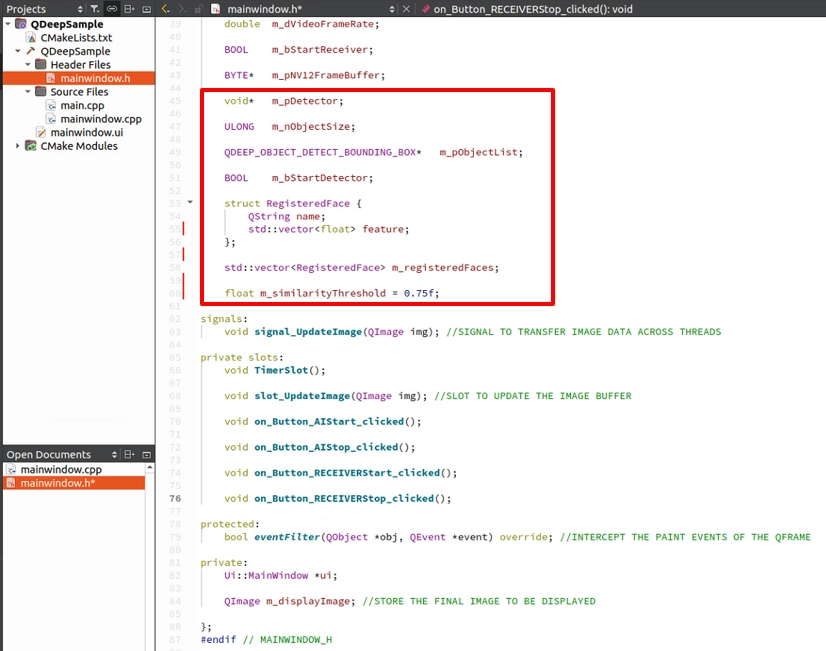
Add a Data Structure for Storing Feature Vectors
To let AI recognize people, we must create a “registry” in memory. In mainwindow.h, declare a structure that binds a “name” with a “feature vector,” and set the comparison threshold.
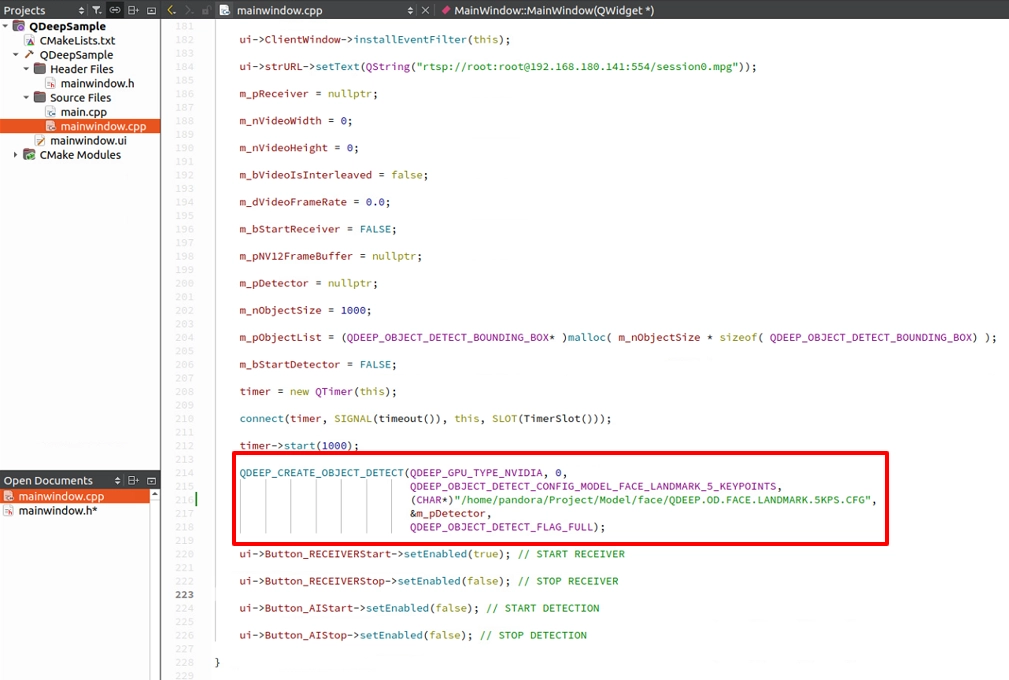
Modify Model Loading
In the constructor, apply the “model configuration” and “full-power flag” we just mentioned.
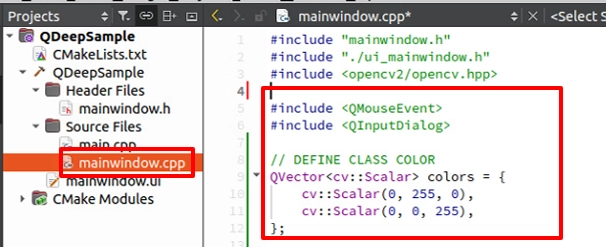
Expand the Class Name
Before the drawing loop, define dedicated colors for male and female : 0: Male (green), 1 : Female (red).
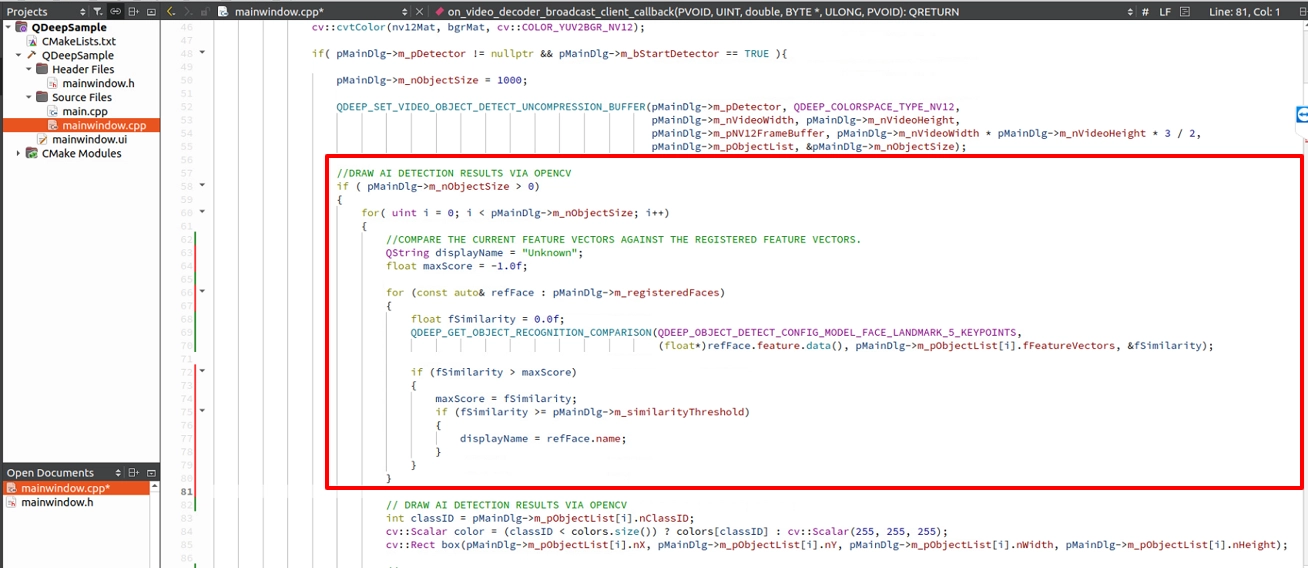
OpenCV Drawing and Feature Comparison Logic
After obtaining detailed object information from the AI engine, we can start using OpenCV APIs to mark the image. However, because this time we are doing “face recognition,” we must first complete the core “feature comparison” before drawing. The following four standard development steps are defined :
1. Obtain the face feature vector : With FLAG_FULL enabled, the AI stores the unique features of the face in the fFeatureVectors array of the structure.
2. Compare features and find the best match : Use QDEEP_GET_OBJECT_RECOGNITION_COMPARISON to compare the “real-time feature vector” with each feature in the registry (m_registeredFaces). As long as the returned similarity score is higher than the threshold we set, such as 0.75, this VIP can be successfully recognized.
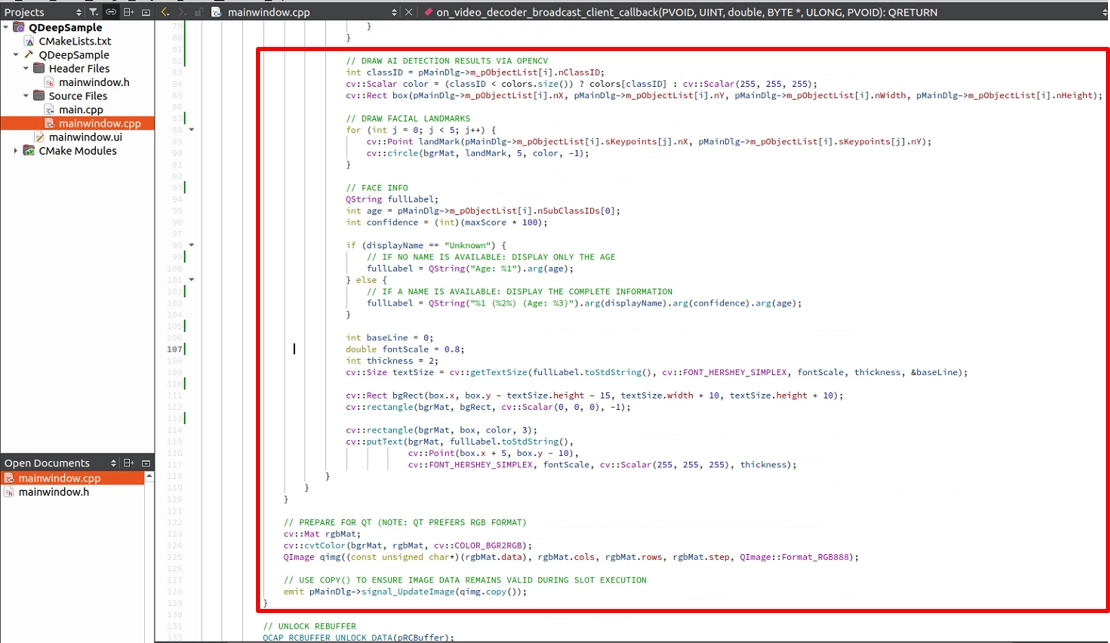
3. Obtain the object position and mark it with OpenCV : After obtaining the comparison result and face coordinates, draw the tracking box and the 5 facial landmark points.
4. Overlay text containing object information : Perfectly overlay the combined information such as “name, confidence, gender, and age” inside a background label box on the image.
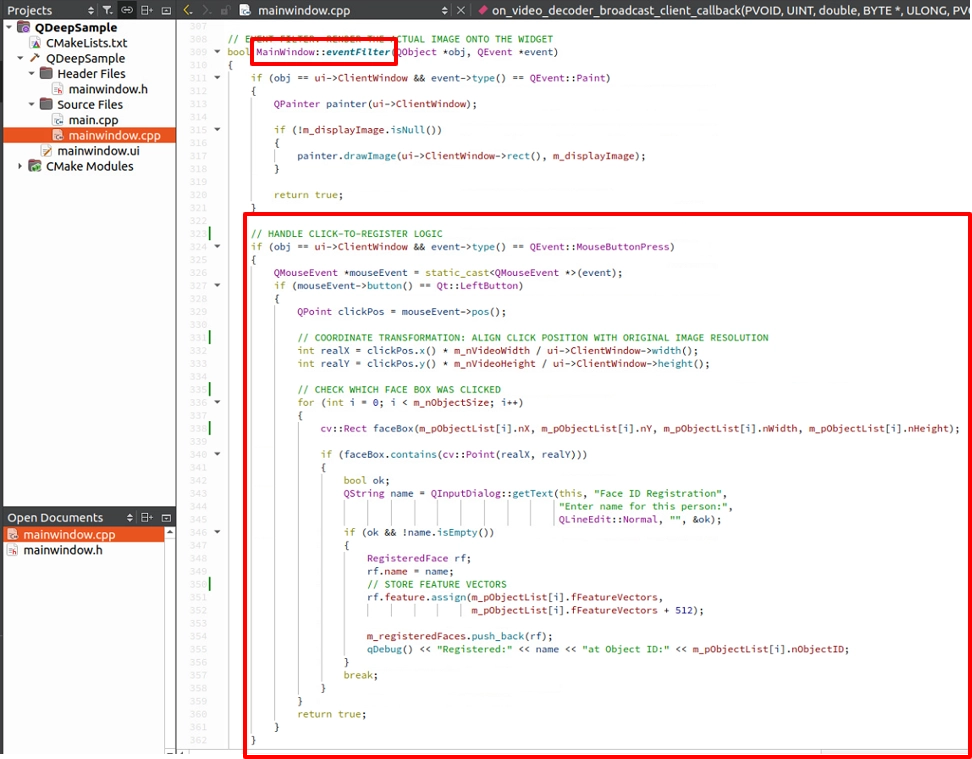
Add a UI Pop-up Window and Feature Registration Mechanism
How do we turn a “stranger” into an “acquaintance”? We need to intercept mouse click events on the canvas. When we “click on a face box” in the image, we can extract its feature vector from the structure and pair it with the entered name. You can override Qt's mousePressEvent and add logic similar to the following concept.
Final Verification
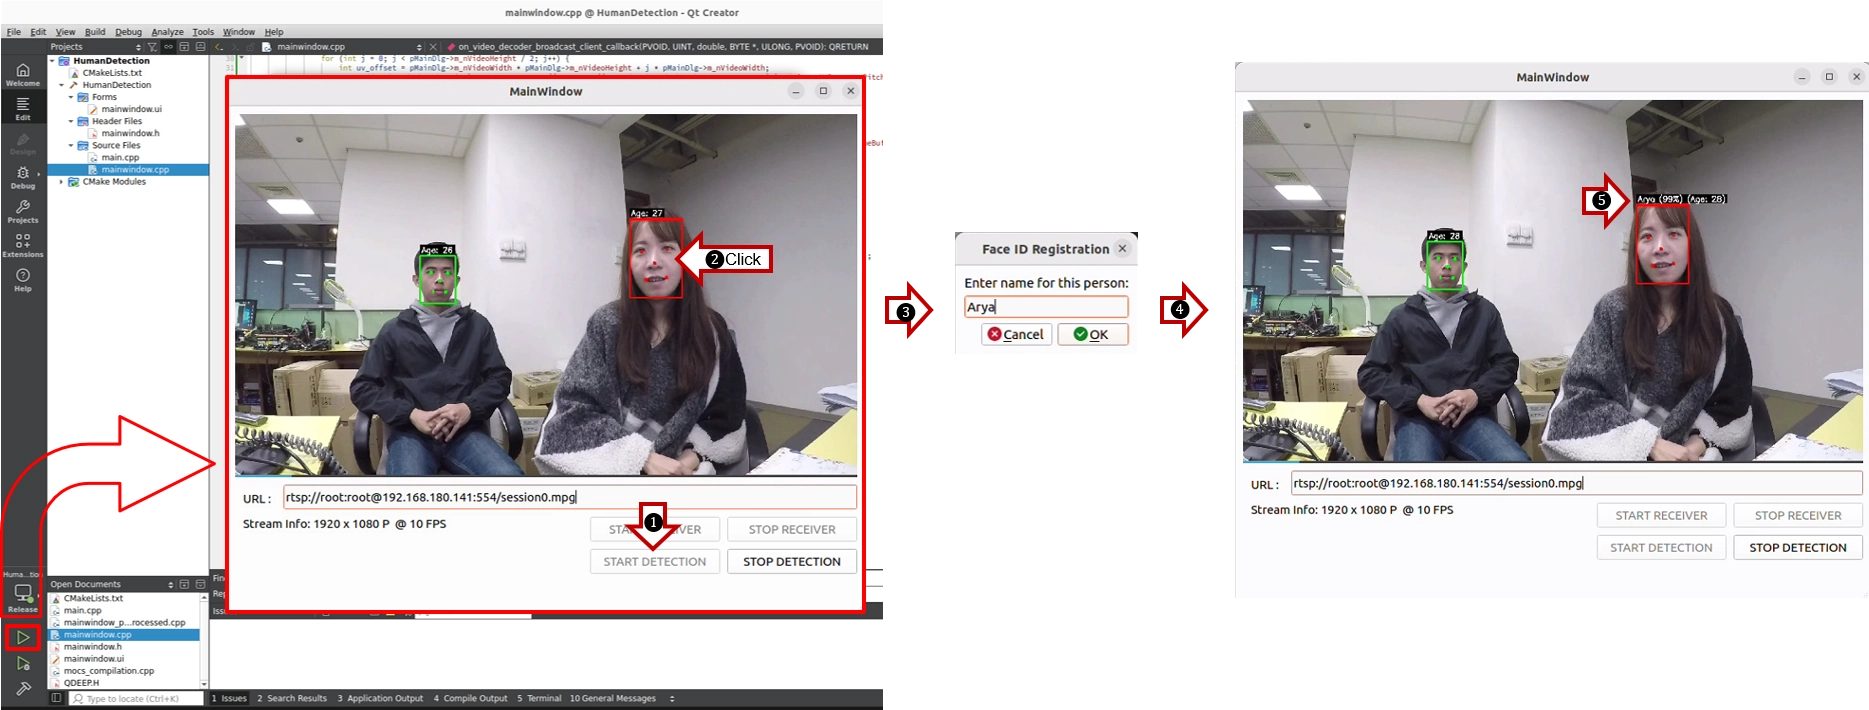
Click “Build and RUN” in the lower-left corner to run the project :
1. After starting receiving and detection, you will see faces in the image boxed, with 5 circular points accurately drawn on both eyes, the nose, and the mouth corners. The text label will display the age predicted by AI, and the face box color will indicate male (green) or female (red).
2. Next, use the mouse to click your face in the image.
3. A UI input window (QInputDialog) will immediately pop up. Enter your name and click OK.
4. In the next second, the label above your head will instantly change from "Age : 27" to "Arya (Age: 27)".
➤ Friendly Reminder (Very Important) : The first time you open this software (run the program), the interface may take a little while to appear. Don't worry! This is because we placed the “AI model loading” logic inside the program constructor. During the first run, the model must perform initialization and configuration, and the system is loading the large neural network weight files into the GPU. Once the software opens successfully, it means the AI brain is ready in the background. The next time you open the software, this initialization wait will no longer be needed.
No matter how you move in front of the camera, or even if you slightly turn your head, the system will firmly remember you through deep feature vectors.
Congratulations! Through this chapter, you have perfectly combined API parameter control, advanced OpenCV drawing, and Qt UI interaction logic. The program you developed is now already a prototype of an intelligent access control system.