10-14 Smart Board Handwriting Extraction Sample Tutorial
In the previous chapters, [10-12] and [10-13], we fully mastered “background blurring” and “virtual background replacement.” In those applications, the core task of the AI was: “keep the person and process the background.”
Now, imagine an extremely common educational scenario: you are watching a recorded online course, and the instructor has written dense and valuable formulas all over the blackboard. However, because the instructor is explaining too passionately, their body keeps blocking the board handwriting, making it impossible for you to copy the notes. In this case, can we make the AI work in the opposite direction: keep the background (the board handwriting) and “remove” the person?
Welcome to a magical technology in the field of smart education: human removal and board handwriting extraction. In this chapter, we will use the powerful background modeling capability of the NexVDO SDK to make the instructor in the frame look as if they are wearing an “invisibility cloak,” leaving only the perfect board handwriting behind them. Even better, you will experience the extreme reusability of this SDK’s underlying architecture.
Learning Objectives
Through this chapter, you will learn:
1. Reverse thinking and model reuse : Experience the logic shift from “background removal” to “person removal,” and discover, pleasantly, that we can actually reuse the same AI model file.
2. Mastering the transparency threshold API : Use Custom API properties to precisely control the sensitivity and cleanliness of human removal.
3. OpenCV side-by-side comparison : Implement the cv::hconcat function to create a professional monitoring interface with “original image on the left vs board handwriting extraction on the right.”
➤ For the side-by-side comparison layout, you can review: 10-7 Human EPTZ Automatic Framing Sample Tutorial
Preparation
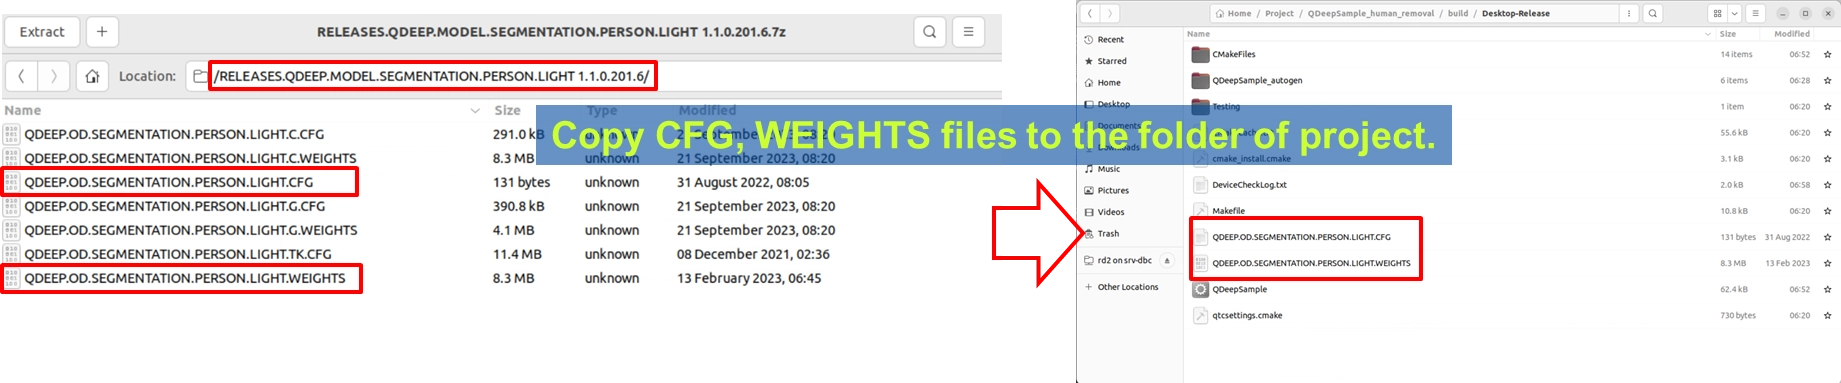
There is no need to change the model files at all. Because both “background removal” and “person removal” rely on the same underlying AI principle: accurately segmenting the “human silhouette.” Therefore, these two features share the same weight files. Please make sure that your project directory still contains QDEEP.OD.SEGMENTATION.PERSON.LIGHT.CFG and its corresponding weight files from the previous two chapters.
How Should the Core API Be Changed?
Although the model file is the same, we must give the AI a different “configuration Enum” and “Custom API property” in the code to tell it that the task this time is to remove the person.
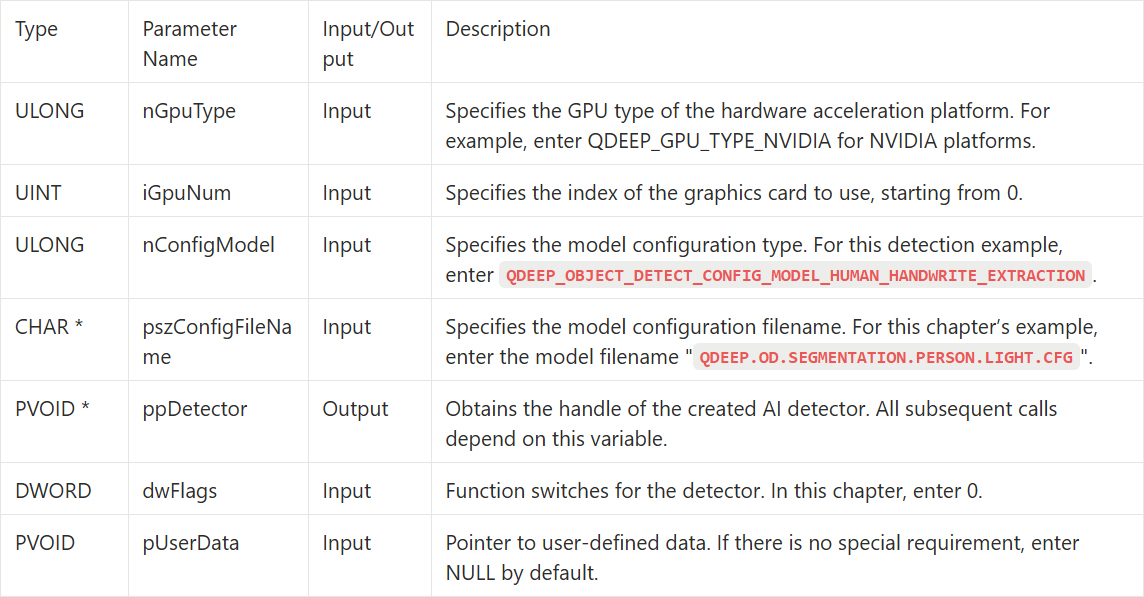
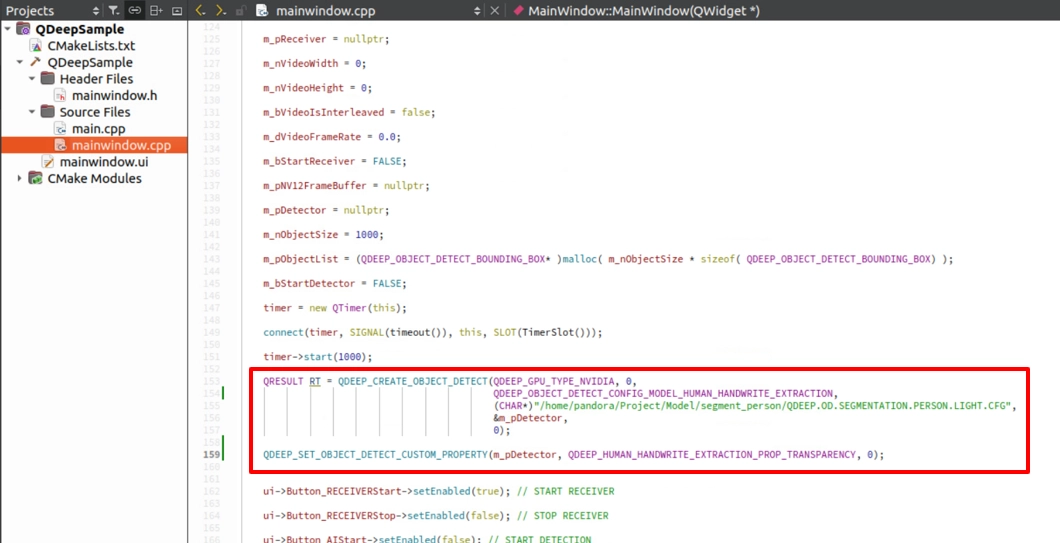
• Change of model configuration Enum : In QDEEP_CREATE_OBJECT_DETECT, change it to the board-handwriting-extraction-specific QDEEP_OBJECT_DETECT_CONFIG_MODEL_HUMAN_HANDWRITE_EXTRACTION.
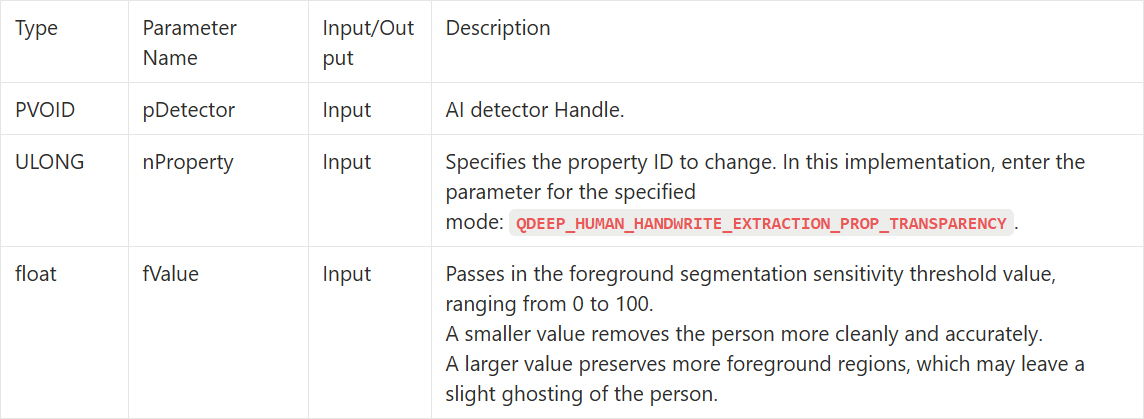
• Use a new property to control “removal sensitivity” : We need to use QDEEP_SET_OBJECT_DETECT_CUSTOM_PROPERTY to pass in a new parameter that determines how “thoroughly” the AI removes the person.
QDEEP_CREATE_OBJECT_DETECT
This is the most critical API for creating the AI engine and loading the “brain” (model). Users must initialize the detector through this API.
QDEEP_SET_OBJECT_DETECT_CUSTOM_PROPERTY
We use QDEEP_SET_OBJECT_DETECT_CUSTOM_PROPERTY to pass in a 0~100 float value to control the refinement level of human mask segmentation :
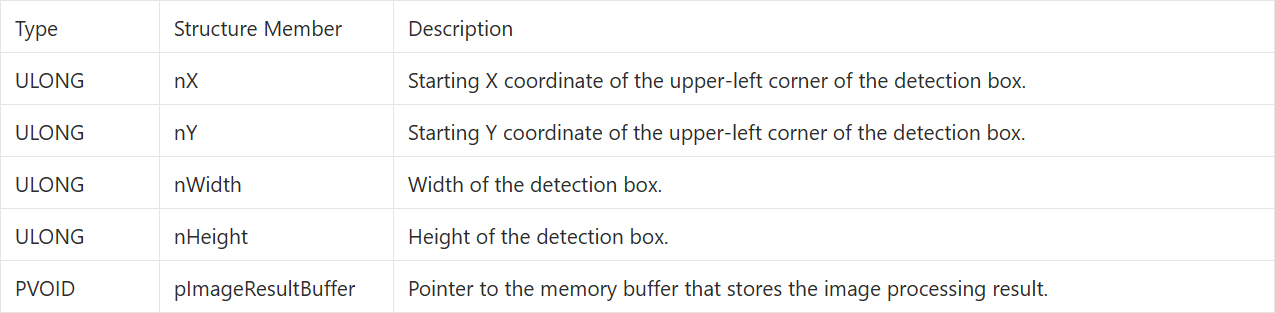
QDEEP_OBJECT_DETECT_BOUNDING_BOX Structure
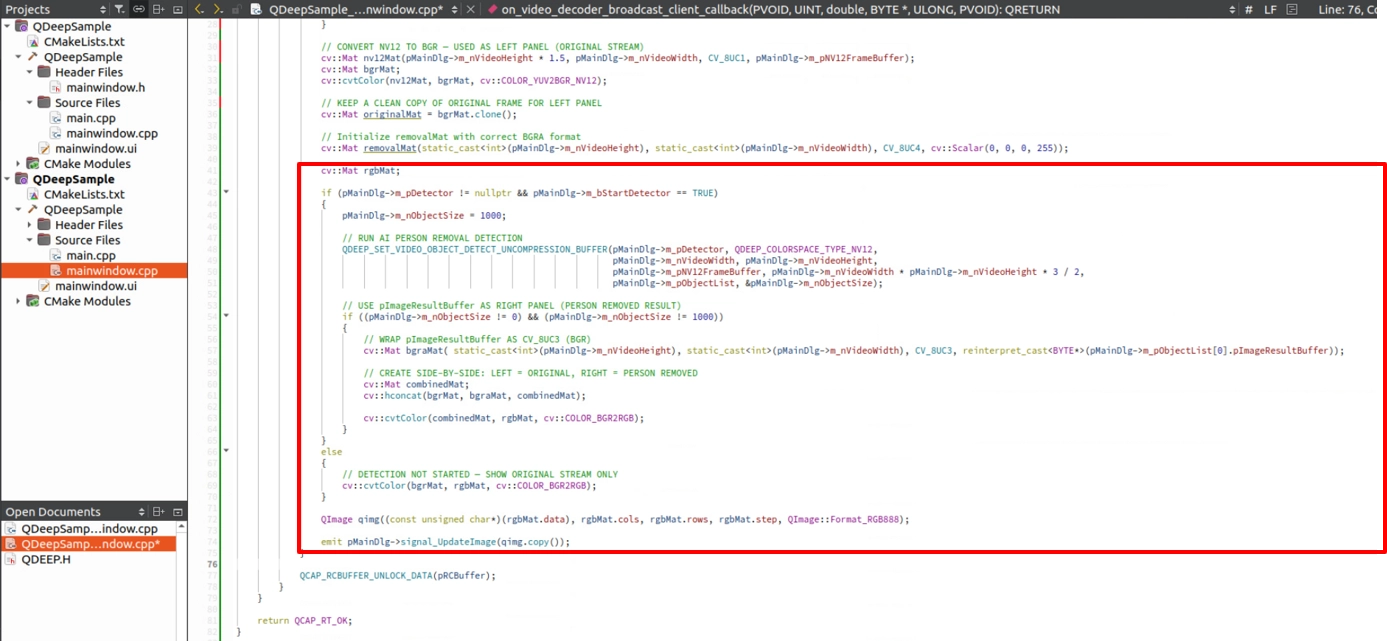
The AI engine will use the pImageResultBuffer parameter in this structure to directly write the calculated high-quality image pixels in BGR format into this memory block for us to retrieve.
Writing the Core Code
Open your project, and we will make the key adjustments.
Model Loading and Sensitivity Setting
In the constructor, apply the new Enum we just introduced and directly set the removal sensitivity to the most accurate value, 0.
Reuse the ImageBuffer Processing Architecture from 10-12
Since the underlying engine also outputs a processed high-quality BGR image, we do not need to modify the Buffer declaration when the connection succeeds.
Implement OpenCV Left-Right Side-by-Side Comparison
To let customers immediately see the power of this “invisible magic,” we should not directly replace the original image. Instead, we should place the “original image” on the left and the “image after human removal” on the right. Do you remember the OpenCV side-by-side stitching technique we used in 10-7 Human EPTZ Auto-Framing, where we monitored both the “original image” and the “tracking close-up” at the same time? Here, we will not only reuse it, but also add one design rule: before the user clicks START DETECTION, the screen should simply show the wide original image. Only after the AI starts should the display instantly split into a left-right comparison.
➤ For the side-by-side comparison layout, you can review: 10-7 Human EPTZ Automatic Framing Sample Tutorial
Final Verification
Click “Build and RUN” in the lower-left corner to run the project:
1. Click “Build and RUN” in the lower-left corner to run the project.
2. It is recommended that you prepare a test video of “someone writing and moving in front of a whiteboard or blackboard,” or ask a colleague to pretend to write on a whiteboard in front of the camera.
3. First, click START RECEIVER to start receiving. At this point, you will see a simple and complete original full-screen image, with the instructor moving in the frame.
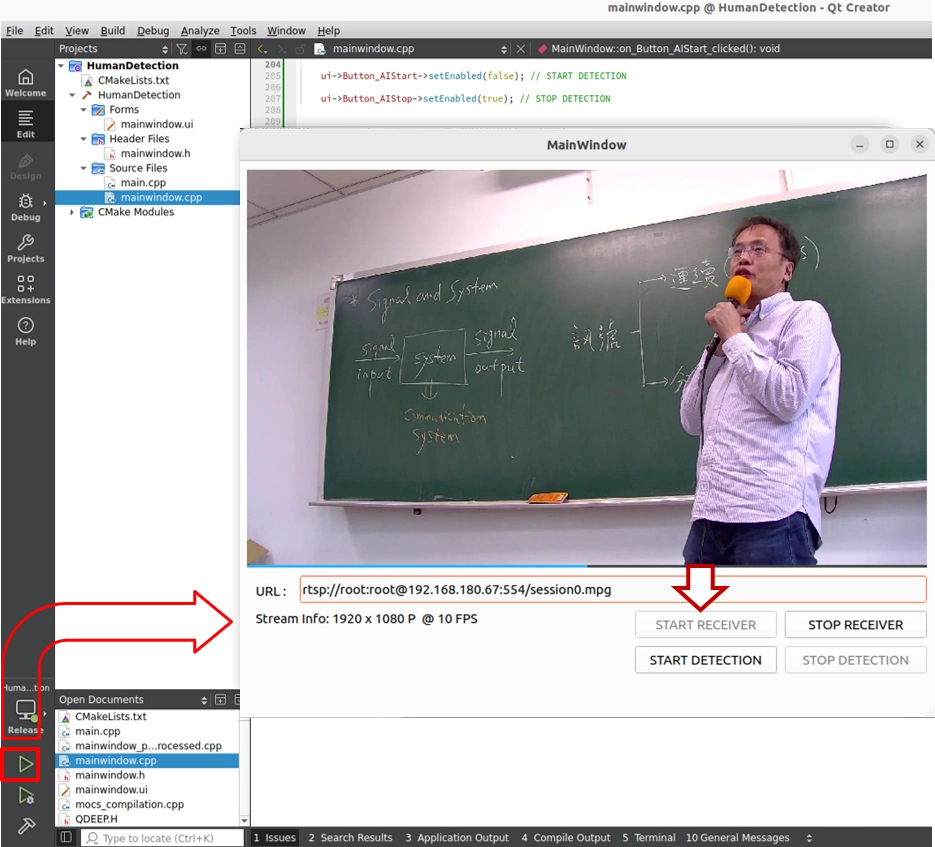
4. Next, click START DETECTION.
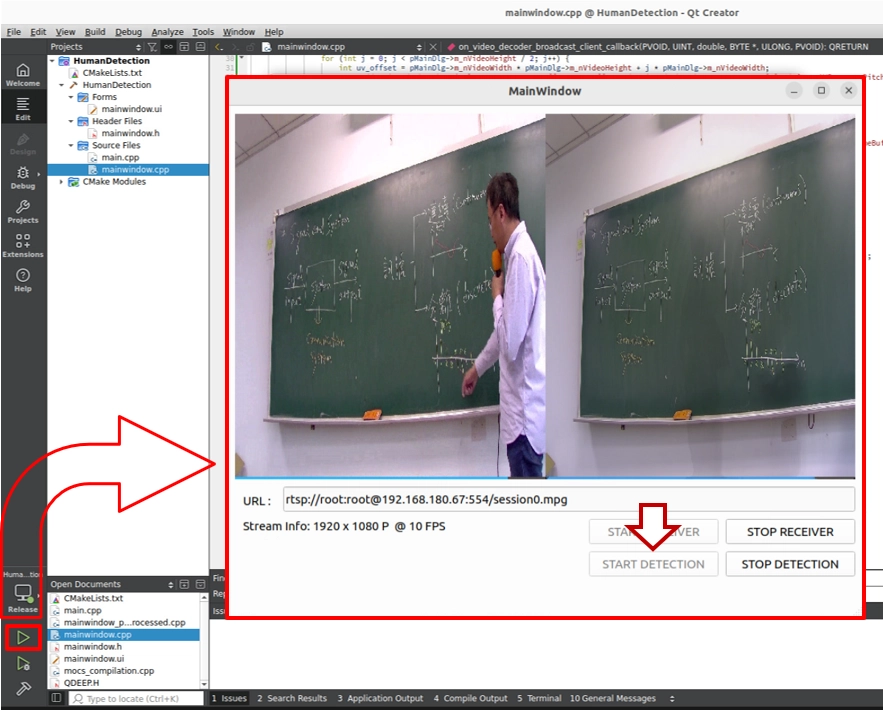
Test result : The screen will be split into two halves from the center:
• Left window ( original image ) : The instructor still walks back and forth in front of the blackboard, and their body blocks the writing behind them.
• Right window ( AI processing ) : The instructor completely disappears from the image. Through background modeling along the image timeline, the AI perfectly restores the board handwriting that was blocked behind the instructor. No matter how the instructor moves on the left side, the blackboard on the right side remains clean, clear, and visible.