10-7 Human EPTZ Automatic Framing Sample Tutorial
In the previous chapters, we learned how to frequently “replace model files” to give AI recognition superpowers across different domains. But you may be wondering: if I do not want to switch models, what else can AI do?
This chapter introduces another feature of the QDEEP engine: EPTZ automatic framing. This time, we will directly reuse the human detection model from 10-3! By simply switching one API setting value, the underlying engine will automatically change from “drawing bounding boxes only” to a professional virtual director with “target cropping and local zoom-in” close-up effects.
➤ Review the human detection model here: 10-3 Human Detection Function Example Tutorial
Learning Objectives
Through this chapter, you will learn :
1. One model, multiple uses : Change the AI engine behavior only by switching QDEEP’s configuration enum value, without replacing the model files.
2. Master advanced OpenCV techniques : safe cropping (cv::Rect), copying (clone), and image scaling (resize).
3. Implement horizontal image stitching in OpenCV, combining two different images into one ultra-wide side-by-side frame for Qt rendering.
Preparation
Because “Human EPTZ Automatic Framing” is still essentially about finding “people,” the system will directly use the human detection model we used in 10-3. Open your project's build output directory and confirm that QDEEP.OD.TINY.PERSON.CFG and QDEEP.OD.TINY.PERSON.WEIGHTS are still there. As long as these two files exist, your preparation is complete!
How Should the Core API Be Modified?
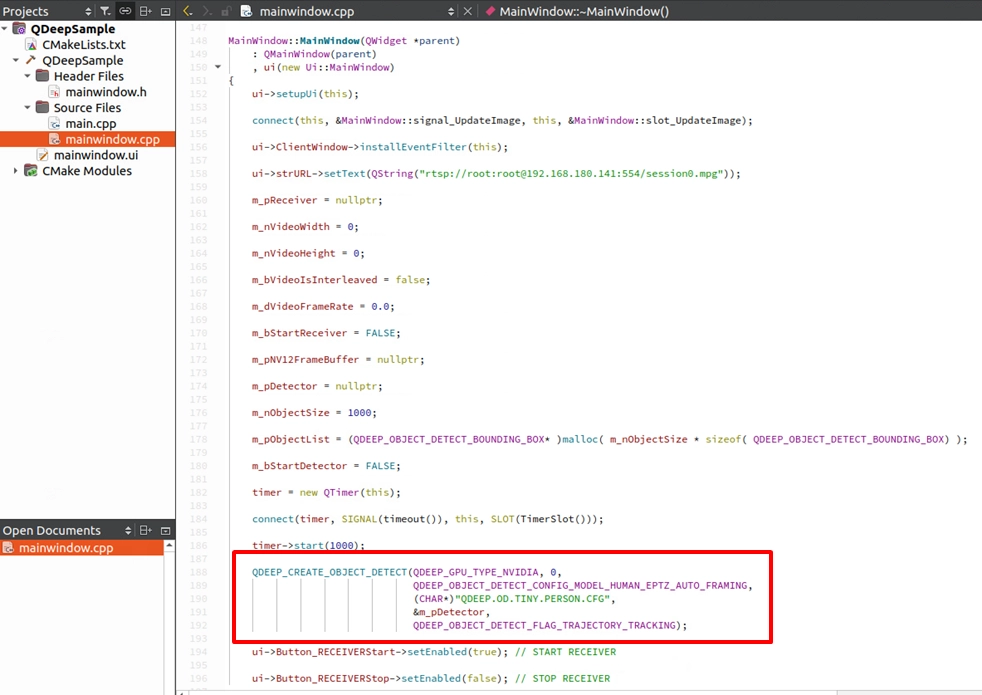
Since the model files remain unchanged, how do we tell the AI engine to enable EPTZ? The secret lies in the third parameter of QDEEP_CREATE_OBJECT_DETECT: model configuration type (nConfigModel).
Replace the original QDEEP_OBJECT_DETECT_CONFIG_MODEL_CUSTOMIZED_LITE with the dedicated EPTZ mode: QDEEP_OBJECT_DETECT_CONFIG_MODEL_HUMAN_EPTZ_AUTO_FRAMING. Once this parameter is changed, the underlying engine logic will automatically switch to automatic framing mode.
QDEEP_CREATE_OBJECT_DETECT
This is the key API for creating the AI engine and loading the model. Users must initialize the detector through this API.

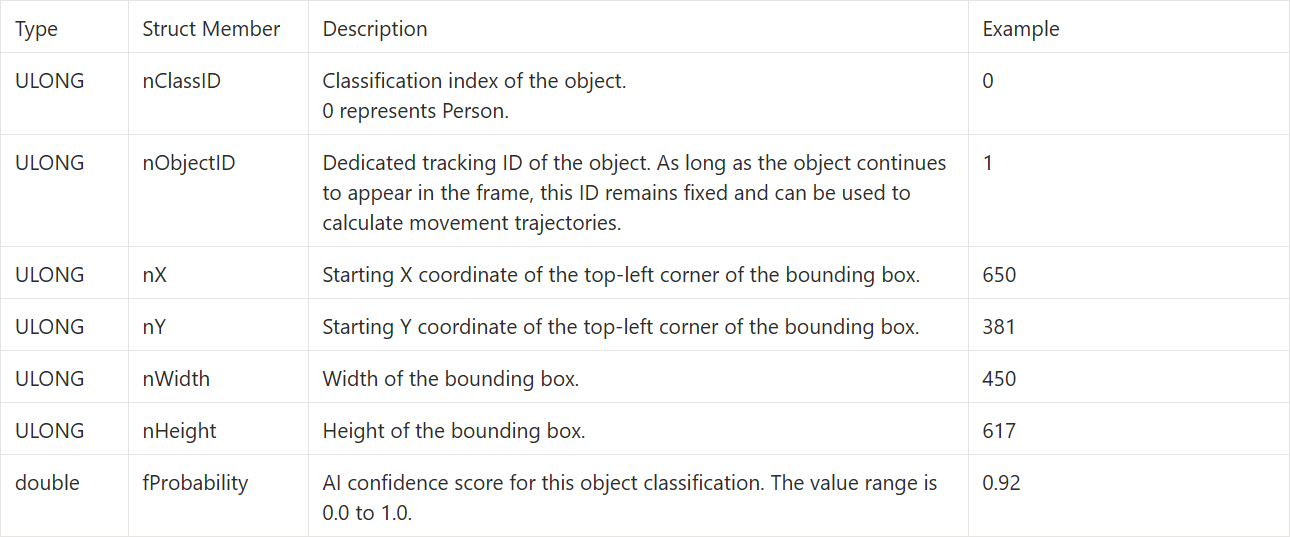
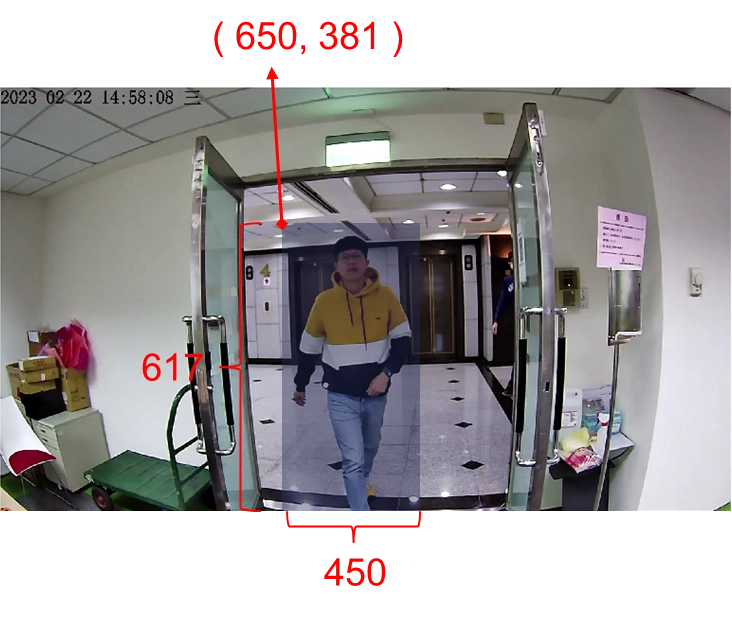
QDEEP_OBJECT_DETECT_BOUNDING_BOX Structure
Writing the Core Code
Open your project and follow along as we perform this exciting “image processing makeover”!
Modify the Model Configuration Parameter
Completely Rewrite the OpenCV Image Processing Logic
This is the decisive difference from before! We are no longer simply using a for loop to draw boxes around everyone. To achieve the close-up effect of a virtual director, we will lock onto the first detected person, crop and enlarge that person, and display the result side by side with the original image. Go to the on_video_decoder_broadcast_client_callback callback function, find the original RGB conversion and bounding-box drawing section, and completely rewrite the AI processing logic below cv::cvtColor with the following content:
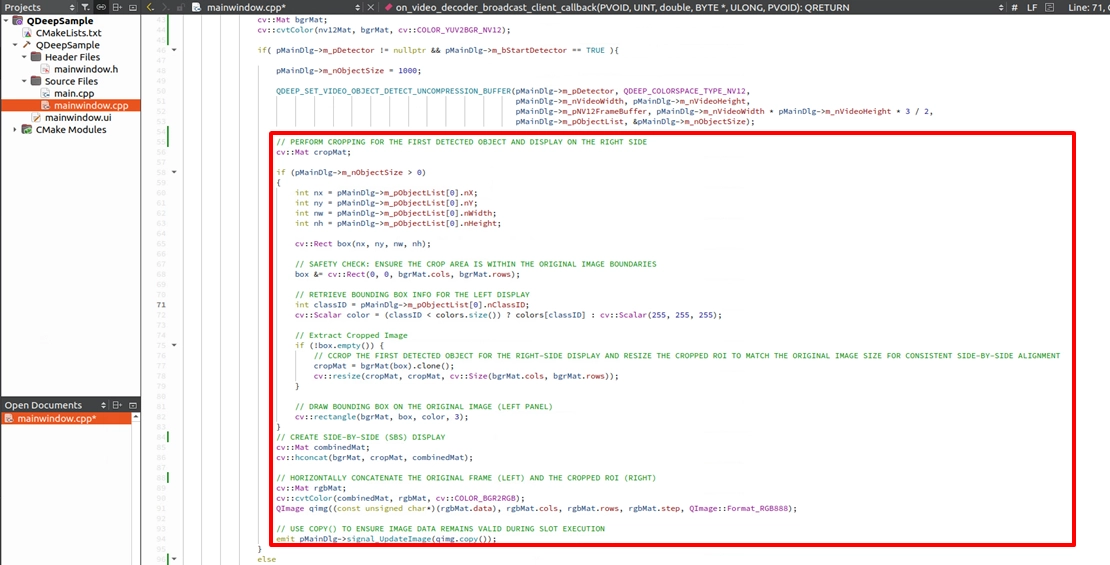
If no person is detected, the original single frame is displayed directly.

➤ OpenCV Deep Dive: The essence of this code lies in box &= cv::Rect(...) to ensure the crop area stays within bounds, and cv::hconcat for horizontal stitching. After hconcat, the image width becomes twice the original width. But do not worry about breaking the UI. The painter.drawImage(ui->ClientWindow->rect(), ...) we wrote in the Qt event filter in chapter 10-2 will automatically scale this ultra-wide image and fit it perfectly into the window.
Final Verification
Final Verification: Witness the birth of a virtual director!
Click “Build and RUN” in the lower-left corner to run the project:
1. Enter the camera RTSP URL and click START RECEIVER.
2. Once the video is smooth, click START DETECTION to start the EPTZ automatic framing engine.
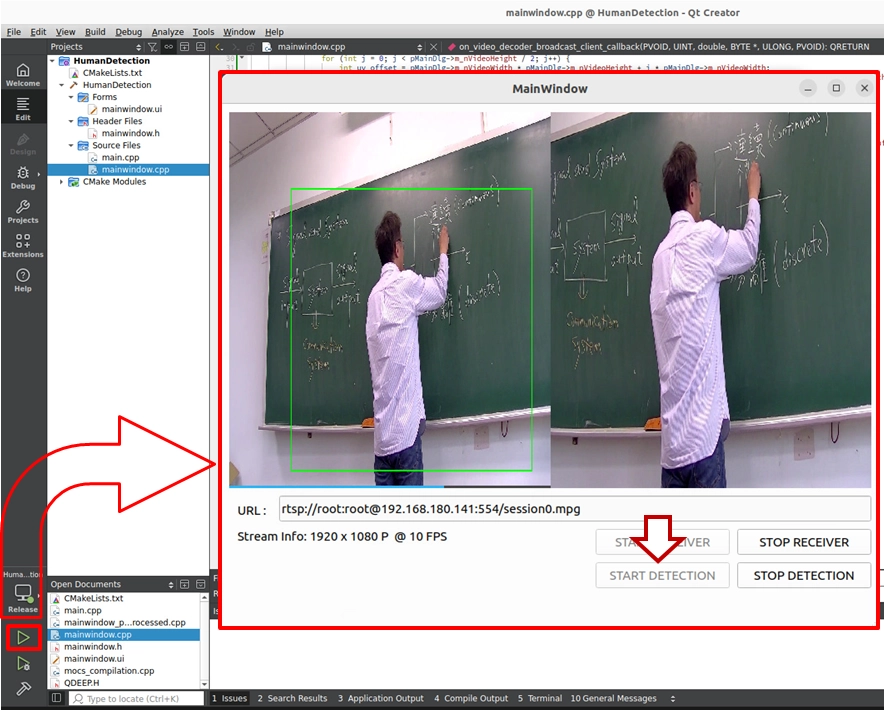
➤ Test Result: When a person walks into the frame, you will see the original single image instantly split into two!
• Left side : Shows the original wide-angle image, with a green box firmly tracking the target.
• Right side : Shows the “perfect close-up image” cropped and proportionally enlarged by AI. As the person moves in front of the camera, the close-up view on the right behaves as if an invisible professional camera operator were adjusting the shot for you, always keeping the person centered in the frame.
Congratulations! You have not only mastered the powerful AI switching capability of the NexVDO SDK, but also learned how to flexibly use OpenCV cropping and stitching techniques to transform a monotonous static view into a high-tech intelligent director system!