10-2 Building the AI Basic Template Project: QDeepSample
Welcome back to the practical session of Chapter 10! In the previous section, we unveiled the mystery of the QDEEP engine and learned the standard S.O.P. for AI video analysis ( Receive Stream ➔ Decode ➔ AI Engine Inference ➔ OpenCV Drawing ).
To avoid falling into the tedious loop of repeatedly writing "building UI, connecting streams, and setting up the environment" every time we implement a new AI function in the future, we have only one core task in this lesson: to build a versatile "AI Visual Analysis Basic Template ( QDeepSample )"!
In this template, we will perfectly combine the "RTSP Receiver Technology" and the "OpenCV Image Processing Library" learned in previous chapters. Our ultimate goal today is to "smoothly see the received stream video" and prepare the cleanest operational framework for the AI recognition model that will be added in the next chapter. Once this foundation is established, whether you are implementing human detection, face recognition, or license plate analysis in the future, you will only need to "copy this template ➔ replace the model ➔ add a few lines of core APIs and modify the drawing method" to complete the development instantly!
➤ You can review the RTSP receiver concept here : 9-9 RTSP Stream Client Example Tutorial
Now, please open your Qt Creator and follow us step by step to lay this indestructible AI development foundation!
Creating the Project and Preparing Core Dependency Files
First, please refer to the steps we learned in Chapter 9 to create a brand new Qt Widgets Application in Qt Creator, and name the project QDeepSample.
➤ You can review the basic template creation here : 9-3 Building a Basic Template Project : Hello NexVDO SDK!
To equip this project with both "Network Stream Receiving" and "AI Analysis" capabilities, we must place the core SDK files into the project directory.
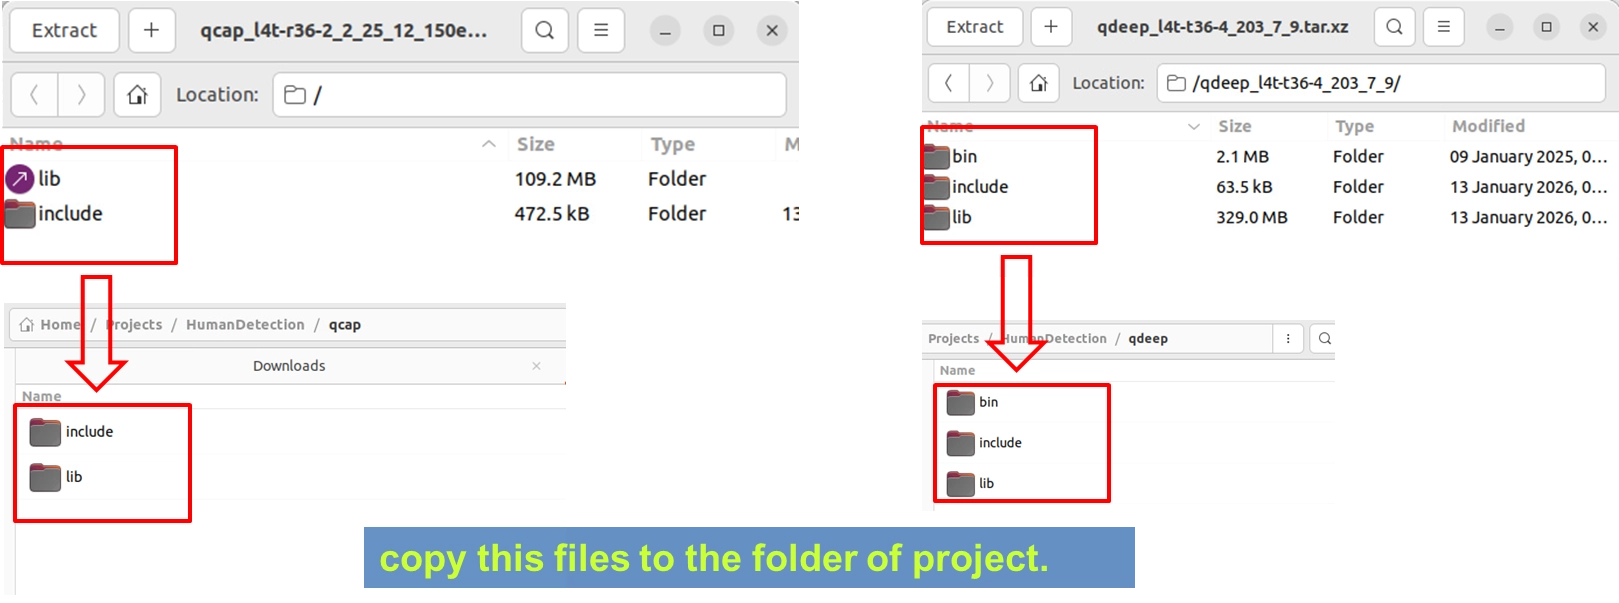
1. Import SDK Libraries: Please open your extracted NexVDO SDK folder, find the Qcap and Qdeep folders respectively, and completely copy the include and lib folders inside them into your QDeepSample project directory.
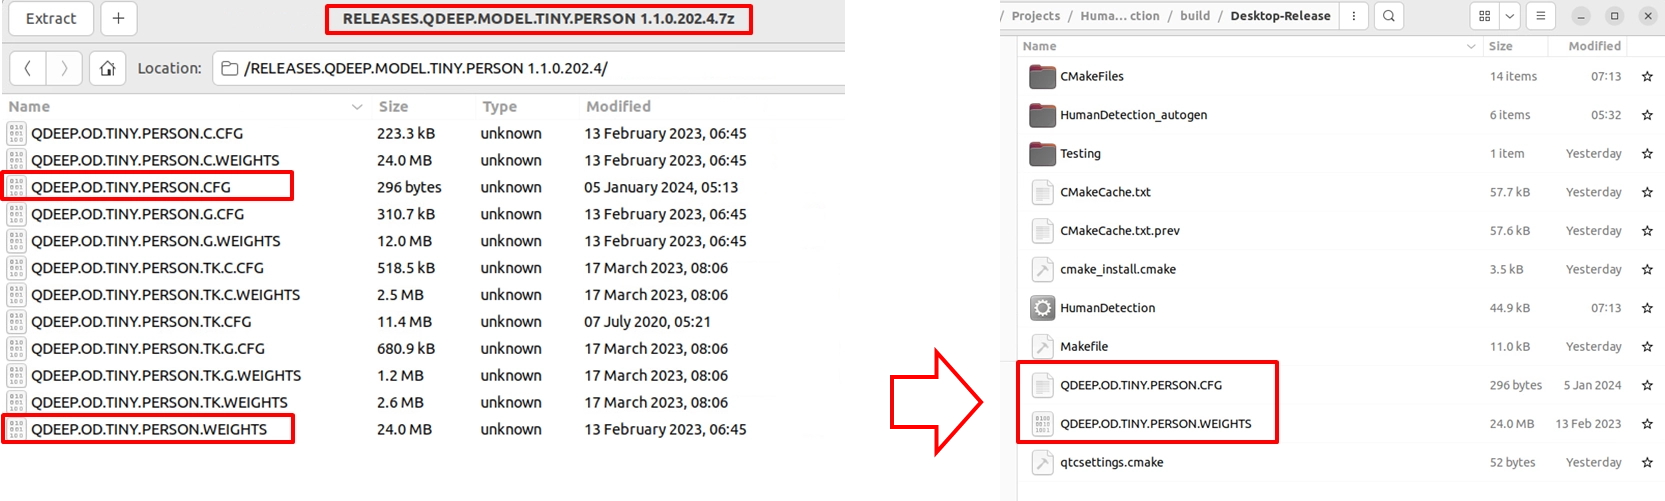
2. Import AI Model Files (Models): Before officially calling the QDEEP engine, we need to prepare the pre-trained model files. Please extract the model compressed file provided by YUAN ( e.g., Tiny Person model ), and copy the files ending with .CFG ( configuration file ) and .WEIGHTS ( weight file ) into the build output directory of your project ( usually inside the build-Release... folder ).
Setting up CMakeLists.txt ( Connecting OpenCV and SDK )
When it comes to AI recognition, the rendering logic of the screen will be different from a simple video player. To draw the "coordinate data" returned by the AI engine into our common green and red "recognition tracking boxes," we must borrow the powerful open-source image processing library : OpenCV.
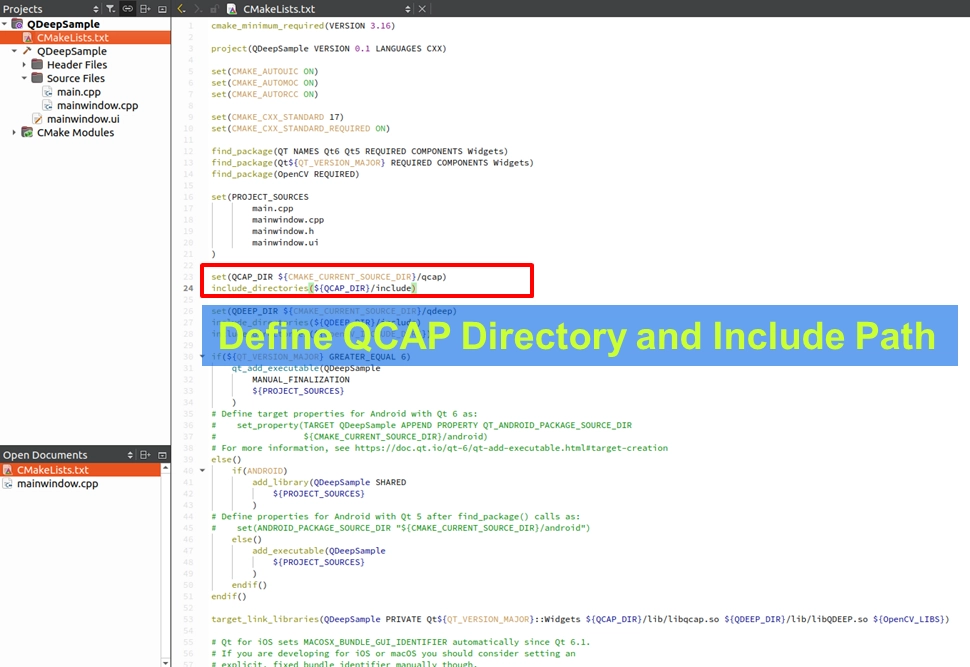
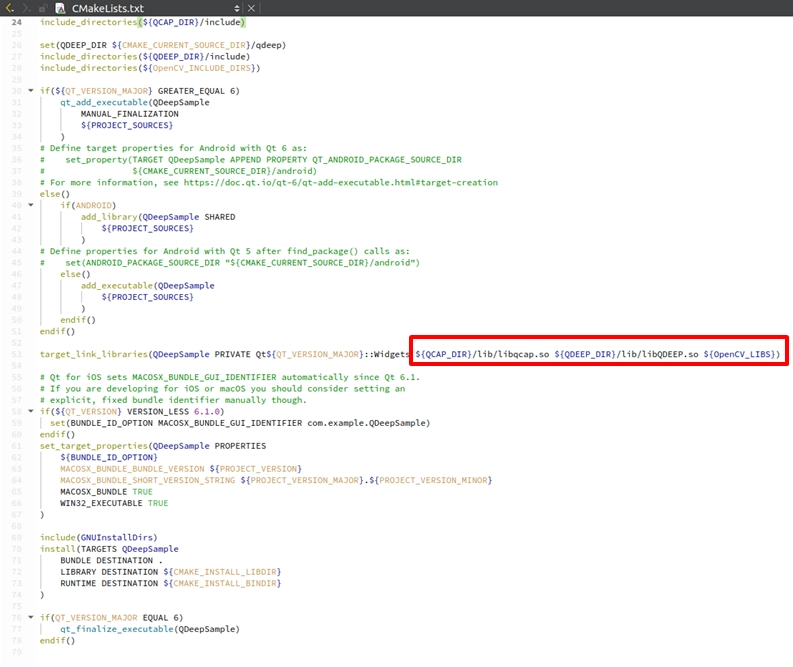
Please open the CMakeLists.txt in your project. We need to bind QCAP, QDEEP, and OpenCV in place all at once :
1. Set SDK Paths: Add the path definitions for QCAP_DIR and QDEEP_DIR, and use include_directories to include their header files.

2. Find and Include OpenCV: Below find_package(Qt6...), add find_package(OpenCV REQUIRED).
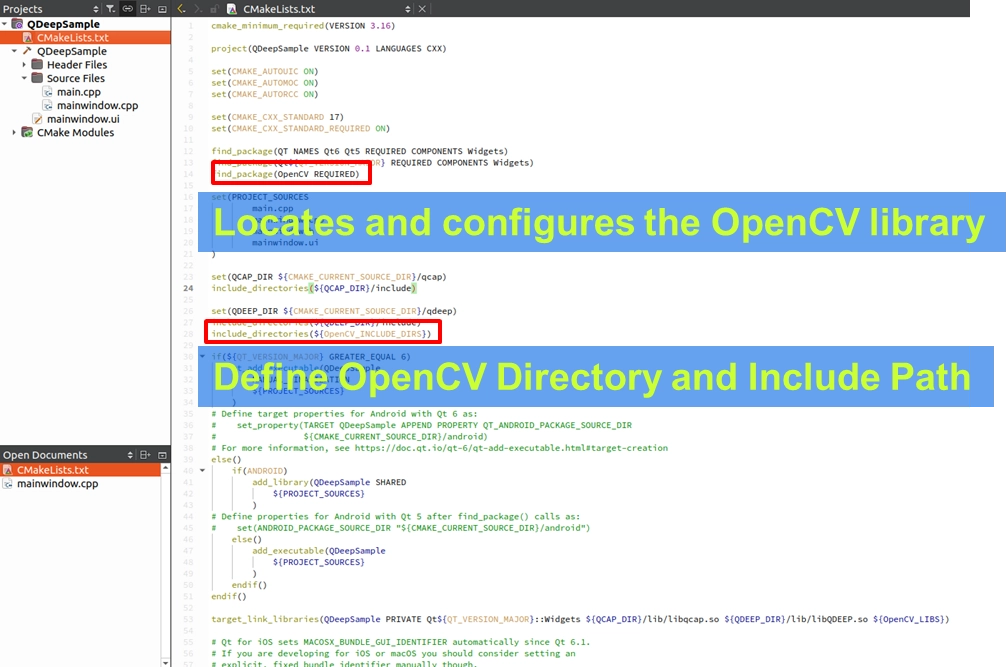
3. Link All Libraries: In the target_link_libraries at the bottom, add libqcap.so, libQDEEP.SO, and ${OpenCV_LIBS} all together!
Building a Standard AI Testing UI
We need a clear and intuitive control panel to independently control the switches for "Video Receiving" and "AI Analysis." Please open mainwindow.ui and arrange the following components:
1. URL Input Box (QLineEdit): Name it StrURL, used for entering the RTSP stream URL.
➤ You can review the URL input box here: 9-9 RTSP Stream Client Example Tutorial
2. Stream Control Buttons (QPushButton): Drag out two buttons and name them "START RECEIVER" and "STOP RECEIVER" respectively, used to control video pulling.

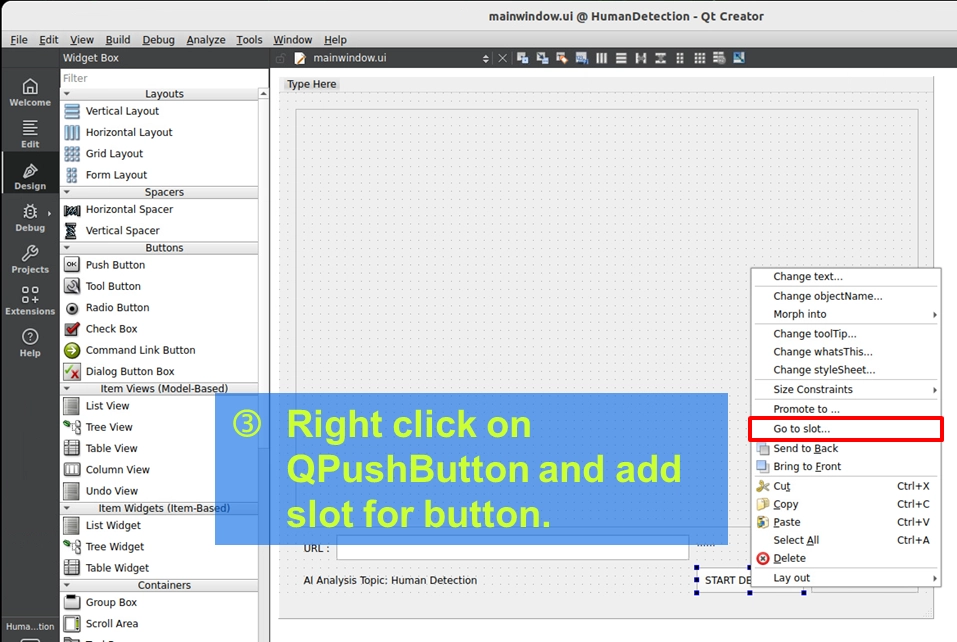
3. AI Control Buttons (QPushButton): Drag out two more buttons and name them "START DETECTION" and "STOP DETECTION" respectively. These will be the switches for starting the AI model in the future!
4. Display Canvas (QFrame): Drag out a QFrame and name it ClientWindow (or PreviewWindow). This canvas will later be handed over to OpenCV to draw the image and recognition bounding boxes.
➤ You can review how to drag out a QFrame here: 9-3 Building a Basic Template Project: Hello NexVDO SDK!
Header Files and Core Variable Declarations
In order for the project to recognize the powerful features of the NexVDO SDK and prepare for the upcoming custom drawing, we must make a series of declarations in mainwindow.h.
Including QCAP, QDEEP, and Qt Drawing Header Files
As shown in the figure, please open mainwindow.h and include the following three indispensable categories of header files at the top:
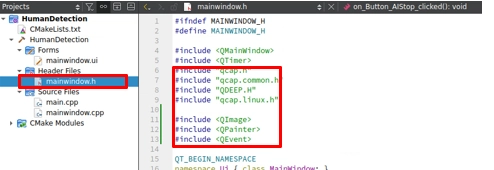
• QCAP Series (qcap.h, qcap.common.h, qcap.linux.h): These are our keys to awaken the underlying capture and receiving capabilities of the NexVDO SDK.
• QDEEP Series (QDEEP.H): Although we haven't officially started AI analysis in this chapter yet, we are preparing the definition files for the AI engine first. This is an important foreshadowing for a "seamless transition" in the next chapter!
• Qt Drawing Series (
Declaring Core Variables and Cross-Thread Mechanisms
Declare our main characters: m_pReceiver (responsible for receiving RTSP), m_pDetector (the Handle responsible for AI analysis), and related parameters:
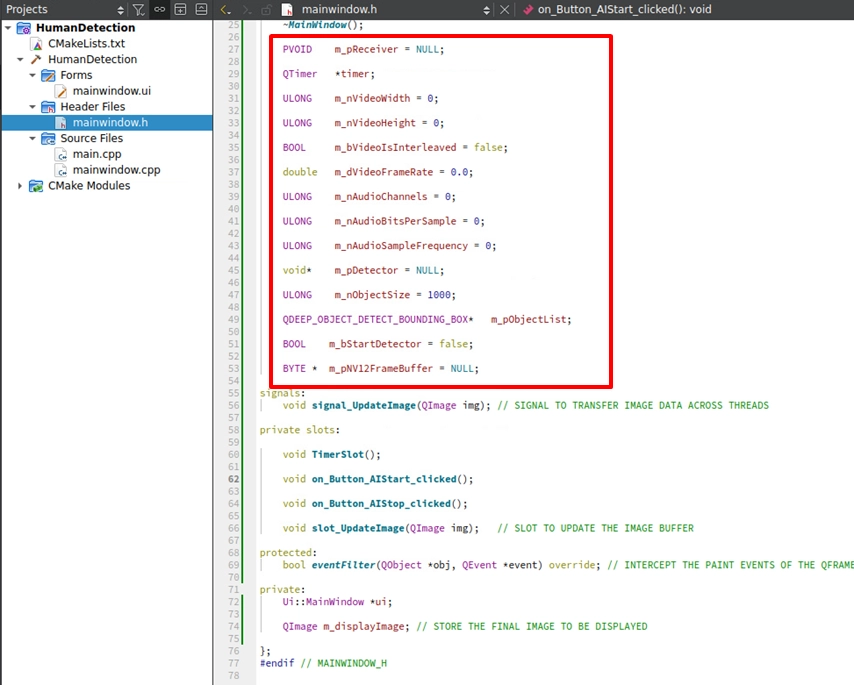
Next, in the MainWindow class, declare the Handle responsible for receiving the stream: PVOID m_pReceiver = NULL;, and the buffer pointer used to store the pure decoded image: BYTE *m_pNV12FrameBuffer = NULL;.
In addition, since the underlying capture callback function and the UI interface belong to different threads, be sure to declare signal_UpdateImage and slot_UpdateImage to perform cross-thread frame transmission, and add eventFilter and m_displayImage to intercept and redraw the UI screen.

Variable Initialization and UI Foolproof Safety Mechanisms
In the world of C++, "always initialize variables before using them" is an extremely important safety rule! At the same time, we must also establish the foolproof skeleton for the UI buttons at this stage, as well as the resource release mechanism when the window is closed.
Core Variable Initialization
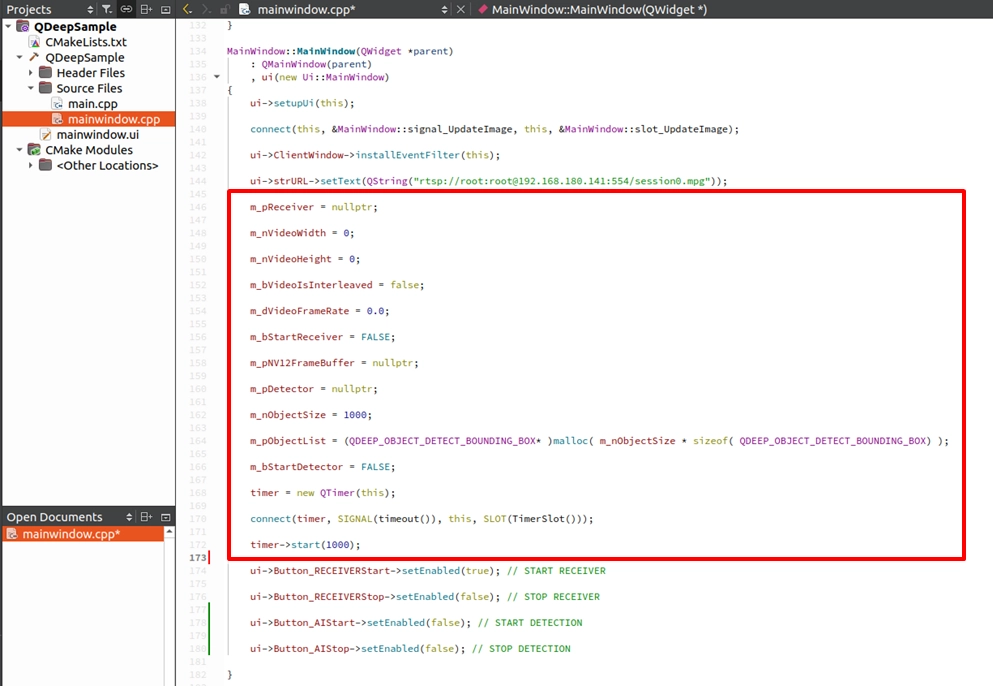
Please open the constructor MainWindow::MainWindow(...) in mainwindow.cpp, and right below ui->setupUi(this);, give all the variables we just declared in the header file clean initial values (such as 0 or NULL). This ensures that the program will not crash when evaluating pointer states later on:
When the program just starts, we haven't begun receiving the stream yet, so naturally, we cannot start AI analysis either. Meanwhile, we also need to prevent users from directly clicking the "X" on the window to close the software without pressing "STOP" first, which could cause network connections to hang or memory leaks. Therefore, we need to set up comprehensive protection mechanisms.
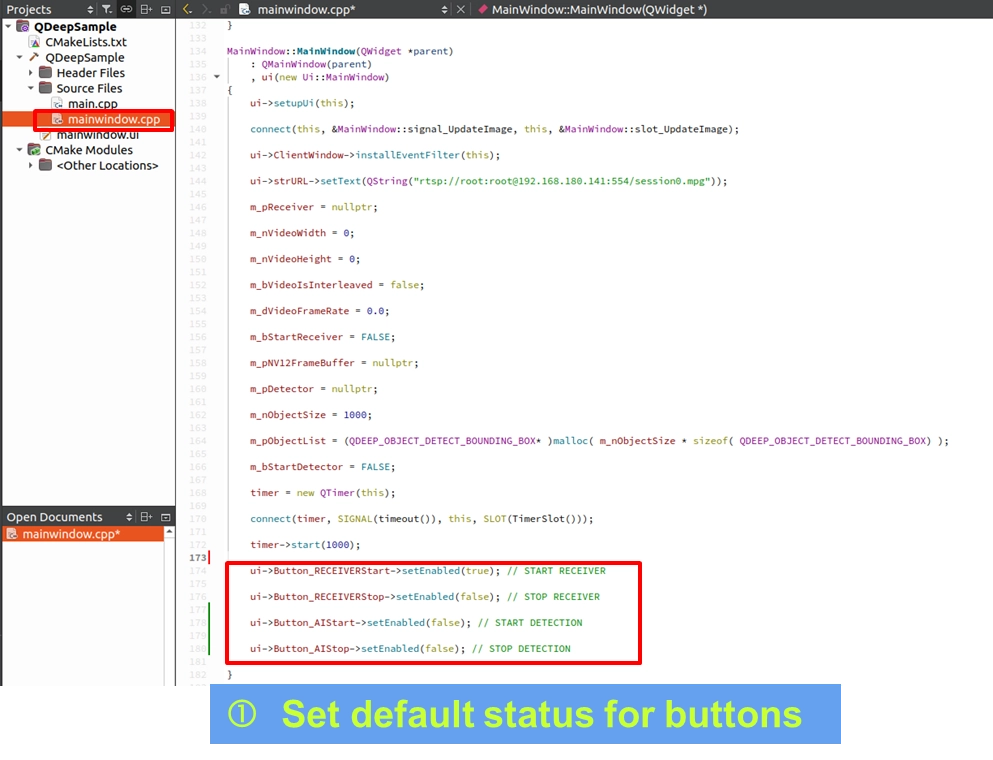
Setting Default Button States in the Constructor
Open mainwindow.cpp. Right when the program starts (i.e., in the MainWindow::MainWindow constructor), directly below the variable initialization, set the foolproof states of the buttons upon opening (cannot press stop before connecting, cannot start AI without a video feed):
State Switching Logic of the Four Buttons
In the slot functions of the four buttons, we first simply write out the "state linkage (setEnabled)" after button clicks to create a safe control flow.

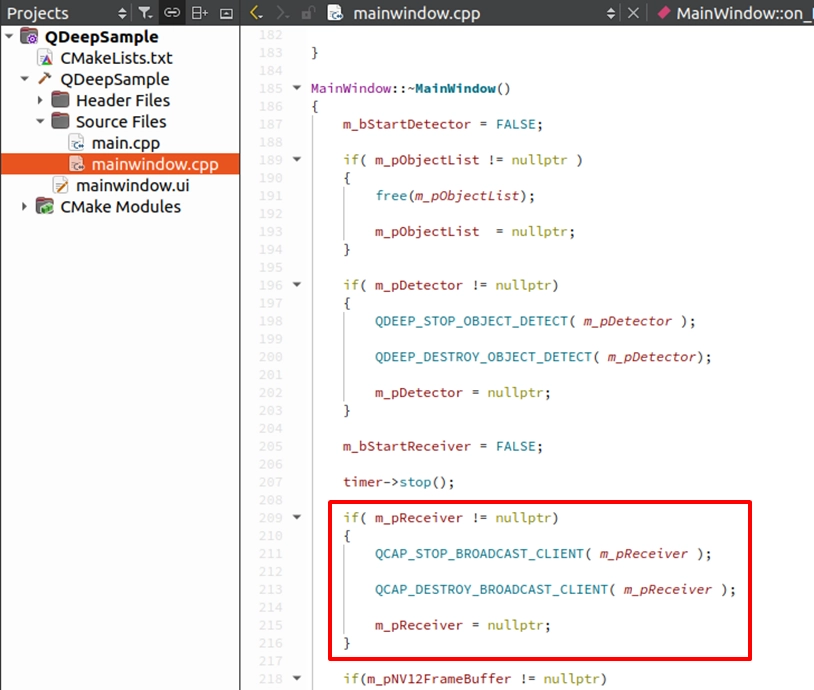
Releasing Resources in the Destructor
Ensure that this manually allocated memory is safely released when the window is closed to avoid Memory Leaks:
Filling in the RTSP Receiving and Connection Logic
With a solid foolproof mechanism in place, we can finally fill in the core APIs for RTSP network stream receiving! This step completely restores the "Receiver Receiving Techniques" we learned in previous chapters.
➤ You can review the RTSP stream receiver here: 9-9 RTSP Stream Client Example Tutorial
Creating Empty Callback Functions
Before binding APIs to initiate the connection, we must first create two Callback hubs in the upper part of mainwindow.cpp to receive underlying information. One is responsible for receiving the connection status (on_broadcast_client_connected_callback), and the other is responsible for intercepting the pure decoded image (on_video_decoder_broadcast_client_callback):


Implementing START RECEIVER
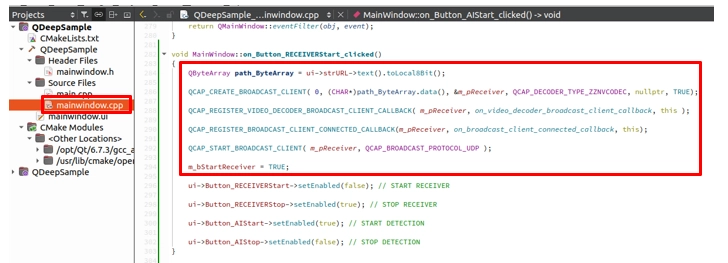
Back in the on_Button_RECEIVERStart_clicked() slot function, above the button state switching (setEnabled) code we originally wrote, officially add the APIs to initiate the connection:
1. Read the URL from the StrURL input box.
2. Call QCAP_CREATE_BROADCAST_CLIENT to create the receiver.
3. Register the two callbacks: QCAP_REGISTER_VIDEO_DECODER_BROADCAST_CLIENT_CALLBACK and QCAP_REGISTER_BROADCAST_CLIENT_CONNECTED_CALLBACK.
4. Call QCAP_START_BROADCAST_CLIENT to officially start receiving the stream!
Do not forget to add m_bStartReceiver = TRUE; to mark that the receiver has officially started.
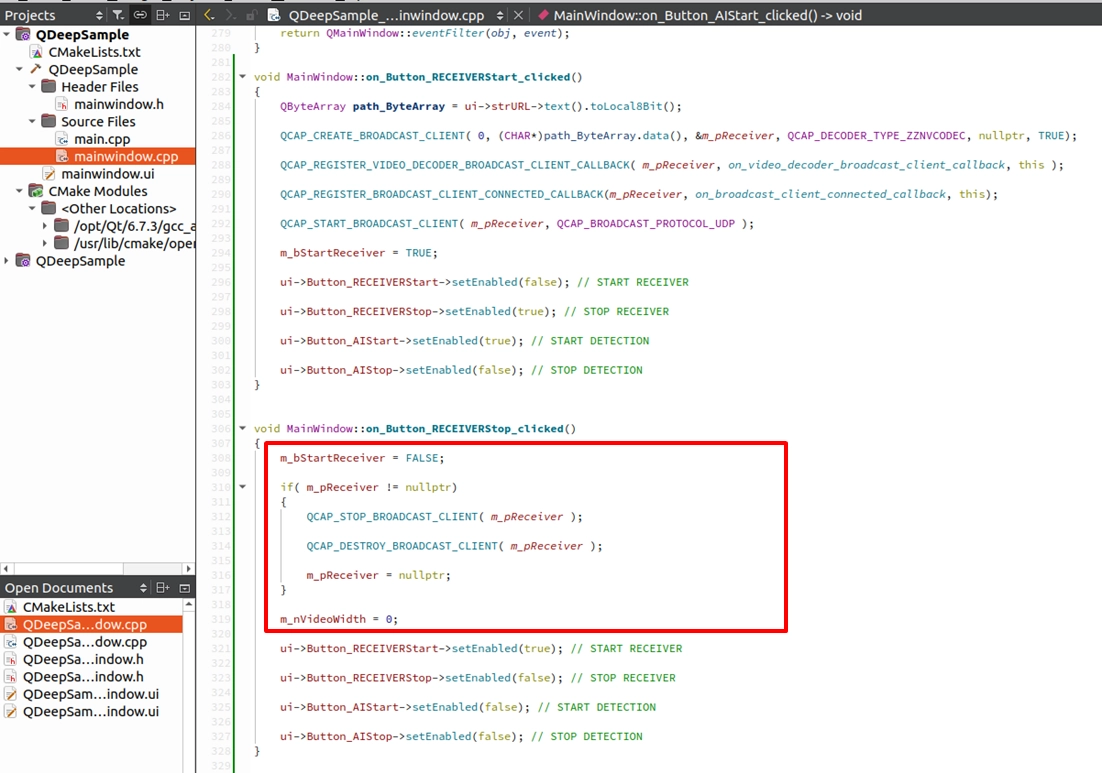
Implementing STOP RECEIVER
Similarly, in the on_Button_RECEIVERStop_clicked() slot function, we need to add the resource release APIs for a safe exit and reset the related state variables:
Dynamically Allocating the NV12 Buffer
Since we are preparing to copy out the underlying image, we must prepare a sufficiently large memory space (Buffer) for it. Because the camera resolution is dynamic, we must dynamically allocate it at the moment of "successful connection and obtaining the width and height," and ensure it is properly released when the project is closed.
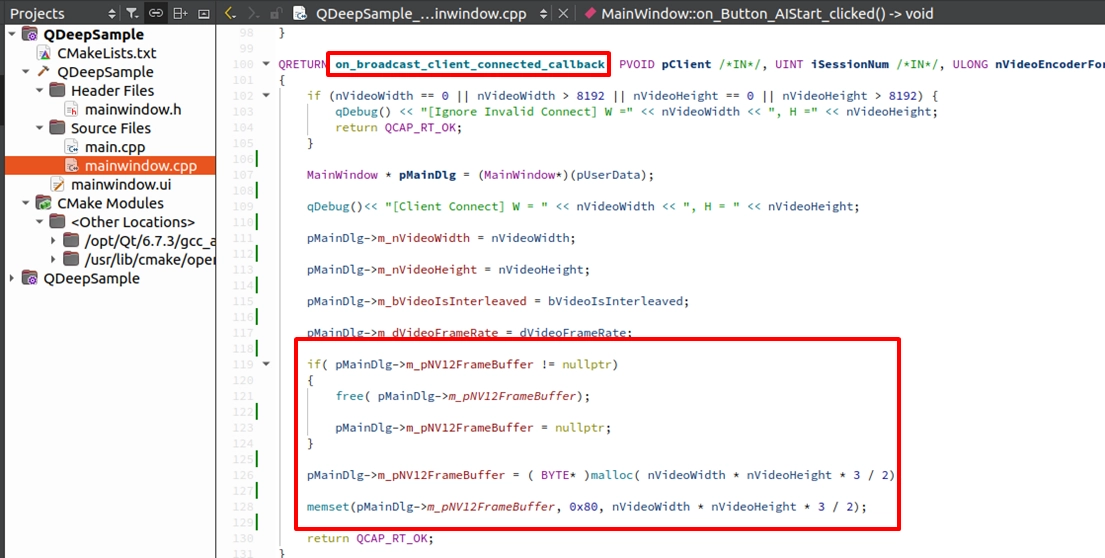
Allocating Memory in the Connection Callback
Return to the on_broadcast_client_connected_callback hub function. After successfully obtaining nVideoWidth and nVideoHeight, we use malloc to allocate the memory size required for NV12 (Width × Height × 1.5):
Introduction to Core APIs and Structs
After the memory is ready, we are finally going to extract the underlying decoded video frames! But before doing this, we must first clarify an extremely important core concept.
➤ Core Concept Analysis: Why do we need to "manually unpack the struct"?
If you followed us through the Chapter 10 tutorial, you might be curious: "When we did pure playback or recording before, didn't we just pass the received parameters directly to the next API? Why do we have to go through so much trouble to copy the memory now?"
There are actually two key considerations behind this:
1. Ensuring AI and OpenCV receive pure RAW Data: The AI engine (QDEEP) and OpenCV only recognize "pure, tightly packed, and impurity-free RAW Data"! In the underlying architecture, when the decoder outputs the frame, these data are wrapped in an exclusive struct named qcap_av_frame_t. In addition, because GPU and hardware process images with a "Memory Alignment" mechanism, the actual stride (nPitch or Stride) of the image in memory is often larger than the true width of the image (nWidth). If we do not unpack the struct and remove the extra edge padding, the image will be severely distorted.
2. Safety protection mechanism for underlying memory: Wrapping the data in a struct and requiring developers to access it through APIs (Lock ➔ Copy ➔ Unlock) is to protect the raw data from being directly touched by the user. In C/C++ development, if the underlying pointers are opened directly, developers can easily cause "out-of-bounds modifications" accidentally when processing images. Through this protection mechanism, we can ensure that the memory space required for the underlying program to run is not easily modified by the outside, which not only makes the system operation safer but also significantly reduces the risk of program crashes.
To safely extract the pure image, we need to call the following three APIs in sequence and understand the internal structure of qcap_av_frame_t:
QCAP_BUFFER_GET_RCBUFFER (Get Buffer)
Used to get the Handle of the underlying image struct from the original data in the Callback.

QCAP_RCBUFFER_LOCK_DATA (Lock and Unpack Struct)
After getting the Handle, we must "lock" it to prevent the data from being overwritten by the underlying layer while copying. Upon successful locking, it will return the qcap_av_frame_t struct!

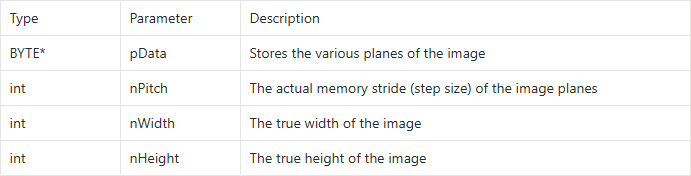
Understanding the qcap_av_frame_t Struct: When we get this struct, it contains four extremely important pieces of image information:
QCAP_RCBUFFER_UNLOCK_DATA (Unlock and Release)
When we safely copy the data inside qcap_av_frame_t into our own memory using memcpy, we absolutely must not forget to call this API to unlock it and return the resources to the underlying layer, otherwise, the system will immediately freeze!

If we do not unpack the struct and just throw the entire memory package directly to AI or OpenCV, those extra "invalid padding margins (Padding)" will cause the image to be severely distorted (for example, showing slanted green and purple stripes).
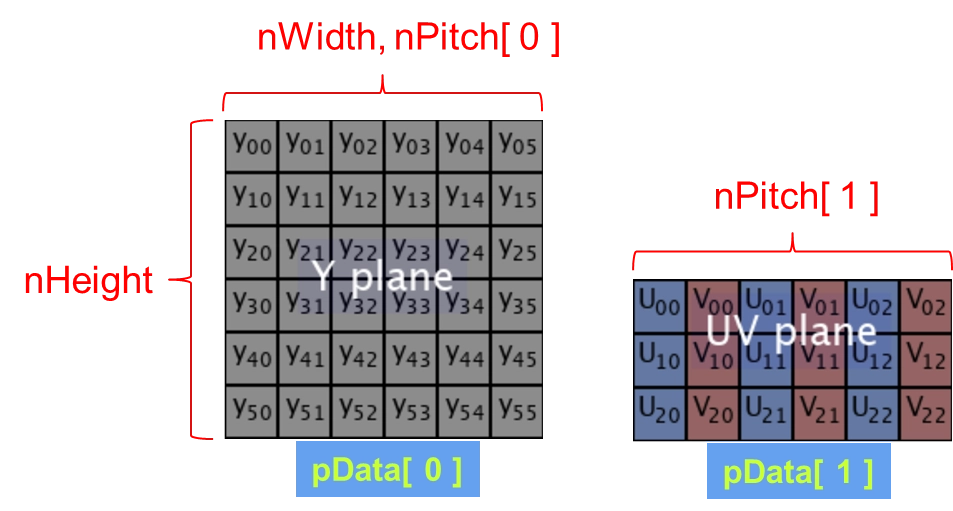
Therefore, in this step, our sacred mission is: to open the struct, strip away all extra Padding, extract the pure Y Plane (Luma) and UV Plane (Chroma), and pack them tightly into the NV12 buffer we just allocated!
Extracting NV12 and OpenCV Image Conversion and Rendering
Including OpenCV in mainwindow.cpp
Before starting to write the image conversion logic, please be sure to go back to the very top of mainwindow.cpp and include the OpenCV core header file:
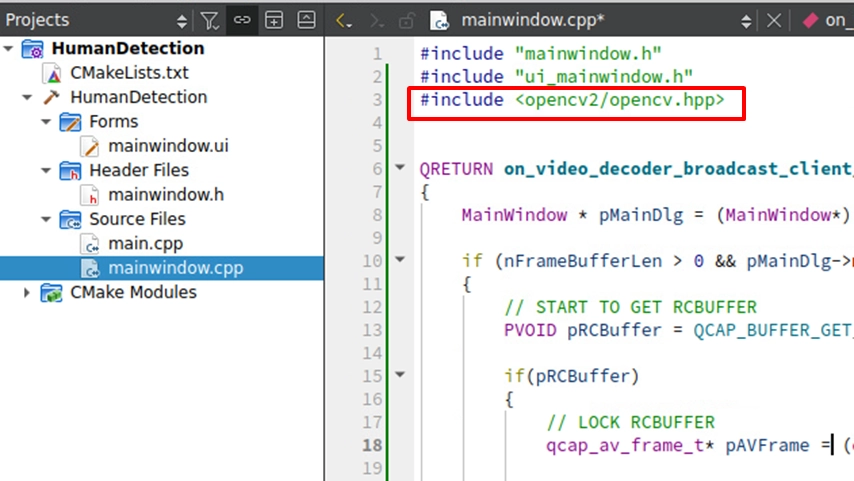
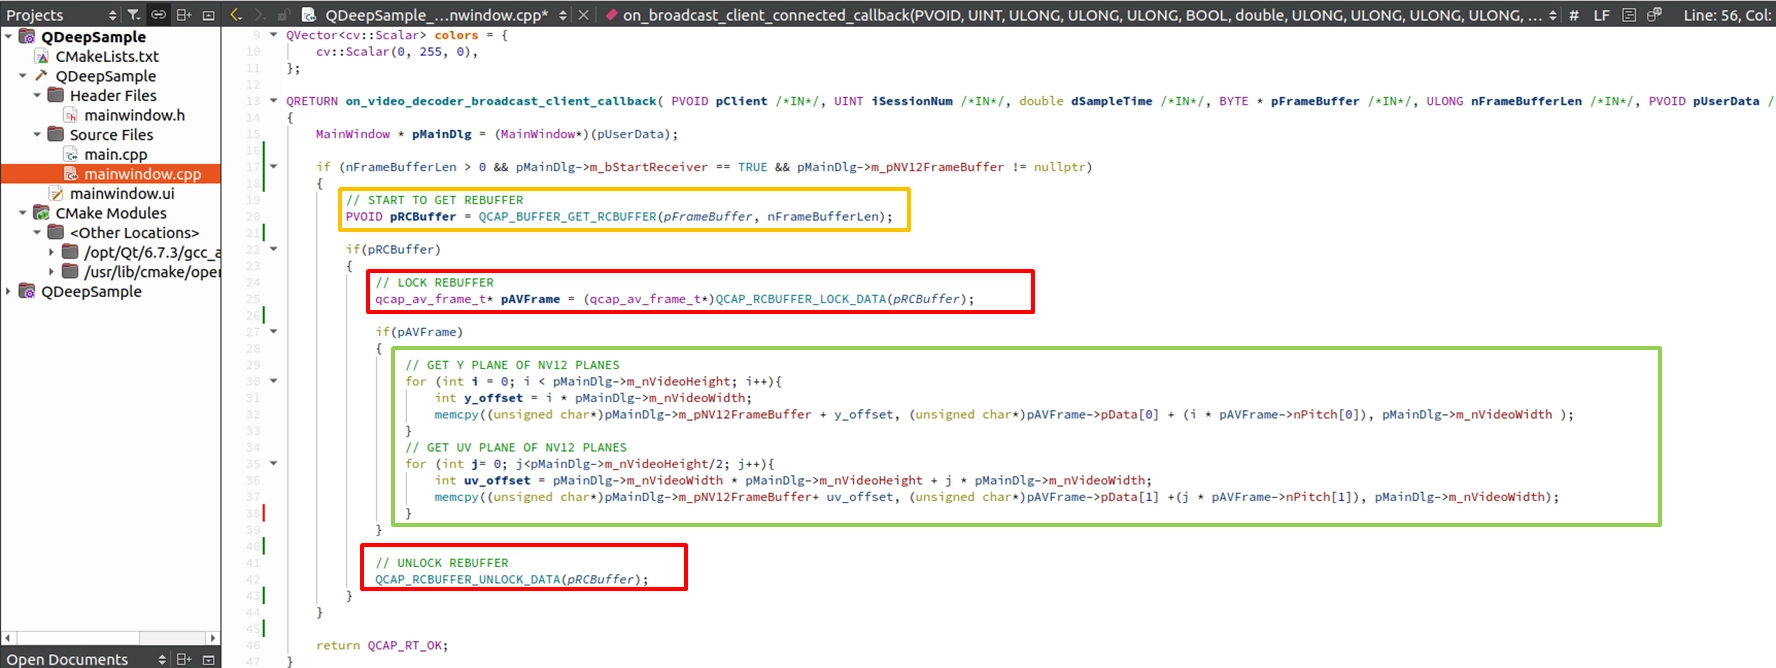
Locking the Buffer and Extracting the Raw NV12 Image
Now, let's combine the APIs we just learned! Please go to the on_video_decoder_broadcast_client_callback hub. To safely extract the video frame, implement this strict process of "Get Buffer ➔ Lock ➔ Copy ➔ Unlock":
1. Call QCAP_BUFFER_GET_RCBUFFER to get the image struct.
2. Call QCAP_RCBUFFER_LOCK_DATA to lock the data (preventing the data from being overwritten by the underlying layer while we are copying it).
3. The NV12 format is divided into two planes: the Y Plane (Luma) and the UV Plane (Chroma). We use loops and memcpy to copy the data from pData (Y) and pData (UV) respectively, according to their stride (nPitch), into our prepared m_pNV12FrameBuffer.
4. Once completed, call QCAP_RCBUFFER_UNLOCK_DATA to unlock.
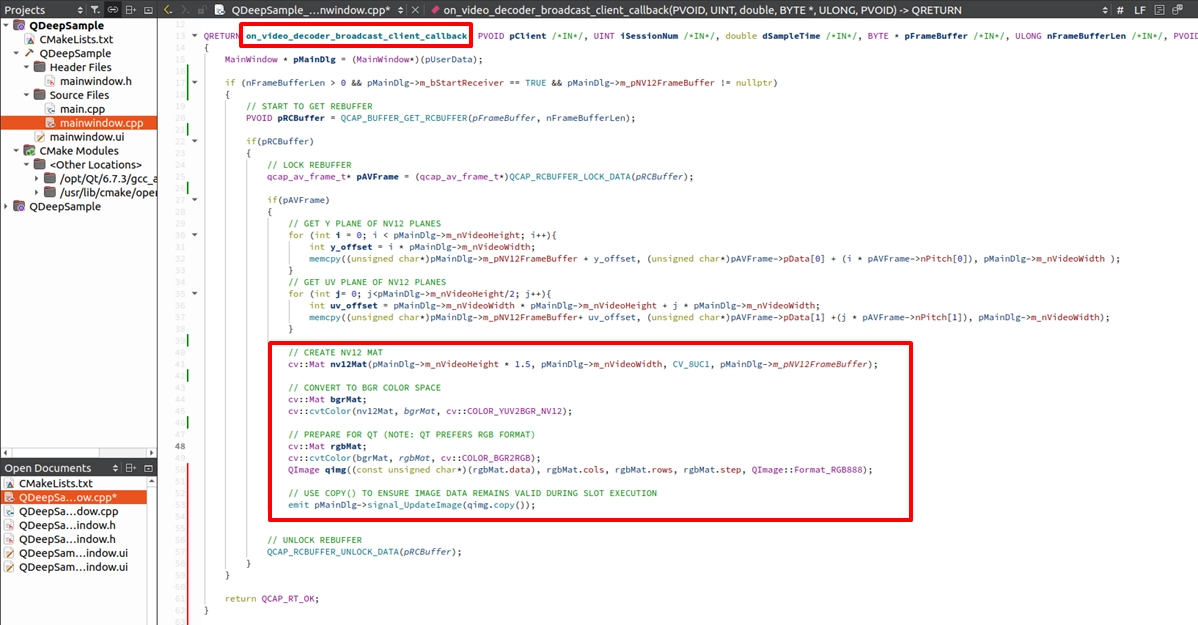
Converting to cv::Mat and Sending the Image Signal Across Threads
Next, in the on_video_decoder_broadcast_client_callback hub, follow the "Get Buffer ➔ Lock ➔ Copy ➔ Unlock" process to copy the NV12 out. Then, immediately use the OpenCV we just included to convert it to an RGB format QImage, and finally send the image across threads via emit:
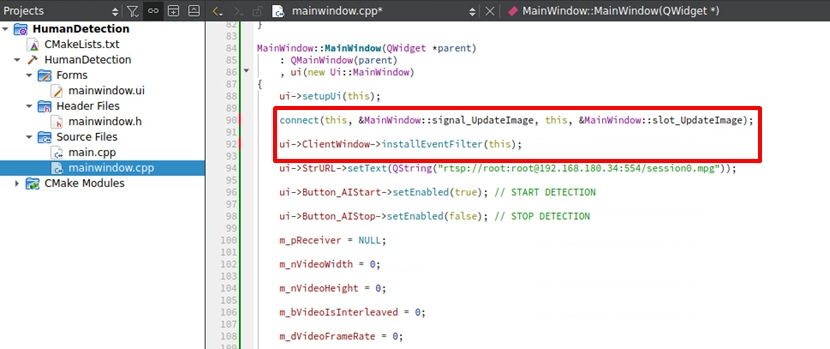
Starting the Cross-Thread Rendering Mechanism in the Constructor
We just emit ted the signal, but how does the UI interface know to receive it? Please return inside the constructor MainWindow::MainWindow(...) of mainwindow.cpp. We must perform "Signal Binding" and "Install Event Filter" here. These two lines are the absolute keys to displaying the image:
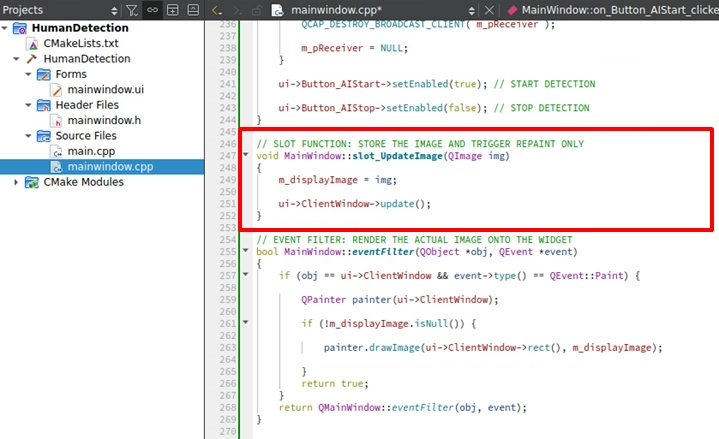
Implementing Image Caching and Triggering Redraw
Next, at the bottom of mainwindow.cpp, implement the slot_UpdateImage we just bound. The job of this slot function is very simple: save the latest image passed to it, and then shout, "Please update the canvas!":
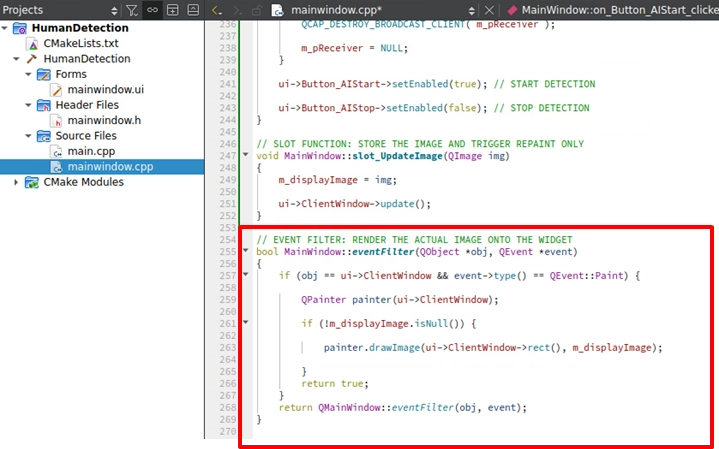
Rendering the Screen Using QPainter
The final step! Implement the eventFilter. When the update() just now triggers the Paint event of ClientWindow, we immediately intercept it and manually draw m_displayImage onto the window using QPainter:
Final Verification
Great! At this point, our QDeepSample basic template is perfectly established. Now, please click "Build and RUN" to execute this project. Paste your RTSP URL and click START RECEIVER. You will see the smooth camera footage perfectly displayed in the software window through the Qt and OpenCV drawing mechanism you wrote yourself!
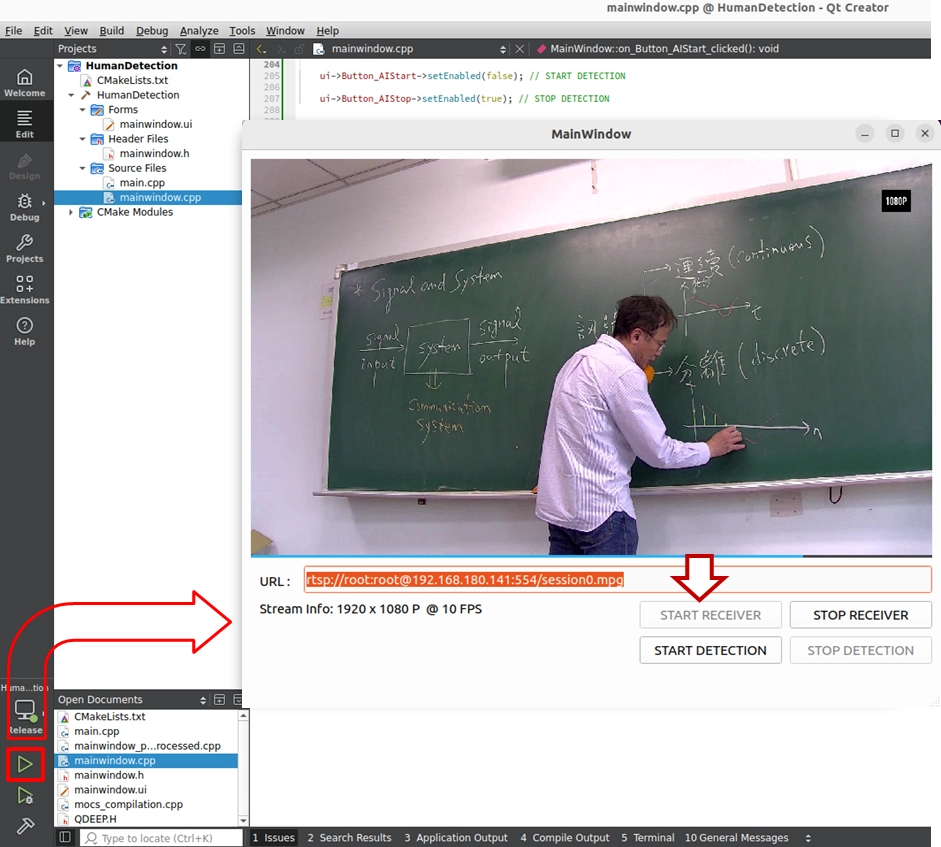
Sharp-eyed as you are, you must have noticed that the START DETECTION and STOP DETECTION buttons on our interface are currently still greyed out when clicked, with no reaction—don't worry, the QDeepSample project in your hands now possesses the "pure NV12 image extraction capability" and the "custom canvas rendering capability." In the next chapter's implementation, we will truly awaken the QDEEP engine. We just need to feed this prepared NV12 image package into it, and then use OpenCV to draw bounding boxes from the coordinates returned by the AI. Your software will instantly gain the superpower to understand the video frames! See you in the next chapter!