9-9 RTSP Stream Client Example Tutorial
In the previous chapter's tutorial, we successfully established an RTSP stream server using the NexVDO SDK and verified the feasibility of remote viewing through the open-source player ffplay .
➤ For the RTSP stream server feature, you can review : 9-8 RTSP Stream Server Example Tutorial
➤ For ffmpeg installation, you can review: 9-6 Video/Audio Recording Example Tutorial

© Blender Foundation | Big Buck Bunny | CC BY 3.0
However, in many real-world project development scenarios ( e.g., building multi-split surveillance software for a control room, a remote drone control interface, or a medical imaging receiving end ), we cannot always rely on third-party players. We need to perfectly integrate the functions of "receiving stream, decoding, and displaying" into our own developed applications.
Don't worry, the NexVDO SDK has comprehensive universal stream client capabilities! Today, we will switch our perspective from the "Sending End ( Server )" to the "Receiving End ( Client )", and teach you how to code a dedicated player capable of receiving RTSP video from scratch!
© Blender Foundation | Big Buck Bunny | CC BY 3.0
➤ Core Concept: The Underlying Operating Logic of the Receiving End
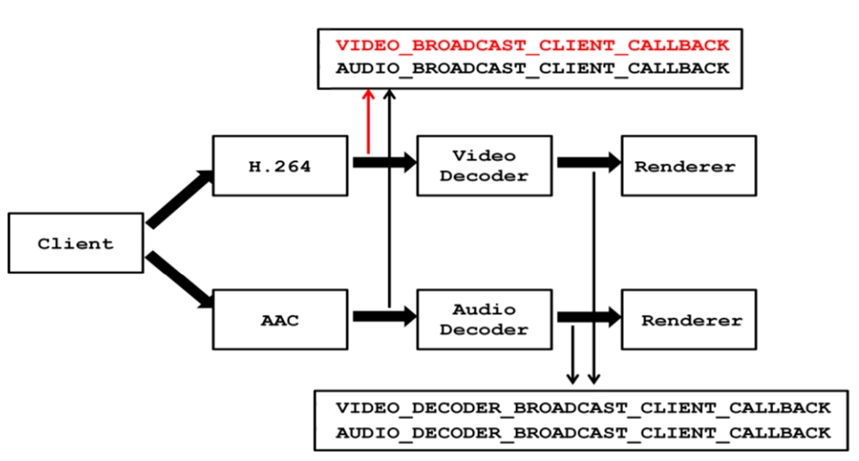
Before we start calling APIs, we must first understand a highly important "Client Architecture Diagram" on page 6 of the official presentation.
When our program connects to the Server acting as a Client, a series of complex conversions actually occur at the bottom layer. The NexVDO SDK has already encapsulated these complex tasks, so you only need to understand the following two core concepts:
1. Network Connection and Protocol Selection : The RTSP server waits on the network at all times, while the Client must actively initiate the connection. During connection, you can flexibly choose to use UDP, TCP, or HTTP to receive the stream depending on the quality of the network environment.
2. Dual-Track Callback Interception Mechanism (Compressed Stream vs. Decoded Frame) : When the Client successfully receives the stream transmitted from the Server, the data is in the compressed H.264 ( Video ) and AAC ( Audio ) formats. The NexVDO SDK provides two highly flexible "interception points ( Callbacks )" for developers to use :
• The First Interception (Broadcast Client Callback) : Allows you to directly intercept the most original, un-decoded H.264/AAC compressed data. This is extremely useful for developers who want to directly "save the stream as a file" or "restream" it.
• The Second Interception (Decoder Broadcast Client Callback) : The SDK has a powerful built-in hardware decoder (Video/Audio Decoder). After decoding, it will output the familiar NV12 ( uncompressed video ) and PCM ( uncompressed audio ). To display the video frame on the UI, we need to listen to this second interception Callback!


Understanding Core APIs - Broadcast Client Engine
Just like the capturing and recording we learned earlier, the RTSP receiving end also follows the consistently elegant lifecycle logic of the NexVDO SDK.

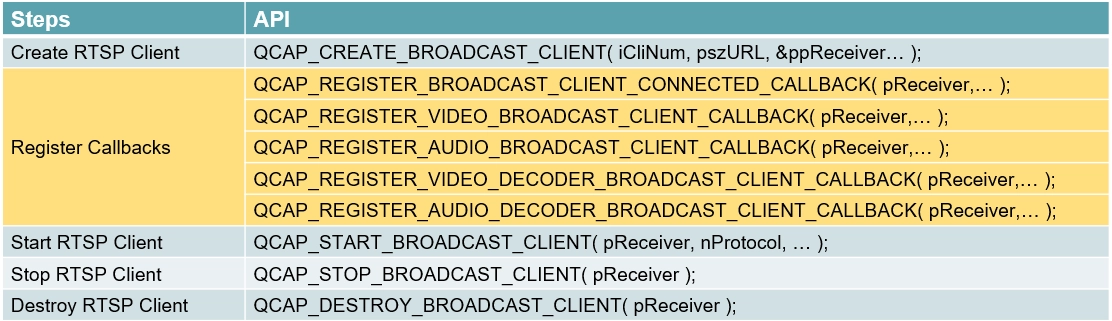
The standard usage sequence is as follows :
1. QCAP_CREATE_BROADCAST_CLIENT :Create the client.
2. QCAP_REGISTER_... :Register event callbacks and data callbacks.
3. QCAP_START_BROADCAST_CLIENT :Start the connection.
4. PF_... :Obtain information and video frames from the callback function definitions.
5. QCAP_STOP_BROADCAST_CLIENT :Stop the client connection.
6. QCAP_DESTROY_BROADCAST_CLIENT :Destroy ( Release ) the client.
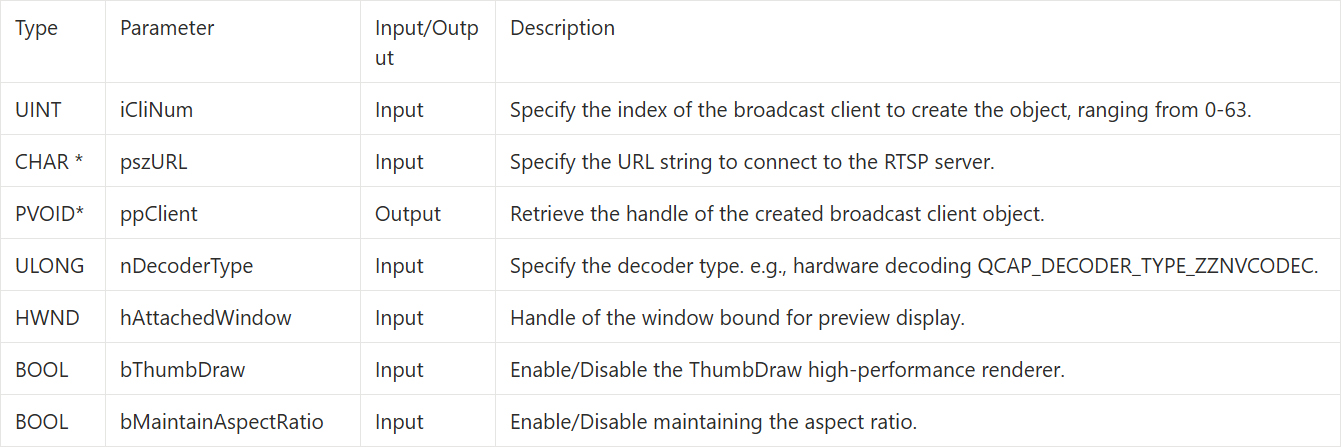
QCAP_CREATE_BROADCAST_CLIENT
This API is used to initialize and create the RTSP Client object. We must specify the URL of the remote server here and set the decoder type to be used to decode the video.
Event Callback - Connection Status
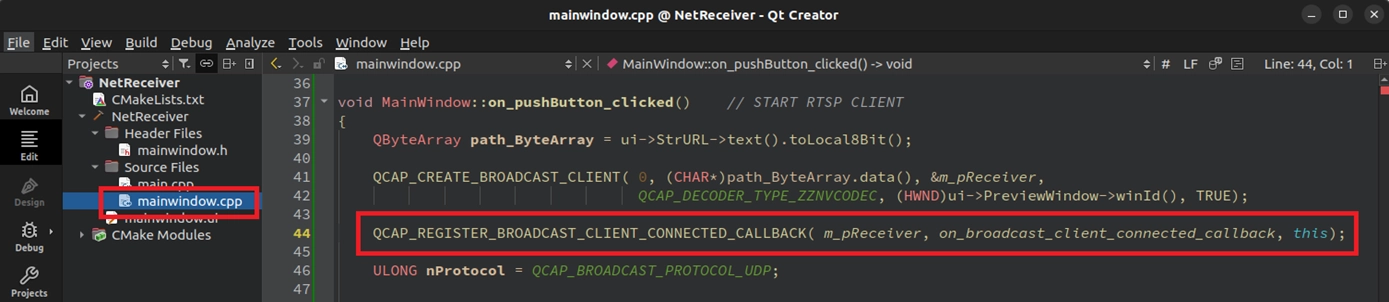
• Registration API :QCAP_REGISTER_BROADCAST_CLIENT_CONNECTED_CALLBACK
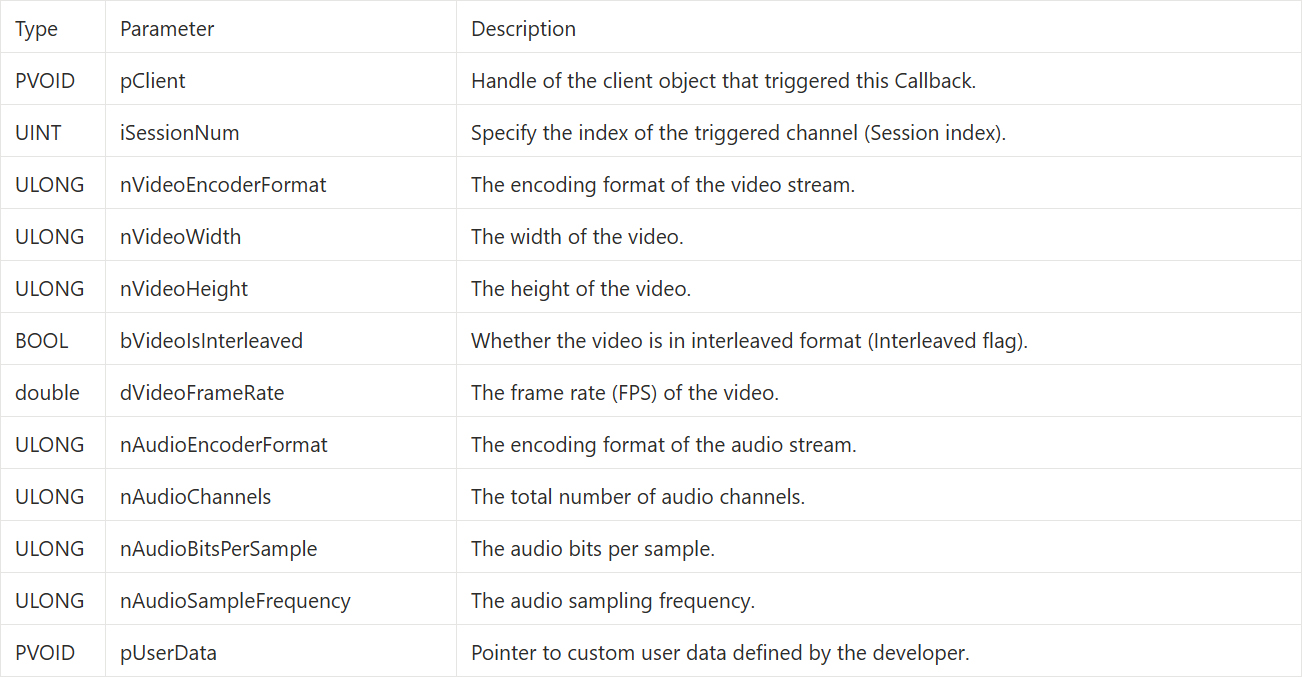
• Trigger Timing : This is a switchboard used to listen to the "connection status". When the receiving end successfully connects to the remote server, the SDK will return important format information such as the server's video resolution, FPS, and audio sampling rate through this Callback.
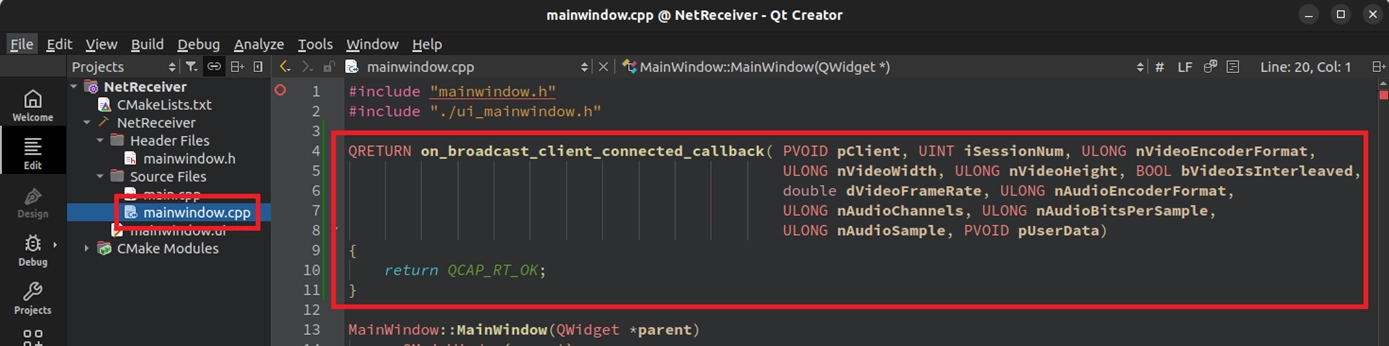
• Returned Information Parameters ( PF_BROADCAST_CLIENT_CONNECTED_CALLBACK ) :
Data Callback - Get Compressed Video Data
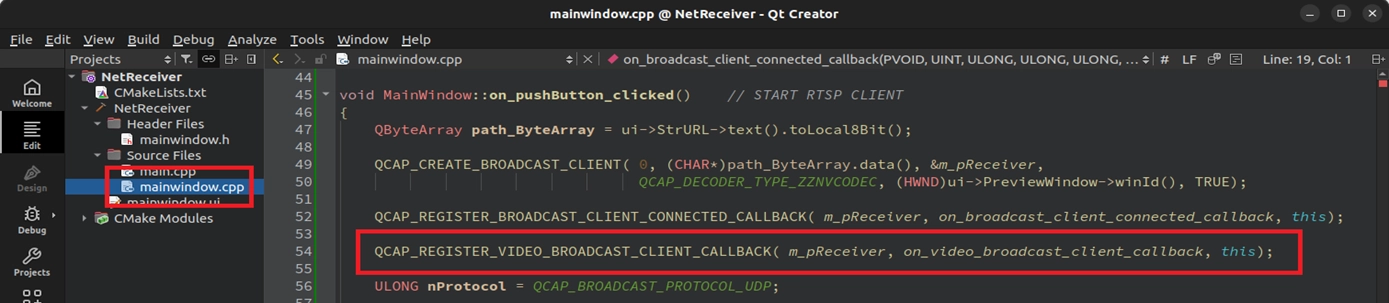
• Registration API :QCAP_REGISTER_VIDEO_BROADCAST_CLIENT_CALLBACK
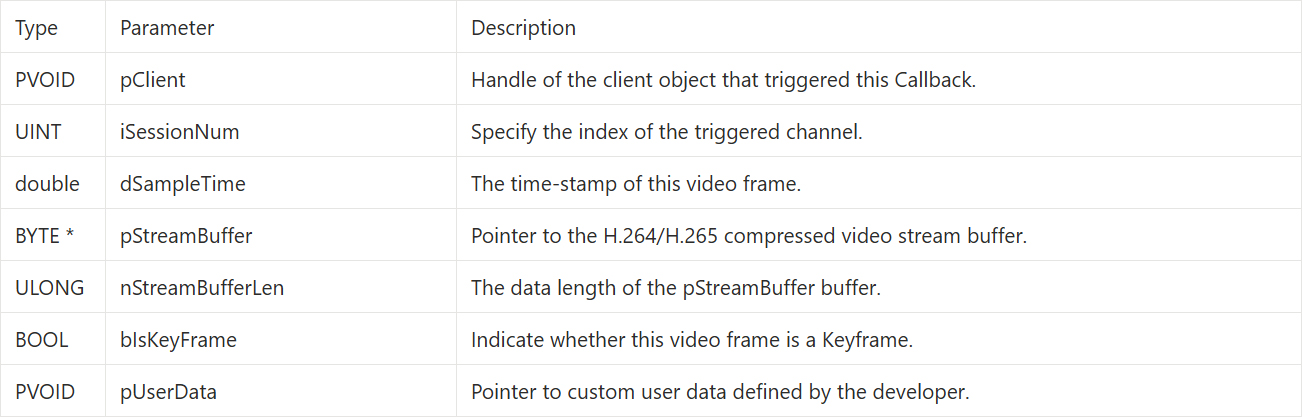
• Trigger Timing : It allows you to intercept and obtain the most original, un-decoded compressed video data ( such as H.264 ), which is highly suitable for directly saving as an MP4 file or restreaming to other servers.
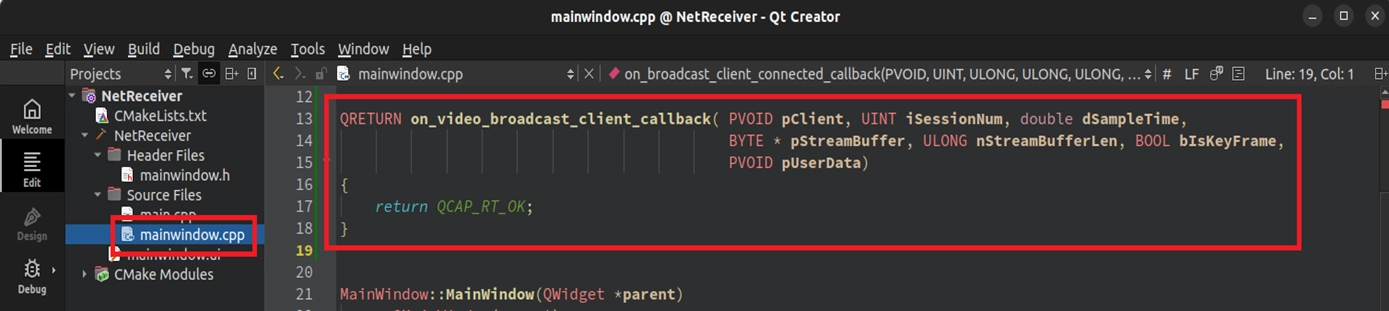
• Returned Information Parameters ( PF_VIDEO_BROADCAST_CLIENT_CALLBACK ) :
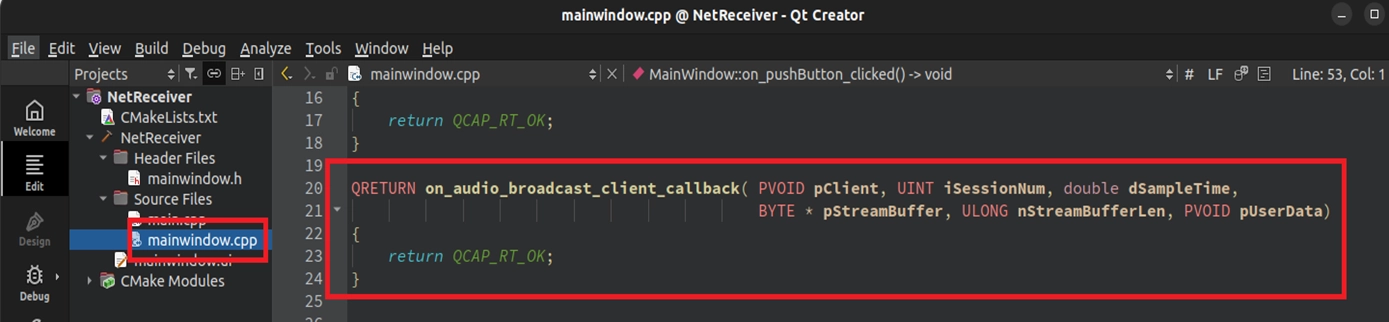
Data Callback - Get Compressed Audio Data
• Registration API :QCAP_REGISTER_AUDIO_BROADCAST_CLIENT_CALLBACK
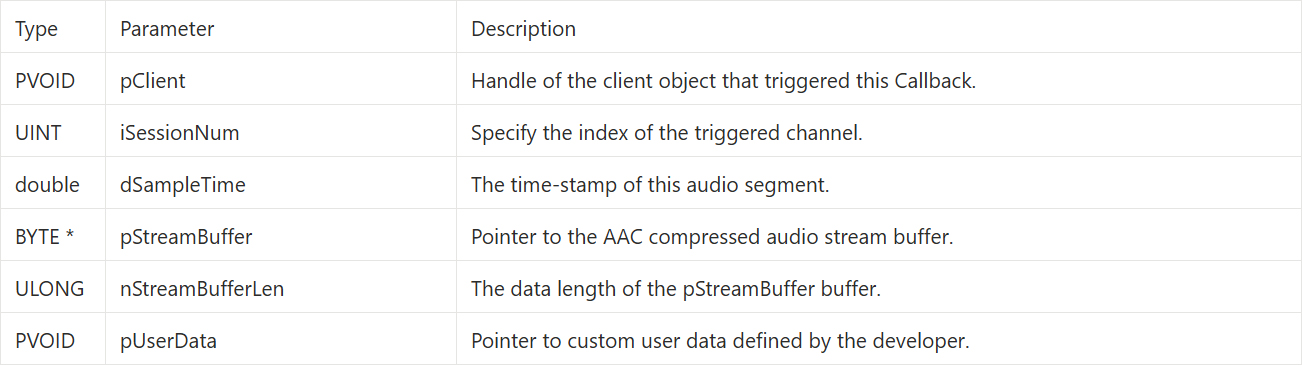
• Trigger Timing : The principle is the same as QCAP_REGISTER_VIDEO_BROADCAST_CLIENT_CALLBACK . This API is specifically used to intercept and obtain un-decoded compressed audio data ( such as AAC ).
• Returned Information Parameters ( PF_AUDIO_BROADCAST_CLIENT_CALLBACK ) :
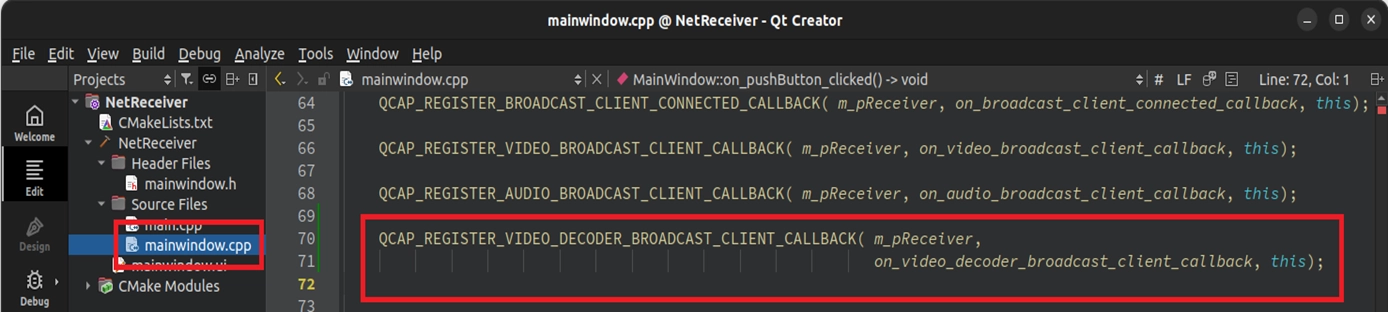
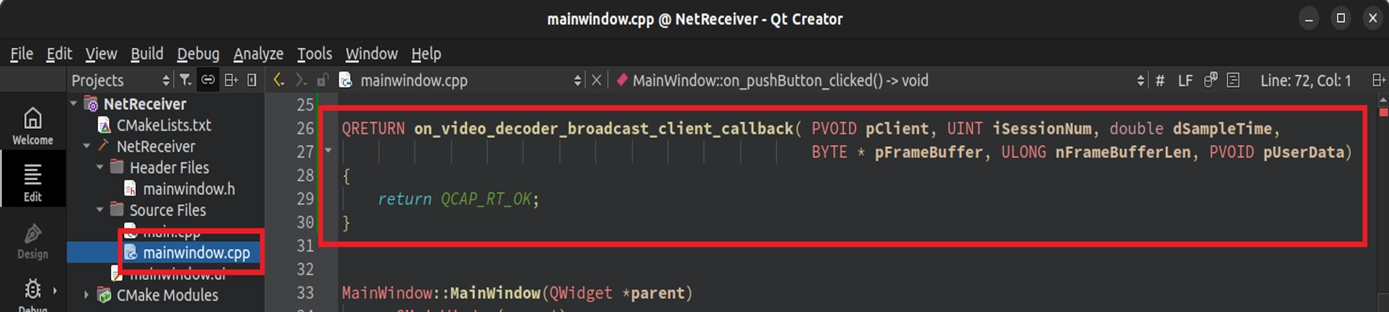
Data Callback - Get Uncompressed Video Data
• Registration API :QCAP_REGISTER_VIDEO_DECODER_BROADCAST_CLIENT_CALLBACK
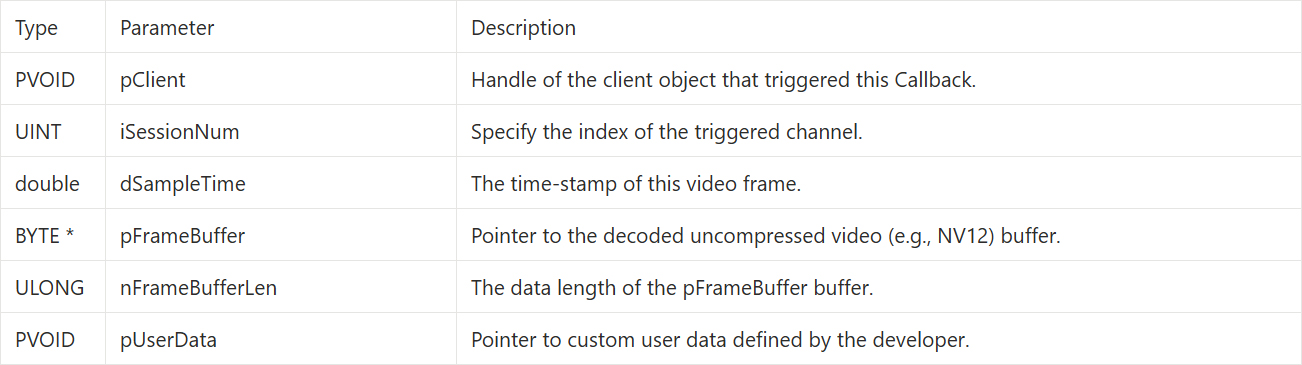
• Trigger Timing : When the stream is processed by the SDK's hardware decoder, it will output uncompressed, pure video frames from here.
• Returned Information Parameters ( PF_VIDEO_DECODER_BROADCAST_CLIENT_CALLBACK ):
Data Callback - Get Uncompressed Audio Data
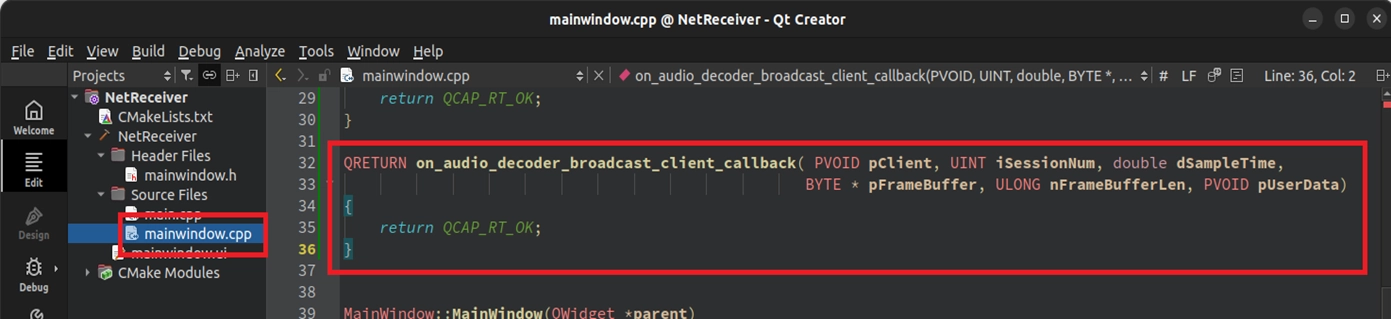
• Registration API :QCAP_REGISTER_AUDIO_DECODER_BROADCAST_CLIENT_CALLBACK
• Trigger Timing : The decoder will restore the received audio into uncompressed raw audio data ( such as PCM ) and output it from here.
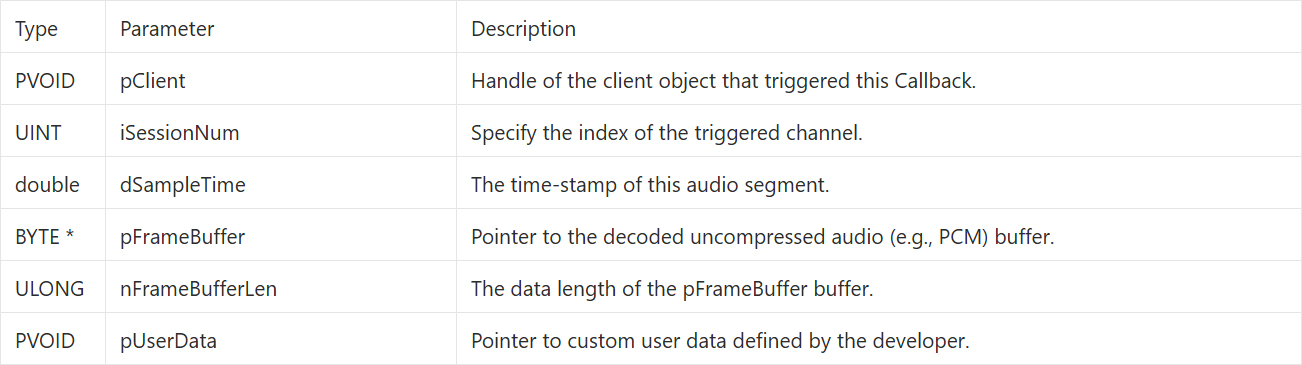
• Returned Information Parameters ( PF_AUDIO_DECODER_BROADCAST_CLIENT_CALLBACK ) :
QCAP_START_BROADCAST_CLIENT
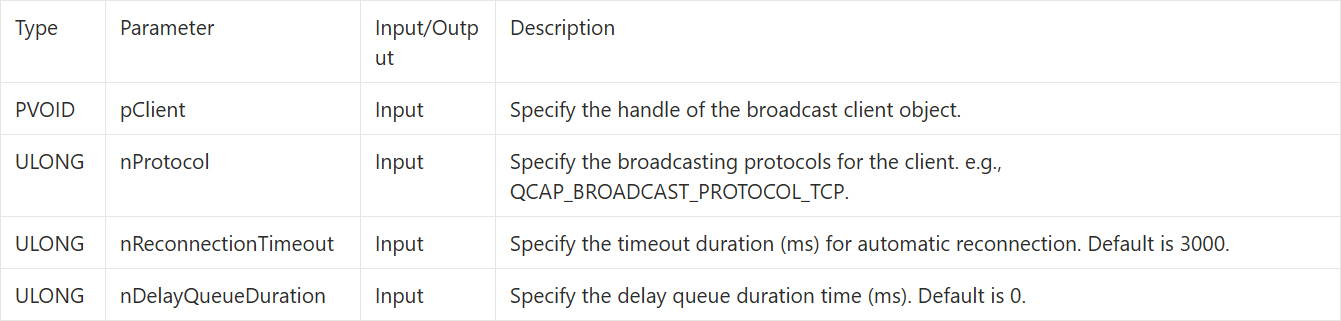
After setting up the URL, this API is responsible for officially initiating the connection request to the server. Here, we can specify whether to use TCP, UDP, or HTTP communication protocols to receive the stream, and set the timeout duration for automatic reconnection upon disconnection.
➤ Pitfall Guide : If your URL is rtsp://..., be sure to choose UDP or TCP as the protocol; if the URL goes through an HTTP channel via a Port like 8080, you must choose the HTTP protocol, otherwise the connection will fail!
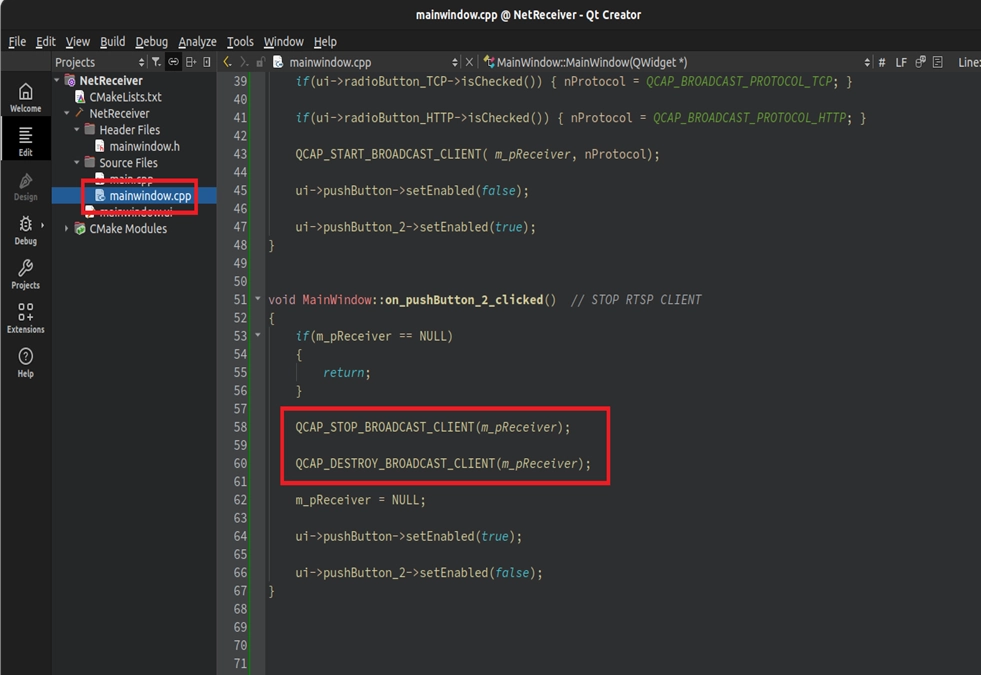
QCAP_STOP_BROADCAST_CLIENT
This API is used to pause or stop the stream receiving action of the client. After stopping, you can call Start again at any time to reconnect.

QCAP_DESTROY_BROADCAST_CLIENT
When the program is about to close or no longer needs to receive the stream, this API is used to completely destroy the client object and release system and network resources to prevent memory leaks.

Building the UI Display Interface
Before we start, you might wonder: "Why can't we just reuse the project from the previous chapter and continue writing like before?”
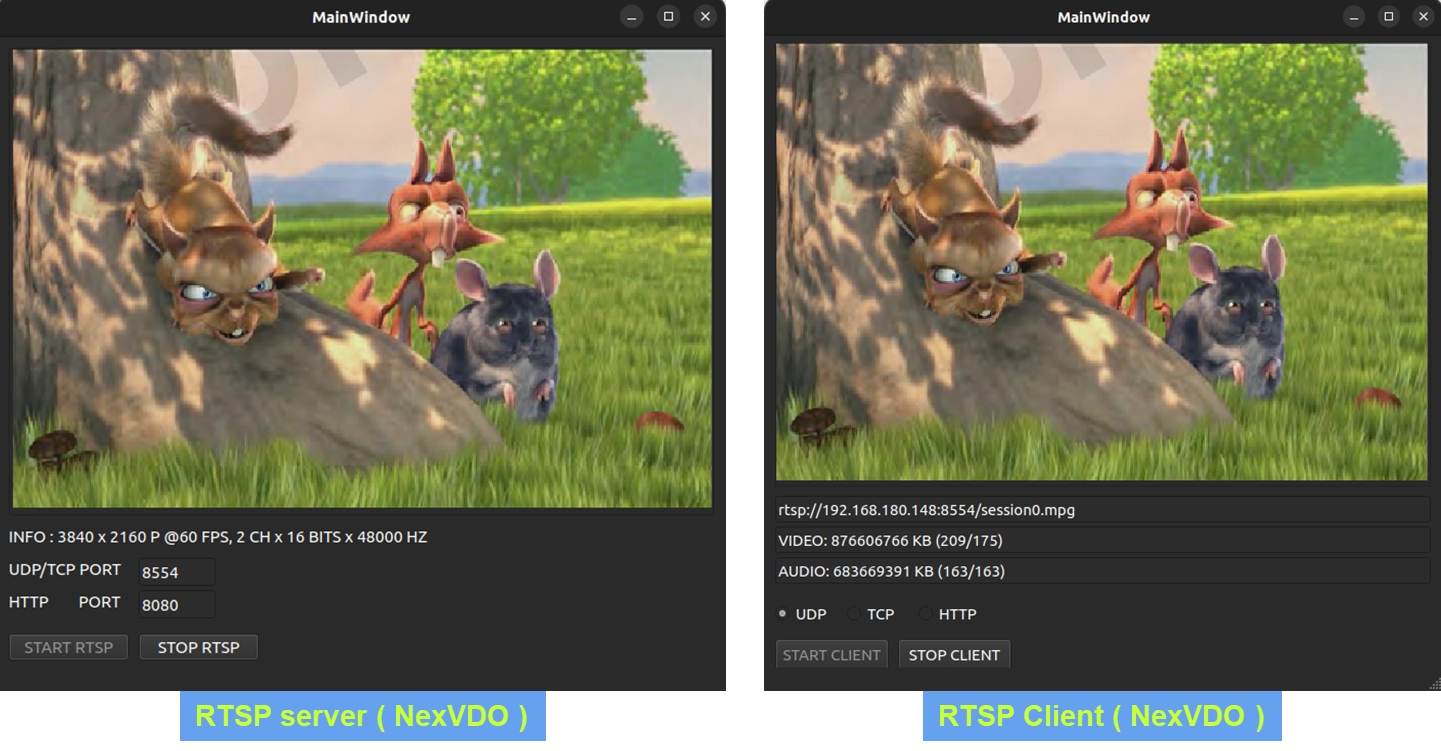
➤ [ Developer Concept Clarification: Why start a new project? ] The reason is simple: because we are now building a brand new "Receiving End ( Client )"! In the architecture of network streaming, there must be both a sender and a receiver. In the "Final Verification" phase later, we must run two independent programs simultaneously to conduct a local connection test — one is the "RTSP Server ( Sending End )" we built in the 9-8 RTSP Stream Server Example Tutorial, and the other is the "Dedicated Player ( Receiving End )" we are about to develop now.
If we directly modify the project from the previous chapter, we won't have a server to send signals for our test later!
This time, we are going to build a small but fully-equipped dedicated player interface. Not only can it input URLs and select communication protocols, but it can also monitor the received data volume in real-time!
Creating a Brand New NetReceiver Project
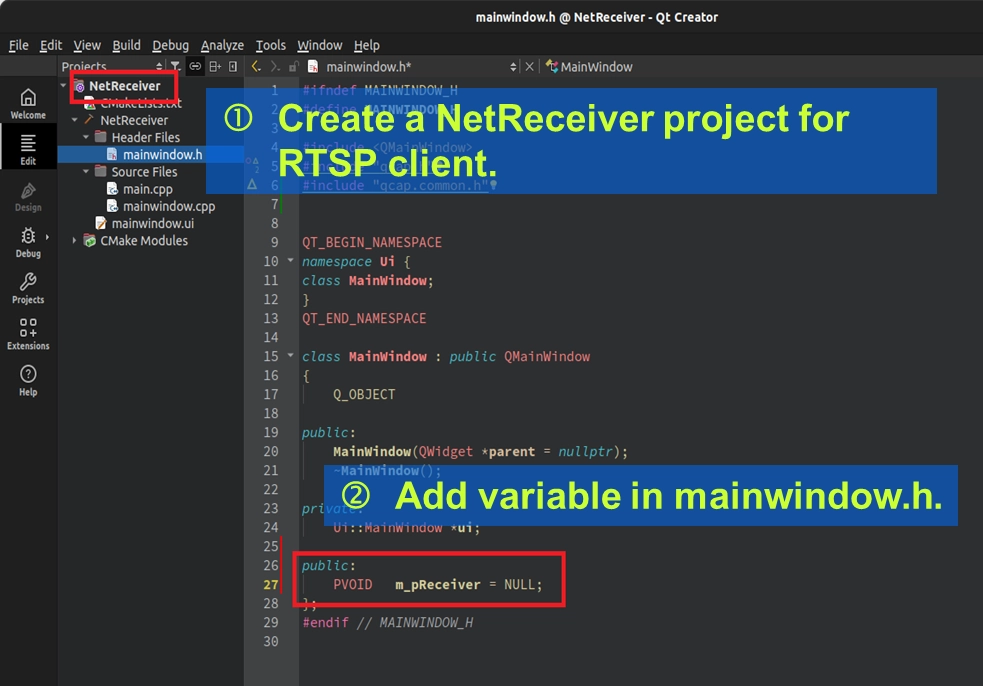
Please open Qt Creator, refer to the steps we learned in 9-3 Building a Basic Template Project: Hello NexVDO SDK!, create a brand new Qt Widgets Application, and name the project NetReceiver. Please make sure you have correctly linked the NexVDO SDK in CMakeLists.txt.
Next, open mainwindow.h, declare our client's brain ( Handle ), and initialize it to NULL:
Laying out the UI Interface Components
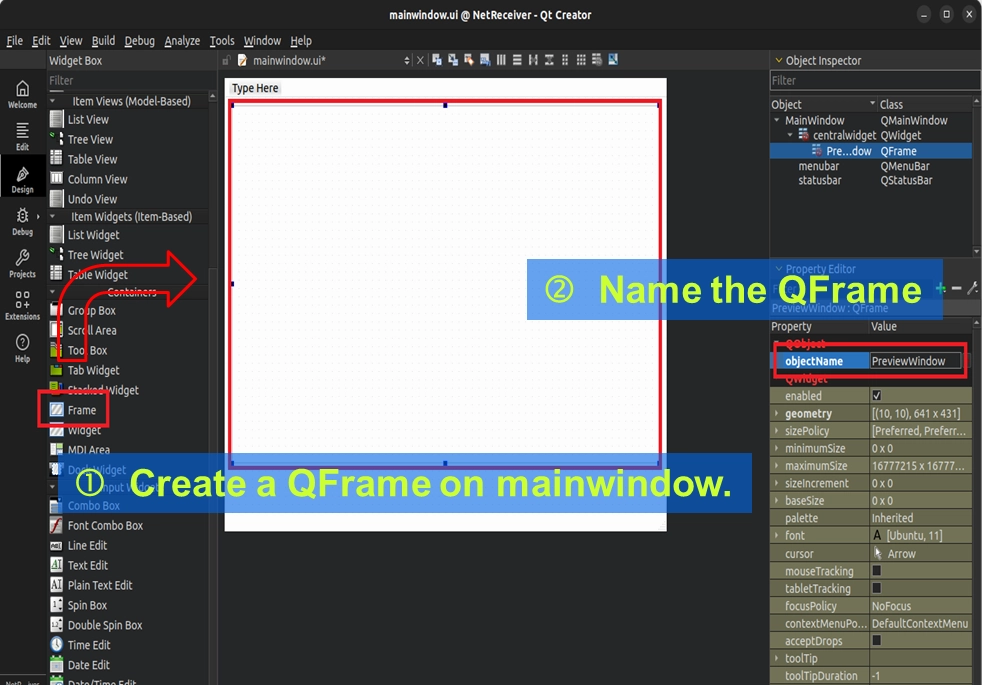
Please double-click to open mainwindow.ui to enter Design Mode, and drag the following components in order to enrich our player interface:
• Playback Window ( QFrame ) : Drag a QFrame and name its objectName as PreviewWindow. This is where the decoded video frame will be displayed later.
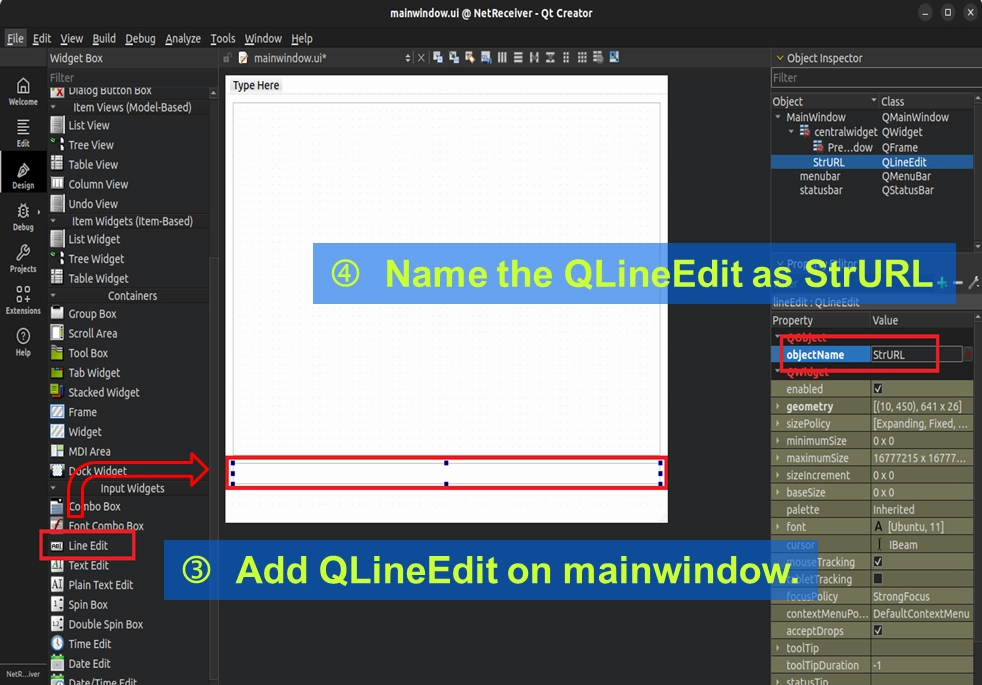
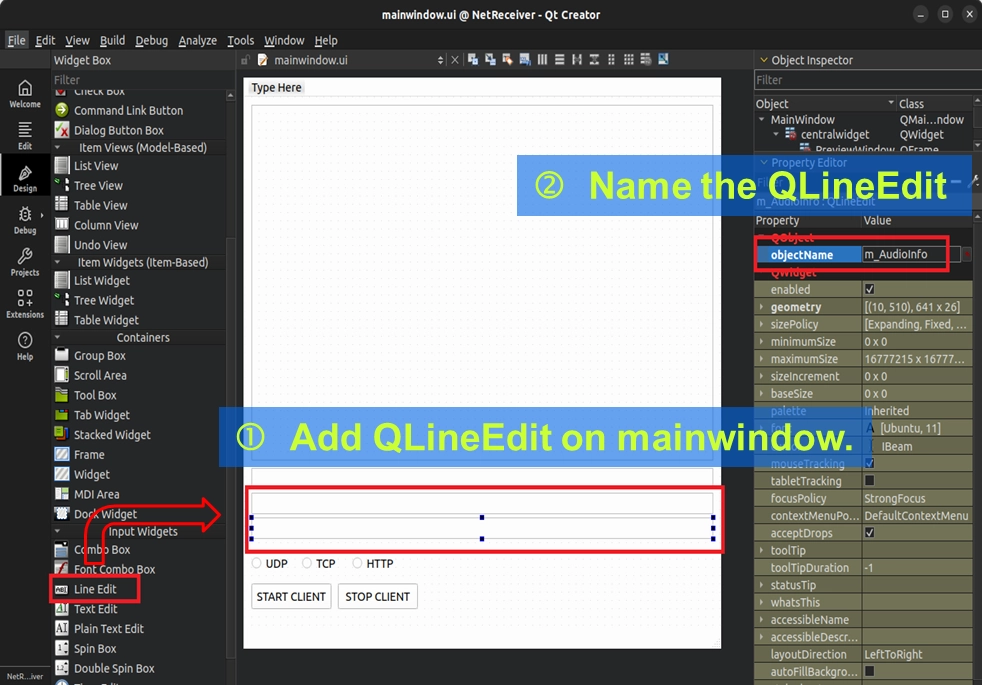
• URL Input Box ( QLineEdit ) : Drag a single-line input box and name it StrURL, allowing users to freely input the remote server's URL.
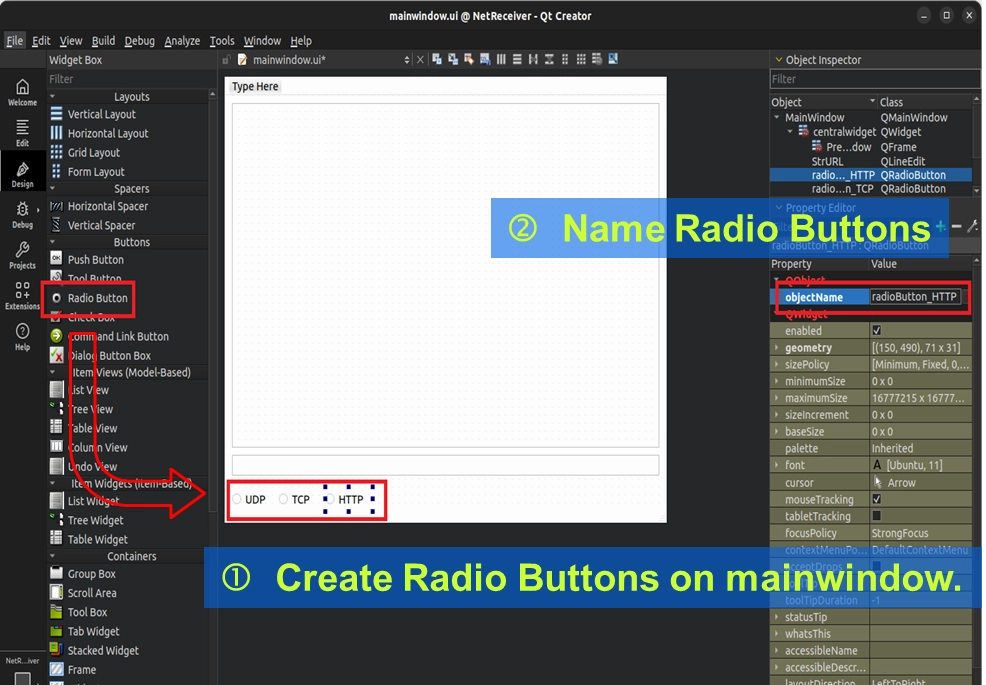
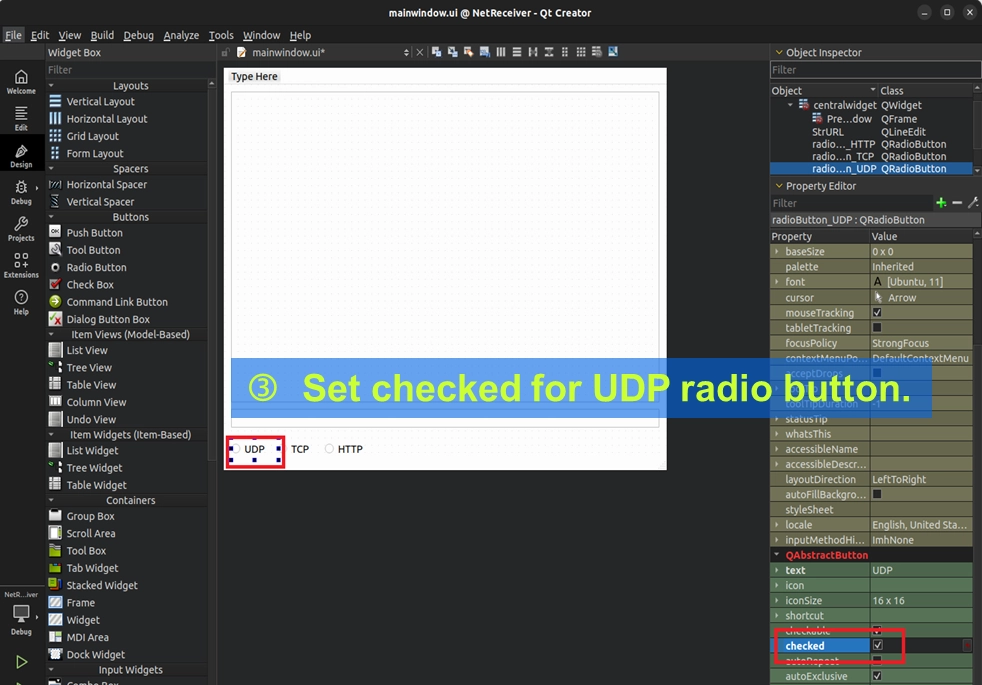
• Protocol Options ( QRadioButton ) : Drag three radio buttons and name them radioButton_UDP, radioButton_TCP, and radioButton_HTTP, respectively.
➤ Tip: Please set UDP as default checked in the property panel.
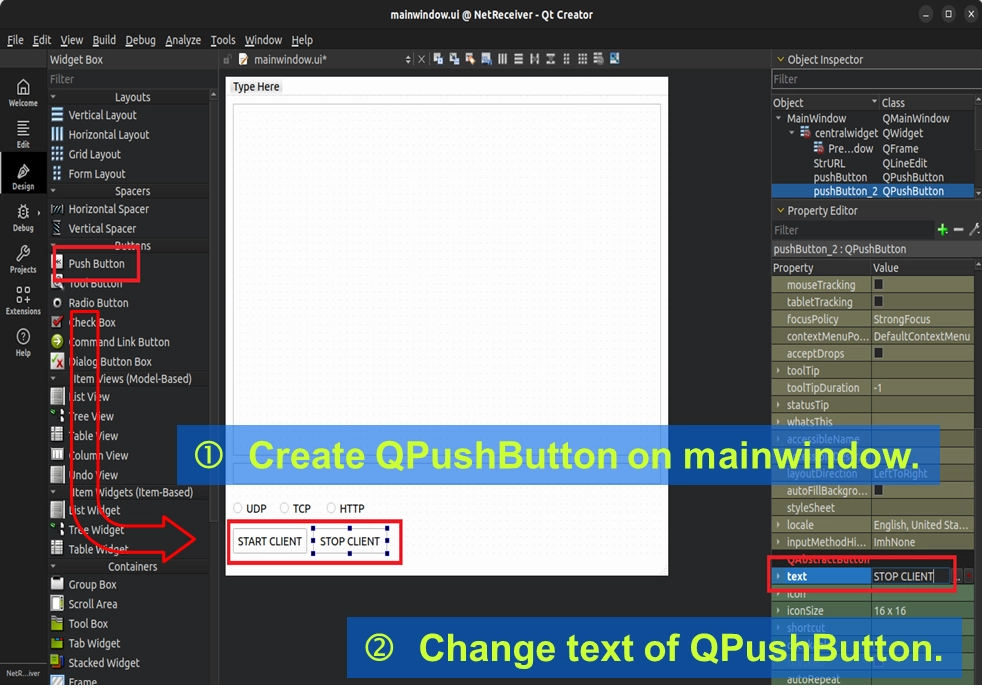
• Control Buttons ( QPushButton ) : Drag two buttons and change their text to "START CLIENT" and "STOP CLIENT", respectively.
• Traffic Monitoring Box ( QLineEdit ) : To display the real-time received data size, drag two more input boxes and name them m_VideoInfo and m_AudioInfo, respectively.
Binding Button Control Events
After all the components are placed, we still lack one extremely critical action—linking the UI buttons with the backend code!
Please right-click on the newly created START CLIENT and STOP CLIENT buttons respectively, and select "Go to slot..." from the menu. This convenient feature will let Qt Creator automatically jump to
mainwindow.cpp and create dedicated button click event blocks ( on_pushButton_clicked ) for us.
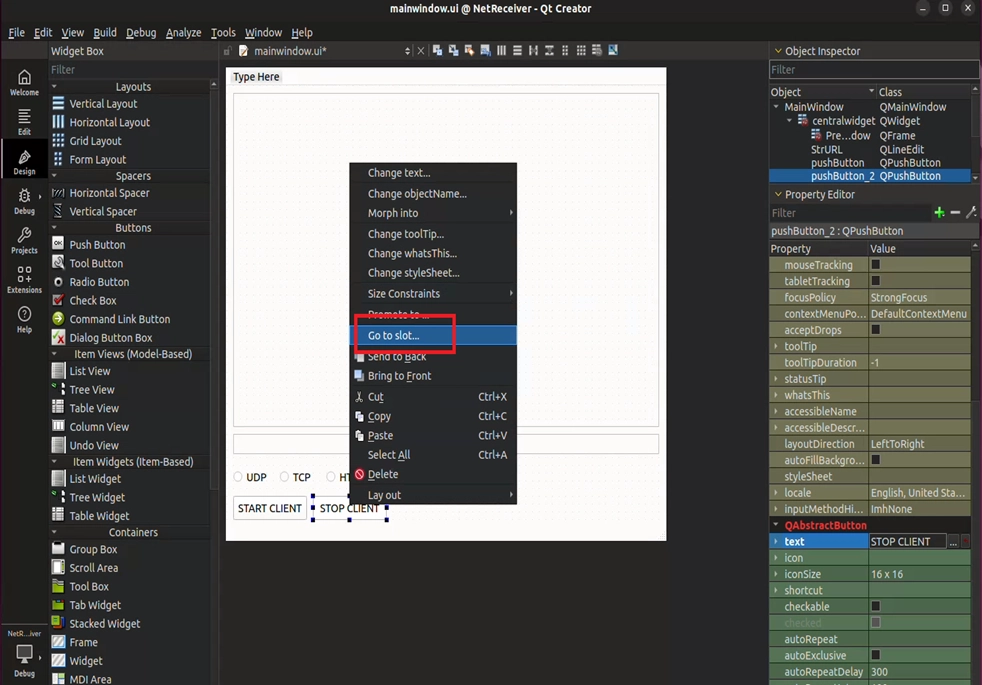
Later, all our RTSP client connection magic will be written in this block!
Writing the Core Code
After the interface is laid out, we will enter mainwindow.cpp and mainwindow.h to write the core logic. This will be divided into four parts: "Header File and Variable Preparation", "Safe Exit Mechanism", "Starting and Stopping the Connection", and the most important "Callback Interception and Traffic Statistics".
Initial URL Setting and Safe Exit Mechanism
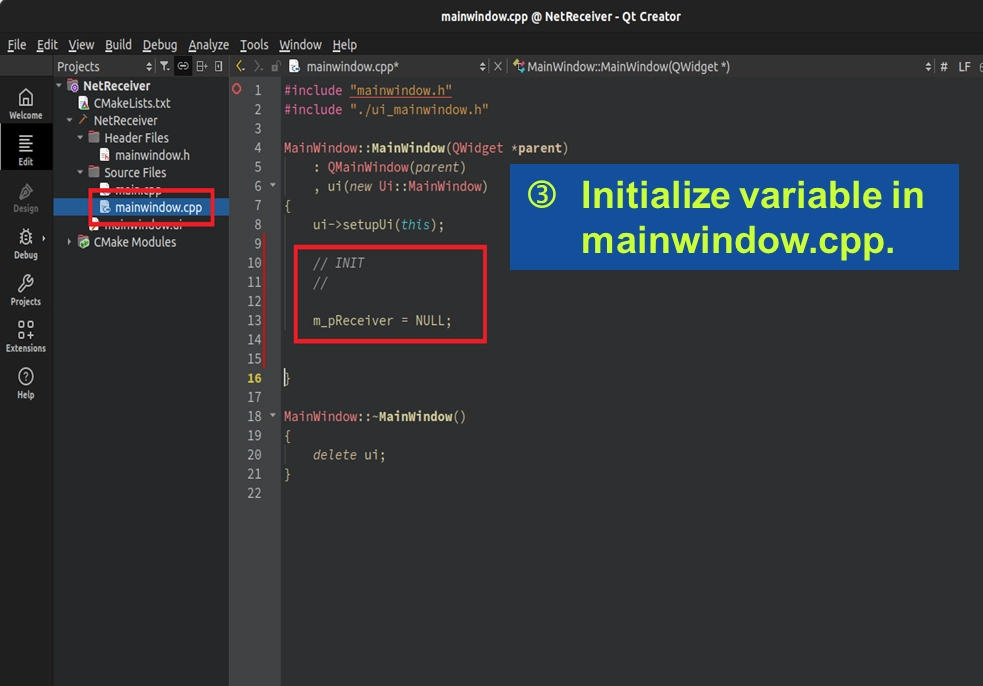
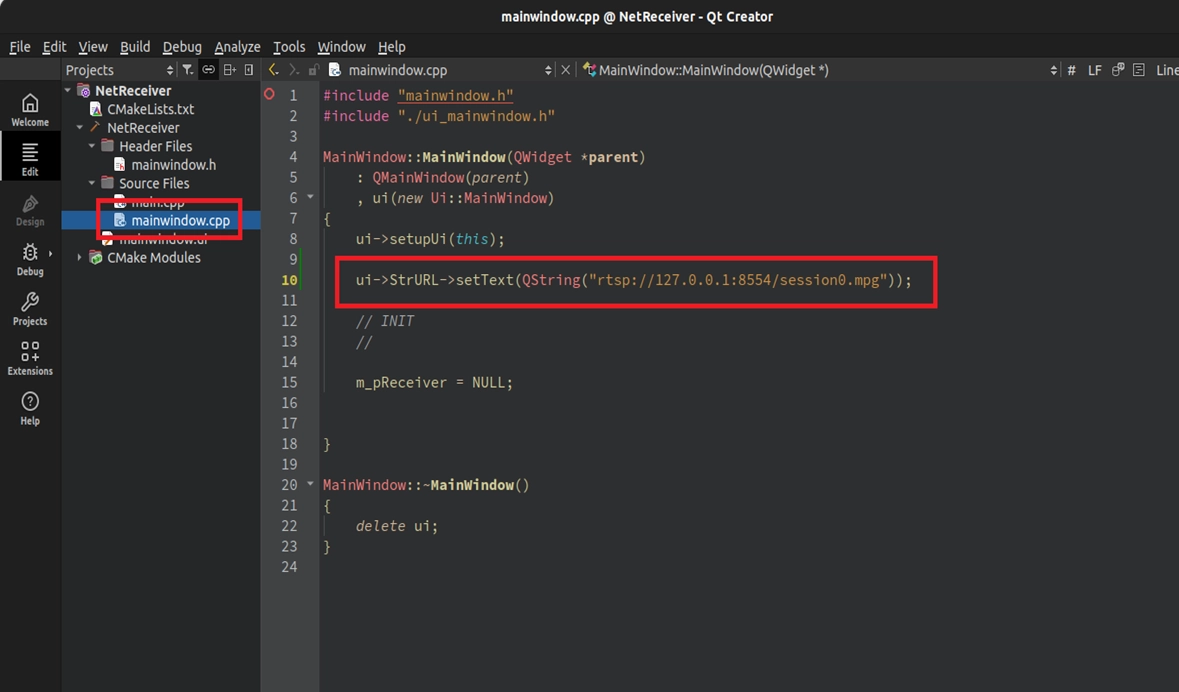
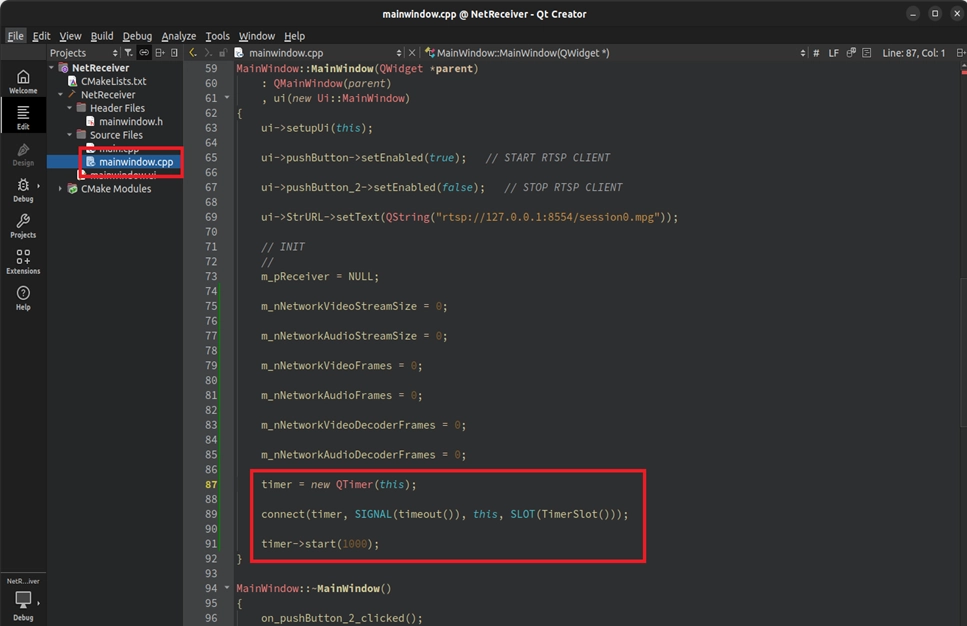
It is too troublesome to make the user re-enter the URL every time the program starts. Please fill in a default local connection URL for our StrURL in the constructor of mainwindow.cpp.
At the same time, set the default fool-proofing state of the buttons.
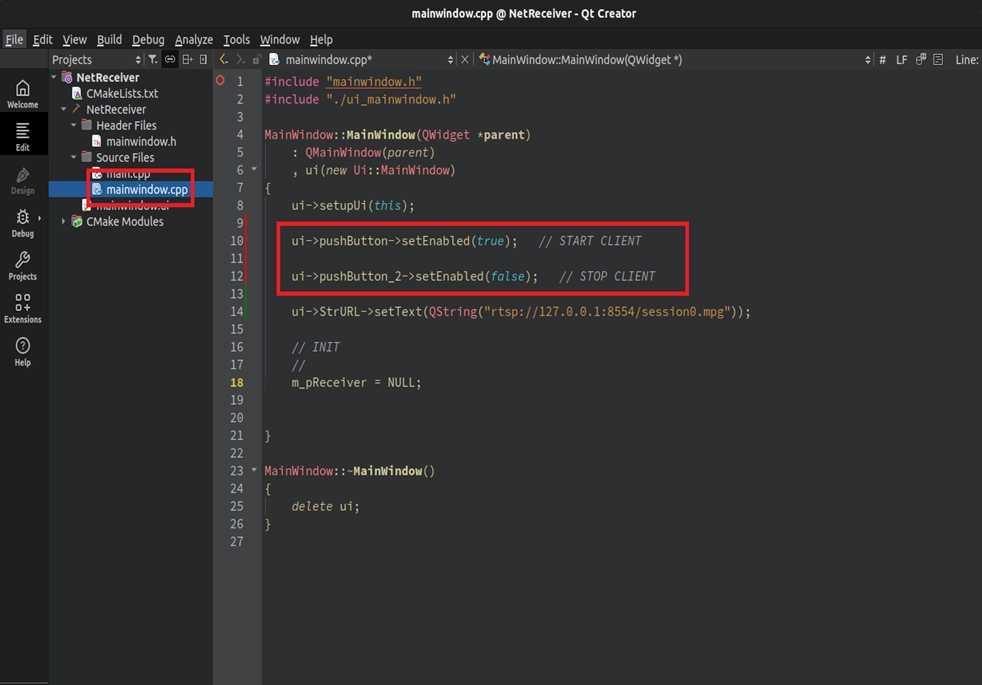
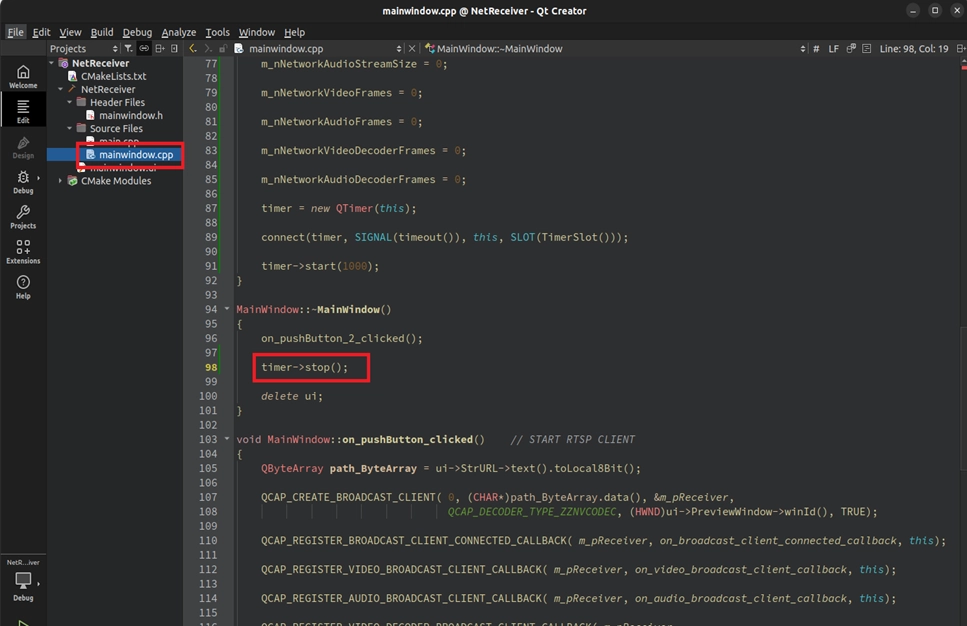
More importantly, to avoid resource lock-ups when the program closes, please be sure to forcefully call STOP in the destructor ( ~MainWindow ) for a safe exit!
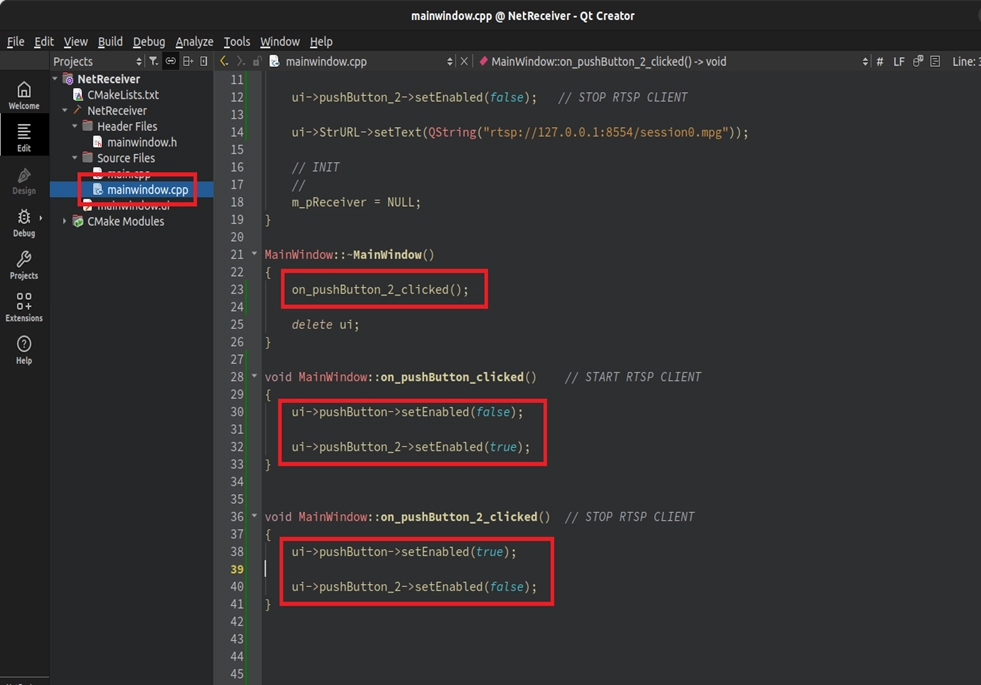
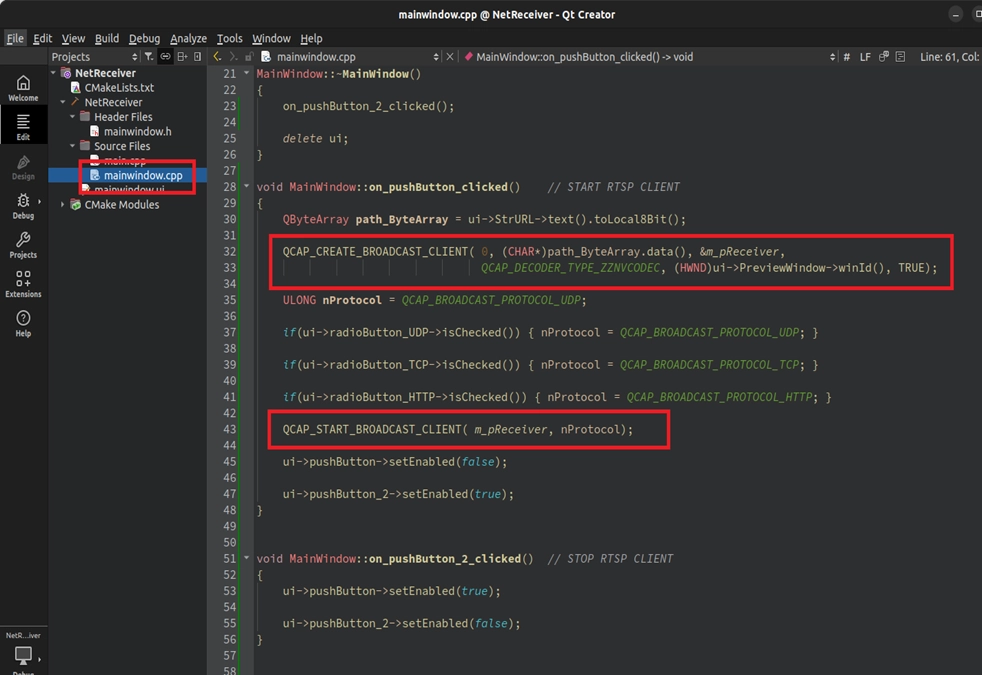
Implementation: START / STOP CLIENT Connection Logic
Next, in the START button, we create the receiving end, determine which communication protocol ( UDP/TCP/HTTP ) is selected on the UI, and officially initiate the connection. The STOP button is responsible for stopping and destroying the object.
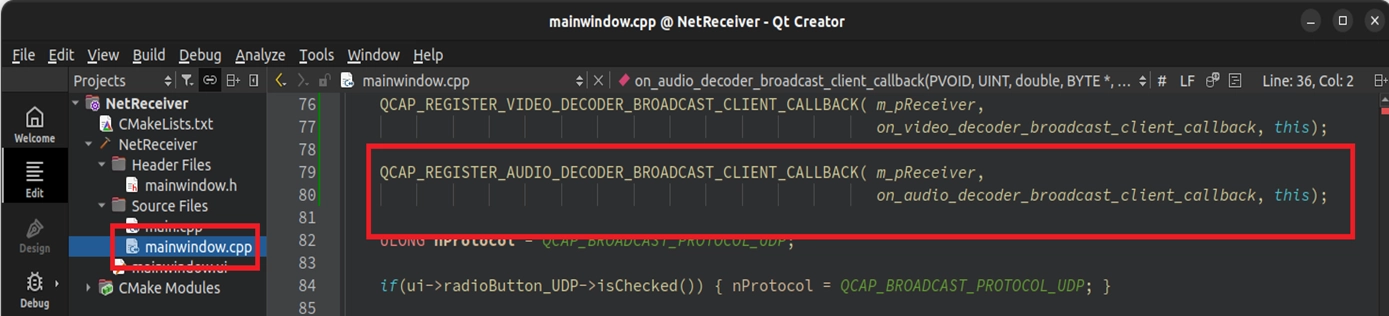
Registering Five Callbacks
After the connection logic is written, we need to register the five Callbacks we learned earlier into the START button. Please add the following code after QCAP_CREATE in the START button:
• QCAP_REGISTER_BROADCAST_CLIENT_CONNECTED_CALLBACK
• QCAP_REGISTER_VIDEO_BROADCAST_CLIENT_CALLBACK
• QCAP_REGISTER_AUDIO_BROADCAST_CLIENT_CALLBACK
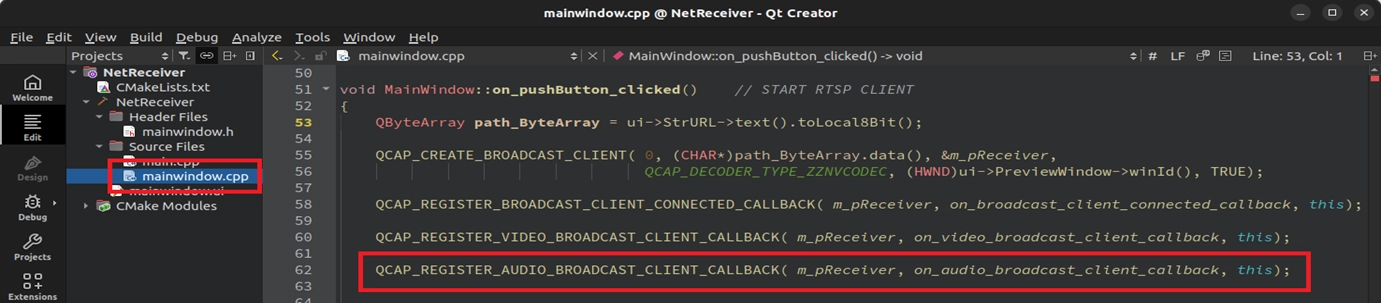
• QCAP_REGISTER_VIDEO_DECODER_BROADCAST_CLIENT_CALLBACK
• QCAP_REGISTER_AUDIO_DECODER_BROADCAST_CLIENT_CALLBACK
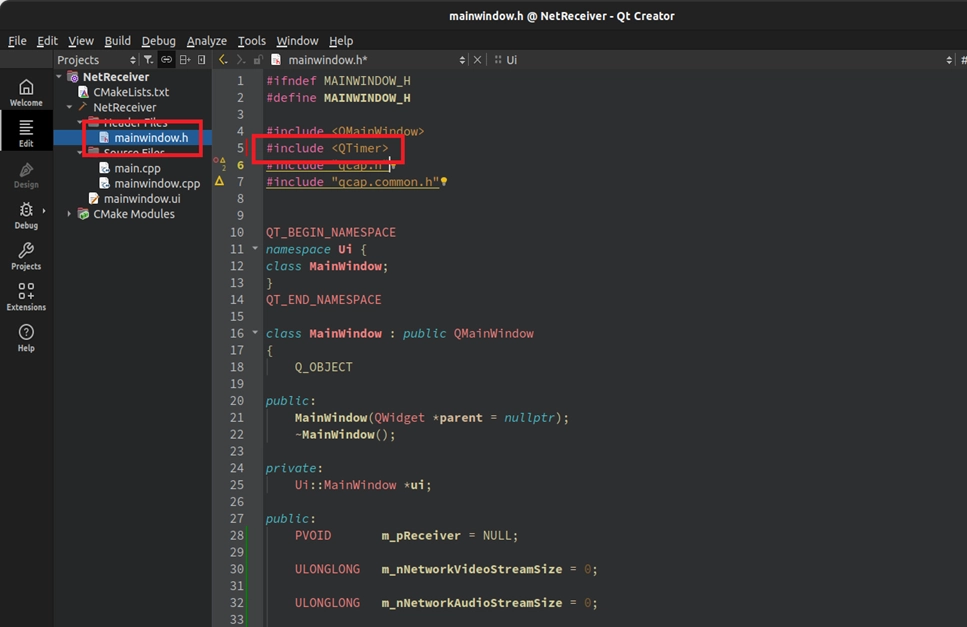
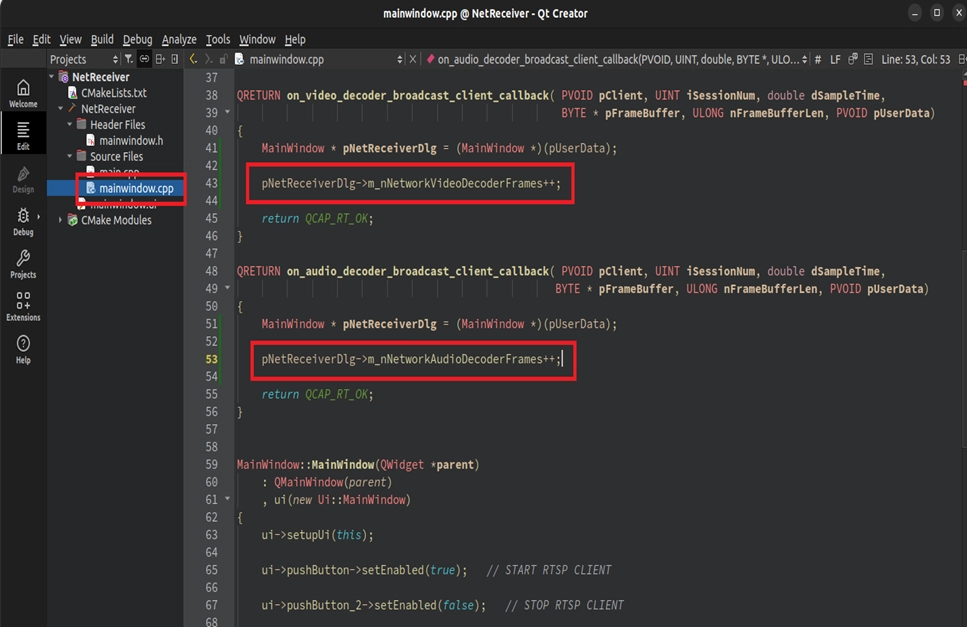
Traffic Statistics and QTimer Real-time Update
To allow the UI to display the receiving status in real-time, please add traffic statistics variables and QTimer in mainwindow.h.
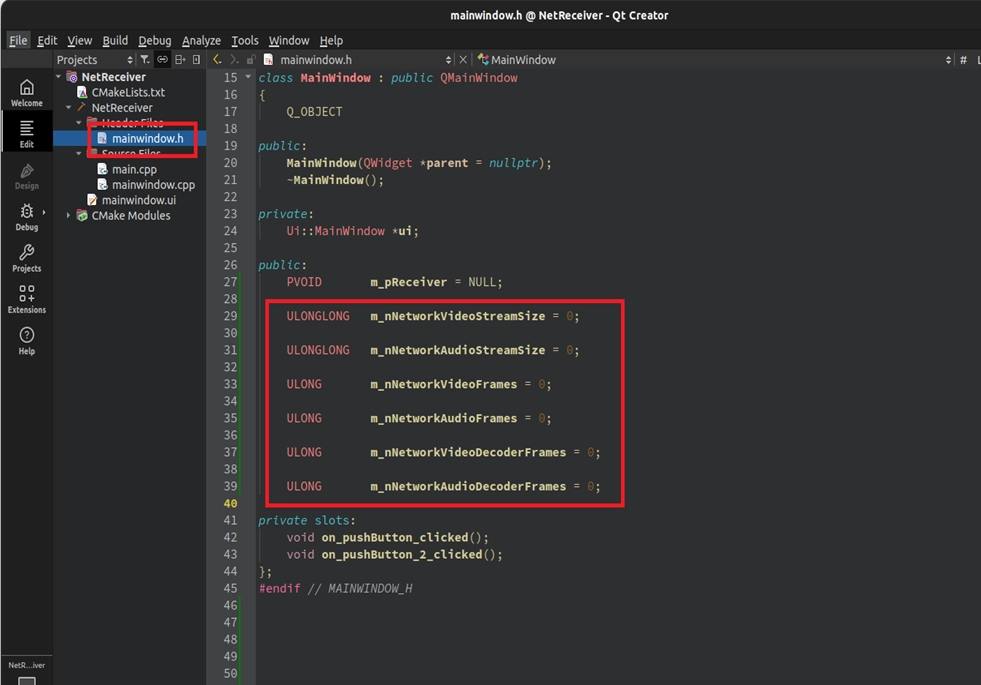

Then, accumulate the data size in the corresponding Callback functions ( e.g.: pNetReceiverDlg->m_nNetworkVideoStreamSize += nStreamBufferLen; ).

Finally, set the interface to update every 1000 milliseconds in mainwindow.cpp :
➤ Reminder : Since QTimer is added, don't forget to add timer->stop(); in the ~MainWindow() destructor to safely close the timer!

Final Verification
Awesome! After the tempering of these past few chapters, we have finally written a dedicated RTSP player with decoding capabilities from scratch! Now is the time to check the results:
1. Start the Sending End ( Server ) : Please go back to our 9-8 RTSP Stream Server Example Tutorial project, compile and run it. After successfully capturing the camera video, click "START RTSP" to let the server start silently broadcasting in the background.
2. Start the Receiving End ( Client ) : Next, compile and run this hot-off-the-press NetReceiver player project we just wrote.
3. Enjoy the Results! Confirm the URL in the input box is rtsp://127.0.0.1:8554/session0.mpg, select the default UDP as the communication protocol, and then press "START CLIENT"!
4. If your camera's video is perfectly displayed in the NetReceiver window, and the VIDEO and AUDIO data below are continuously increasing and updating every second... you've successfully done it!
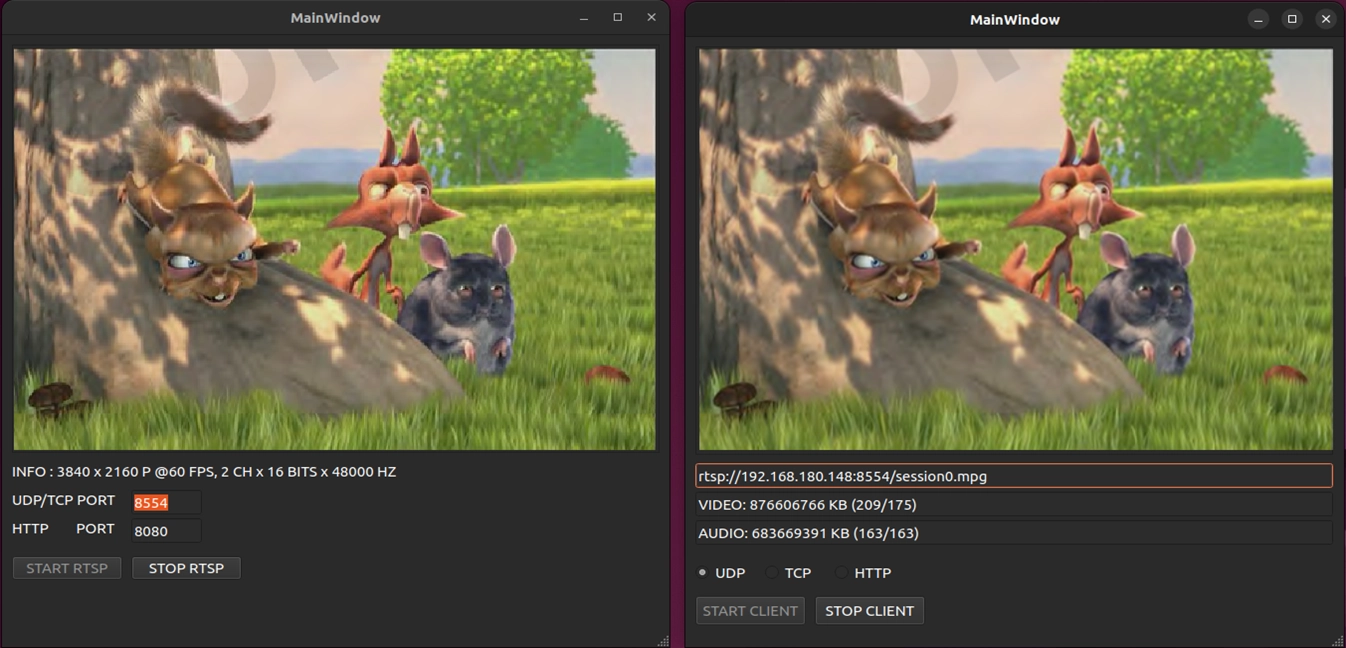
© Blender Foundation | Big Buck Bunny | CC BY 3.0