5-5 Adding to Your Images
Drawing Lines: Make Your Images Pop with Cool Lines!
Ever wanted your code to not just process images, but also draw on them like an artist? That's where OpenCV's line function comes in—it's your "line drawing pen"! It lets you easily draw straight lines on an image, which is super useful for simple markings or creating special visual effects!
line:Your Image "Drawing Pen"!
The line function in OpenCV is used to draw straight lines on an image. All you need to do is tell it the line's start and end points, color, and thickness, and it will draw the line for you.
Function Prototype and Parameters: Tell line How to Draw!
The line function needs a few "commands" to know how to draw:
pt1: cv2.typing.Point,
# This is the starting point (x, y) of the line segment.
pt2: cv2.typing.Point,
# This is the ending point (x, y) of the line segment.
color: cv2.typing.Scalar,
# This is the color of the line (in BGR format).
thickness: int = ...,
# This is the thickness of the line (in pixels).
lineType: int = ...,
# This is the line type (solid, dashed, etc.,
# usually you can use the default).
shift: int = ...)
# The number of fractional bits in the coordinates
# (usually you can use the default).
-> cv2.typing.MatLike: ...
# Returns the image with the line drawn on it!
Return Value: line gives you the image with the line drawn on it!
When line successfully draws a line for you, it will return the new image data.
Hands-On Example: Draw a Red Diagonal Line!
Let's write some code to draw a red line from the top-left to the bottom-right corner of an image!
import cv2 as cv
# Set the path to the original image file.
# Don't forget to replace 'Pandora.png' with your own image!
file_path = "Pandora.png"
# Read the image using OpenCV's imread function.
source_picture = cv.imread(file_path)
# Check if the image was loaded successfully.
if source_picture is None:
print(f"Warning: Oops! Couldn't load the image.")
print(f"Please check if the path is correct: {file_path}")
else:
# --- Create a "canvas copy" of the image ---
# We create a "copy" of the original image called `modified_image`.
# This way, when we draw on `modified_image`,
# we don't affect the original `source_picture`.
# You'll be able to see a side-by-side comparison of the original and
# the modified image!
modified_image = source_picture.copy()
# --- Draw a red line segment on the image! ---
# The cv.line function will draw a line on `modified_image`.
# (0, 0): The starting point of the line, which is the top-left corner of the image.
# (1024, 344): The ending point of the line. This will depend on your image size.
# You can try changing it to
# (modified_image.shape[1]-1, modified_image.shape[0]-1)
# to draw a perfect diagonal line!
# (0, 0, 255): The color of the line. In OpenCV's BGR format, this is pure red.
# 2: The thickness of the line, set to 2 pixels wide here.
cv.line(modified_image, (0, 0), (1024, 344), (0, 0, 255), 2)
# --- Image display loop ---
# Enter an infinite loop to continuously display the image windows.
while True:
# Display the original image.
cv.imshow("Original Picture", source_picture)
# Display the image with the line drawn on it.
cv.imshow("Picture with Line", modified_image) # Clearer window name!
# The cv.waitKey(1) function pauses the program for
# 1 millisecond to check for a key press.
key = cv.waitKey(1)
# If the ESC key (number 27) is pressed, exit the loop and end the display.
if key & 0xFF == 27:
break
# --- Release resources ---
# Finally, close all image windows created by OpenCV to free up computer resources.
cv.destroyAllWindows()
Program Result:

Run the code above, and you'll see two windows: one with your original picture, and another with a red line drawn on it!
By learning the line function, you can do many cool things with your images, such as:
1. Highlighting points: Draw lines to mark important objects or areas.
2. Creating shapes: Draw various geometric shapes like triangles or squares by combining multiple line segments.
3. Assisting analysis: In computer vision tasks, draw lines to visualize algorithm results.
Try changing the coordinates of pt1 and pt2 to draw lines in different positions and directions. You can also change the color and thickness to give your lines different colors and widths!
Drawing Rectangles: Put a Box on Your Image!
Imagine you've taken a great photo and want to label something important or highlight an area. That's when you can "draw a rectangle" on the image! In OpenCV, the rectangle function is your "box-drawing pen," letting you easily add rectangular frames to images. This is super useful for things like marking faces or identifying objects.
rectangle:Your Image "Box-Drawing Pen"!
The rectangle function in OpenCV is used to draw rectangles on an image. You just need to tell it the coordinates of the top-left and bottom-right corners, the color, and the thickness, and it will draw a box for you.
Function Prototype and Parameters: Tell rectangle How to Draw a Box!
The rectangle function needs a few "commands" to know how to draw a box:
def rectangle(img: cv2.typing.MatLike,
pt1: cv2.typing.Point,
# This is the top-left corner's coordinate (x, y).
pt2: cv2.typing.Point,
# This is the bottom-right corner's coordinate (x, y).
color: cv2.typing.Scalar,
# This is the color of the rectangle's border (in BGR format).
thickness: int = ...,
# This is the thickness of the border (in pixels).
lineType: int = ...,
# This is the line type (solid, dashed, etc.,
# usually you can use the default).
shift: int = ...)
# The number of fractional bits in the coordinates
# (usually you can use the default).
-> cv2.typing.MatLike: ... # Returns the image with the box drawn on it!
### **Return Value:** rectangle hands you back the image with your box drawn on it!
When rectangle successfully draws a rectangle for you, it returns the new image data.
Hands-On Example: Draw a Blue Rectangle!
Now let's write some code to draw a blue rectangle on an image!
import cv2 as cv
# Set the path to the original image file.
file_path = "Pandora.png"
# Read the image using OpenCV's imread function.
source_picture = cv.imread(file_path)
# Check if the image was loaded successfully.
if source_picture is None:
print(f"Warning: Couldn't load the image. Please check the path: {file_path}")
else:
# --- Create a "canvas copy" of the image ---
# We create a "copy" of the original image called `modified_image`.
# This way, when we draw on `modified_image`,
# we don't affect the original `source_picture`.
# You'll be able to see a side-by-side comparison of the original and
# the modified image!
modified_image = source_picture.copy()
# --- Draw a blue rectangle on the image! ---
# The cv.rectangle function will draw a box on `modified_image`.
# (30, 30): The top-left corner's coordinate (x=30, y=30).
# (30 + 632, 30 + 200): The bottom-right corner's coordinate.
# This means starting from the top-left corner,
# it extends 632 pixels to the right and 200 pixels down.
# So the actual bottom-right coordinate is (662, 230).
# (255, 0, 0): The color of the rectangle's border.
# In OpenCV's BGR format, this is pure blue.
# 8: The thickness of the border, set to 8 pixels wide here.
cv.rectangle(modified_image, (30, 30), (30 + 632, 30 + 200),
(255, 0, 0), 8)
# --- Image display loop ---
# Enter an infinite loop to continuously display the image windows.
while True:
# Display the original image.
cv.imshow("Original Picture", source_picture)
# Display the image with the rectangle drawn on it.
cv.imshow("Picture with Rectangle", modified_image) # Clearer window name!
# The cv.waitKey(1) function pauses the program for
# 1 millisecond to check for a key press.
key = cv.waitKey(1)
# If the ESC key (number 27) is pressed, exit the loop and end the display.
if key & 0xFF == 27:
break
# --- Release resources ---
# Finally, close all image windows created by OpenCV to free up computer resources.
cv.destroyAllWindows()
Program Result:
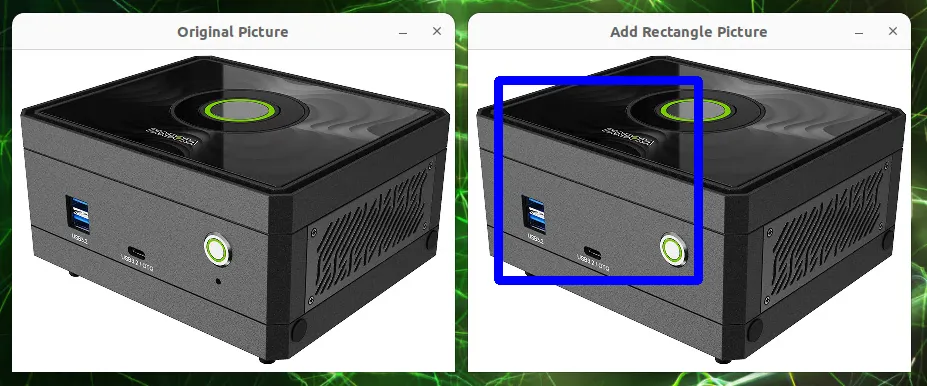
Run the code above, and you'll see two windows: one with your original picture, and another with a blue rectangle drawn on it!
By learning the rectangle function, you can make many practical markings on your images, such as:
1. Marking faces or objects: Draw a rectangle around a face or a specific object after it's been detected.
2. Highlighting key areas: Draw a box on an image to draw the viewer's attention to a specific spot.
3. Creating graphical interfaces: Draw simple boxes on an image to serve as buttons or regions.
Try changing the coordinates of pt1 and pt2 to draw rectangles of different sizes and positions. You can also change the color and thickness to give your boxes different colors and widths!
Drawing Circles: Put a Cute Circle on Your Image!
Want to highlight something with a circle or add some round decorations to your photo? Just like circling a location on a map, OpenCV's circle function is your "compass"! It lets you easily draw circles of various sizes, which is very useful for marking objects or creating special effects
circle: Your Image "Compass"!
The circle function in OpenCV is used to draw circles on an image. You just need to tell it the center's coordinate, the radius, the color, and the line thickness, and it will draw a circle for you.
Function Prototype and Parameters: Tell circle How to Draw!
The circle function needs a few "commands" to know how to draw a circle:
def circle(img: cv2.typing.MatLike,
center: cv2.typing.Point,
# This is the center's coordinate (x, y).
radius: int,
# This is the radius of the circle (in pixels).
color: cv2.typing.Scalar,
# This is the color of the circle's border (in BGR format).
thickness: int = ...,
# This is the thickness of the border (in pixels).
lineType: int = ...,
# This is the line type (solid, dashed, etc., usually you can use the default).
shift: int = ...)
# The number of fractional bits in the coordinates (usually you can use the default).
-> cv2.typing.MatLike: ... # Returns the image with the circle drawn on it!
Return Value: circle gives you the image with your circle drawn on it!
Once circle successfully draws the shape for you, it returns the new image data.
Hands-On Example: Draw a Rotated Magenta Ellipse!
Now, let's write some code to draw a magenta ellipse on an image!
import cv2 as cv
# Set the path to the original image file.
file_path = "Pandora.png"
# Read the image using OpenCV's imread function.
source_picture = cv.imread(file_path)
# Check if the image was loaded successfully.
if source_picture is None:
print(f"Warning: Oops! Couldn't load the image. ")
print("Please check if the path is correct: {file_path}")
else:
# --- Create a "canvas copy" of the image ---
# We create a "copy" of the original image called `modified_image`.
# This way, when we draw on `modified_image`,
# we don't affect the original `source_picture`.
# You'll be able to see a side-by-side comparison of the original and
# the modified image!
modified_image = source_picture.copy()
# --- Draw a green circle on the image! ---
# The cv.circle function will draw a circle on `modified_image`.
# (410, 172): The center's coordinate (x=410, y=172).
# 50: The radius of the circle, set to 50 pixels here.
# (0, 255, 0): The color of the circle's border. In OpenCV's BGR format,
# this is pure green.
# 5: The thickness of the border, set to 5 pixels wide here.
cv.circle(modified_image, (410, 172), 50, (0, 255, 0), 5)
# --- Image display loop ---
# Enter an infinite loop to continuously display the image windows.
while True:
# Display the original image.
cv.imshow("Original Picture", source_picture)
# Display the image with the circle drawn on it.
cv.imshow("Picture with Circle", modified_image) # Clearer window name!
# The cv.waitKey(1) function pauses the program for
# 1 millisecond to check for a key press.
key = cv.waitKey(1)
# If the ESC key (number 27) is pressed, exit the loop and end the display.
if key & 0xFF == 27:
break
# --- Release resources ---
# Finally, close all image windows created by OpenCV to free up computer resources.
cv.destroyAllWindows()
Program Result:
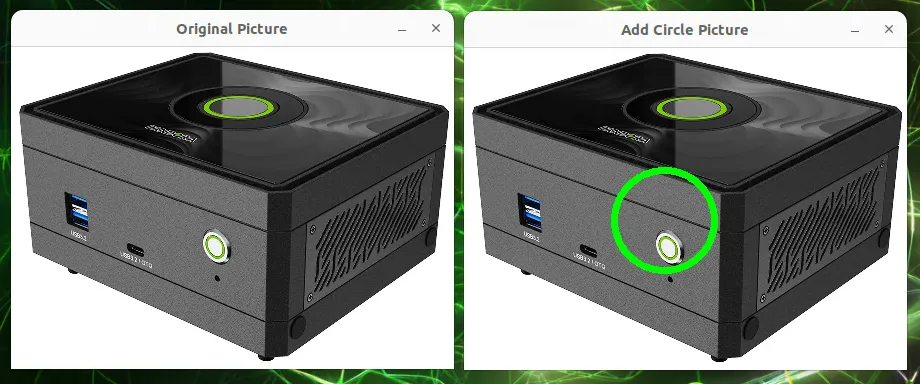
Run the code above, and you'll see two windows: one with your original picture, and another with a green circle drawn on it!
By learning the circle function, you can make many practical markings on your images, such as:
1. Marking eyes or round objects: After detecting eyes or spherical objects, use a circle to draw around them.
2. Creating target indicators: In games or apps, use a circle to indicate a target's location.
3. Adding cute decorations to photos: Add some round design elements to your images.
Try changing the center coordinate to make the circle appear in different places. You can also change the radius to make the circle bigger or smaller, and of course, change the color and thickness to give your circles different colors and widths!
Drawing Ellipses: Add an Elegant Ellipse to Your Image!
You've already learned how to draw lines, rectangles, and circles. Now, do you want to try an even more interesting shape? Like an elegant ellipse! OpenCV's ellipse function is your "ellipse drawing pen." It lets you easily draw ellipses of various sizes, orientations, and colors, which is very useful for marking irregular objects or creating graphic designs.
ellipse: Your Image "Ellipse Drawing Pen"!
The ellipse function in OpenCV is used to draw ellipses on an image. It's a little more complex than drawing a circle because an ellipse has not only a center and size, but also "major and minor axes" and a "rotation angle." But don't worry, OpenCV makes all of this easy to handle!
Function Prototype and Parameters: Tell ellipse How to Draw!
The ellipse function needs a few "commands" to know how to draw an ellipse:
pt1: cv2.typing.Point,
# This is the starting point (x, y) of the line segment.
pt2: cv2.typing.Point,
# This is the ending point (x, y) of the line segment.
color: cv2.typing.Scalar,
# This is the color of the line (in BGR format).
thickness: int = ...,
# This is the thickness of the line (in pixels).
lineType: int = ...,
# This is the line type (solid, dashed, etc.,
# usually you can use the default).
shift: int = ...)
# The number of fractional bits in the coordinates
# (usually you can use the default).
-> cv2.typing.MatLike: ...
# Returns the image with the line drawn on it!
Return Value: line gives you the image with the line drawn on it!
When line successfully draws a line for you, it will return the new image data.
Hands-On Example: Draw a Rotated Magenta Ellipse!
Now, let's write some code to draw a magenta ellipse on an image!
import cv2 as cv
# Set the path to the original image file.
file_path = "Pandora.png"
# Read the image using OpenCV's imread function.
source_picture = cv.imread(file_path)
# Check if the image was loaded successfully.
if source_picture is None:
print(f"Warning: Couldn't load the image. Please check the path: {file_path}")
else:
# --- Create a "canvas copy" of the image ---
# We create a "copy" of the original image called `modified_image`.
# This way, when we draw on `modified_image`,
# we don't affect the original `source_picture`.
# You'll be able to see a side-by-side comparison of the original and the
# modified image!
modified_image = source_picture.copy()
# --- Draw a magenta ellipse on the image! ---
# The cv.ellipse function will draw an ellipse on `modified_image`.
# (650, 172): The center's coordinate (x=650, y=172).
# (100, 130): The half-axis lengths of the ellipse.
# This means the horizontal half-axis is 100 pixels long and
# the vertical is 130.
# (Note: The order here is (x-axis radius, y-axis radius),
# not necessarily major/minor, it depends on the `angle`.)
# 90: The rotation angle of the ellipse, set to 90 degrees counter-clockwise here.
# 0: The starting angle for drawing, starting from 0 degrees.
# 360: The ending angle, ending at 360 degrees, which means a full ellipse is drawn.
# (255, 0, 255): The color of the ellipse's border. In OpenCV's BGR format,
# this is magenta.
# 5: The thickness of the border, set to 5 pixels wide here.
cv.ellipse(modified_image, (650, 172), (100, 130), 90, 0, 360,
(255, 0, 255), 5)
# --- Image display loop ---
# Enter an infinite loop to continuously display the image windows.
while True:
# Display the original image.
cv.imshow("Original Picture", source_picture)
# Display the image with the ellipse drawn on it.
cv.imshow("Picture with Ellipse", modified_image) # Clearer window name!
# The cv.waitKey(1) function pauses the program for
# 1 millisecond to check for a key press.
key = cv.waitKey(1)
# If the ESC key (number 27) is pressed, exit the loop and end the display.
if key & 0xFF == 27:
break
# --- Release resources ---
# Finally, close all image windows created by OpenCV to free up computer resources.
cv.destroyAllWindows()
Program Result:
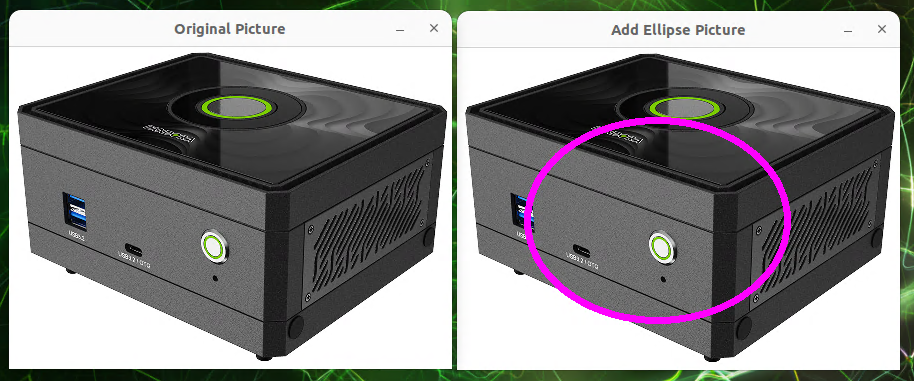
Run the code above, and you'll see two windows: one with your original picture, and another with a magenta ellipse drawn on it!
By learning the ellipse function, you can draw more diverse shapes on your images, such as:
1. Marking irregular objects: If an object isn't a perfect circle or square, an ellipse is a much better way to mark it.
2. Creating special design elements: Add more aesthetically pleasing geometric patterns to your images.
3. Simulating lighting or perspective: By adjusting the ellipse's axes and angle, you can create the illusion of different perspectives.
Try changing the center, axes, and angle parameters to draw ellipses in different positions, sizes, and rotation angles. And of course, you can change the color and thickness to give your ellipses different colors and widths!
Drawing Polygons: Draw Any Shape on Your Image!
You've learned how to draw lines, rectangles, and circles, but what if you want to draw a more free-form, irregular shape? Like drawing anything you want with a pencil on paper! That's where OpenCV's polylines function comes in—it's your "polygon artist"! It lets you draw various polygons on an image by connecting a series of points, which is super useful for marking complex objects or drawing custom designs.
polylines:Your Image "Polygon Artist"!
The polylines function in OpenCV is used to draw one or more polygons on an image. A polygon is a shape made of several straight line segments connected end-to-end. All you need to do is provide the coordinates of all the vertices that make up the polygon, and it will draw it for you.
Function Prototype and Parameters: Tell polylines How to Draw a Polygon!
The polylines function needs a few "commands" to know how to draw a polygon:
def polylines(img: cv2.typing.MatLike,
pts: _typing.Sequence[cv2.typing.MatLike],
# This is the "list of vertices" for the polygon.
# It needs a list containing one or more point arrays.
isClosed: bool,
# This is a boolean (True/False) that decides whether
# the last point should be connected back to the first one,
# forming a closed shape.
color: cv2.typing.Scalar,
# This is the color of the polygon's lines (in BGR format).
thickness: int = ...,
# This is the thickness of the polygon's lines (in pixels).
lineType: int = ...,
# This is the line type (solid, dashed, etc.,
# usually you can use cv.LINE_AA for smoother lines).
shift: int = ...)
# The number of fractional bits in the coordinates
# (usually you can use the default).
-> cv2.typing.MatLike: ... # Returns the image with the polygon(s) drawn on it!
Return Value: polylines gives you back the image with all your shapes drawn on it!
Once polylines successfully draws the polygon(s) for you, it returns the new image data.
Hands-On Example: Draw a Yellow Pentagon!
Now, let's write some code to draw a yellow pentagon on an image!
import cv2 as cv
import numpy as np # We need NumPy to handle the point coordinates
# Set the path to the original image file.
file_path = "Pandora.png"
# Read the image using OpenCV's imread function.
source_picture = cv.imread(file_path)
# Check if the image was loaded successfully.
if source_picture is None:
print(f"Warning: Oops! Couldn't load the image. ")
print(f"Please check if the path is correct: {file_path}")
else:
# --- Create a "canvas copy" of the image ---
# We create a "copy" of the original image called `modified_image`.
# This way, when we draw on `modified_image`,
# we don't affect the original `source_picture`.
# You'll be able to see a side-by-side comparison of the original and
# the modified image!
modified_image = source_picture.copy()
# --- Define the "vertices" coordinates of the polygon ---
# These points will be connected in order to form the sides of the polygon.
# The coordinates must be of integer type (np.int32).
pts = np.int32([
[285, 215], # First point
[354, 175], # Second point
[415, 227], # Third point
[381, 300], # Fourth point
[305, 295] # Fifth point
])
# --- Adjust the data format of the points ---
# The polylines function expects the points to be in a format like this:
# [[[x1,y1]], [[x2,y2]], ...].
# So we need to use the reshape function to adjust the point array.
# `(-1, 1, 2)` means:
# -1: Let NumPy automatically calculate the number of points.
# 1: Treat each point group as a separate array
# (used for drawing multiple disconnected polygons).
# 2: Each point has two coordinates, x and y.
pts = pts.reshape((-1, 1, 2))
# --- Draw a yellow polygon on the image! ---
# The cv.polylines function will draw a polygon on `modified_image`.
# `[pts]`: Here we wrap `pts` in square brackets to indicate
# we have only one polygon to draw.
# `True`: `isClosed` is set to True, which means the last point will
# be connected to the first,
# forming a closed pentagon.
# `(0, 255, 255)`: The color of the polygon's lines. In OpenCV's BGR format,
# this is yellow.
# `5`: The thickness of the lines, set to 5 pixels wide here.
# `cv.LINE_AA`: Use "anti-aliasing" mode to draw smoother, nicer-looking lines.
cv.polylines(modified_image, [pts], True, (0, 255, 255), 5, cv.LINE_AA)
# --- Image display loop ---
# Enter an infinite loop to continuously display the image windows.
while True:
# Display the original image.
cv.imshow("Original Picture", source_picture)
# Display the image with the polygon drawn on it.
cv.imshow("Picture with Polygon", modified_image) # Clearer window name!
# The cv.waitKey(1) function pauses the program for
# 1 millisecond to check for a key press.
key = cv.waitKey(1)
# If the ESC key (number 27) is pressed, exit the loop and end the display.
if key & 0xFF == 27:
break
# --- Release resources ---
# Finally, close all image windows created by OpenCV to free up computer resources.
cv.destroyAllWindows()
Program Result:
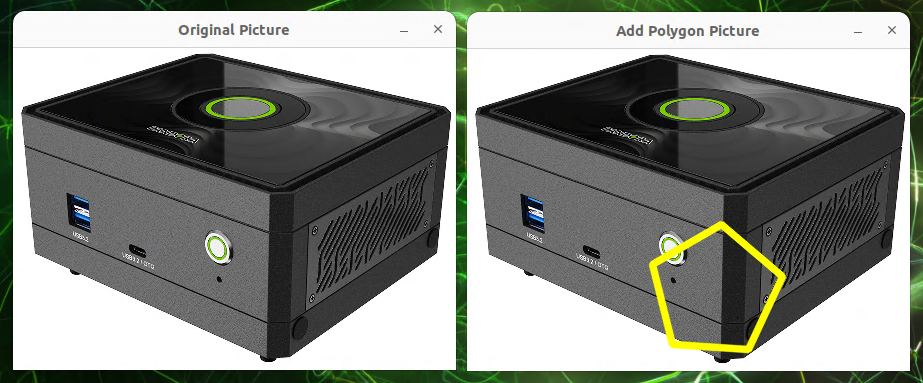
Run the code above, and you'll see two windows: one with your original picture, and another with a yellow pentagon drawn on it!
By learning the polylines function, you can draw any complex shape made of straight line segments on your images, which is very useful for many applications, such as:
1. Marking irregular regions: Circle an irregularly shaped object, like a country's border on a map or a person's outline.
2. Custom pattern design: Draw unique geometric patterns or design elements on an image.
3. Drawing game maps: Define walkable areas or obstacle boundaries for a game character.
Try changing the coordinates and number of points in pts to draw polygons of different shapes. You can also change the isClosed parameter to see the difference between an open polygon and a closed one!
Adding Text: Write a Message on Your Image!
Ever thought about adding text directly onto an image, like a watermark, title, or a description for an object? Just like writing a date or a note on a photo, OpenCV's putText function is your "text pen"! It lets you easily write text on an image, which is very practical for creating image labels and custom images!
Function Prototype and Parameters: Tell putText How to Write!
The putText function needs a few "commands" to know how to write text:
text: str,
# This is the "text content" you want to write (a string).
org: cv2.typing.Point,
# This is the starting coordinate (x, y) of the text's bottom-left corner.
fontFace: int,
# This is the "font type" of the text.
fontScale: float,
# This is the "scaling factor" of the text
# (the larger the number, the bigger the text).
color: cv2.typing.Scalar,
# This is the color of the text (in BGR format).
thickness: int = ...,
# This is the thickness of the text strokes (in pixels).
lineType: int = ...,
# This is the line type (usually you can use the default).
bottomLeftOrigin: bool = ...)
# Decides if the text origin is the bottom-left corner
# (usually you can use the default).
-> cv2.typing.MatLike: ... # Returns the image with the text written on it!
Return Value: putText gives you back the image with your text written on it!
Once putText successfully writes the text for you, it returns the new image data.
Hands-On Example: Write "Pandora"!
Now, let's write some code to write the text "Pandora" on an image and make it red!
import cv2 as cv
# Set the path to the original image file.
file_path = "Pandora.png"
# Read the image using OpenCV's imread function.
source_picture = cv.imread(file_path)
# Check if the image was loaded successfully.
if source_picture is None:
print(f"Warning: Oops! Couldn't load the image.")
print(f"Please check if the path is correct: {file_path}")
else:
# --- Create a "canvas copy" of the image ---
# We create a "copy" of the original image called `modified_image`.
# This way, when we write on `modified_image`,
# we don't affect the original `source_picture`.
# You'll be able to see a side-by-side comparison of the original and
# the modified image!
modified_image = source_picture.copy()
# --- Write text on the image! ---
# The cv.putText function will write text on `modified_image`.
# 'Pandora': The text content we want to write.
# (270, 125): The starting coordinate (x=270, y=125) of the text's
# bottom-left corner.
# cv.FONT_HERSHEY_SIMPLEX: We've chosen to use this common and simple font.
# 1.0: The font scaling factor, set to 1.0x size here.
# (0, 0, 255): The color of the text. In OpenCV's BGR format, this is pure red.
# 3: The thickness of the text strokes, set to 3 pixels wide here.
cv.putText(modified_image, 'Pandora', (270, 125), cv.FONT_HERSHEY_SIMPLEX,
1.0, (0, 0, 255), 3)
# --- Image display loop ---
# Enter an infinite loop to continuously display the image windows.
while True:
# Display the original image.
cv.imshow("Original Picture", source_picture)
# Display the image with the text written on it.
cv.imshow("Picture with Text", modified_image) # Clearer window name!
# The cv.waitKey(1) function pauses the program for
# 1 millisecond to check for a key press.
key = cv.waitKey(1)
# If the ESC key (number 27) is pressed, exit the loop and end the display.
if key & 0xFF == 27:
break
# --- Release resources ---
# Finally, close all image windows created by OpenCV to free up computer resources.
cv.destroyAllWindows()
Program Result:
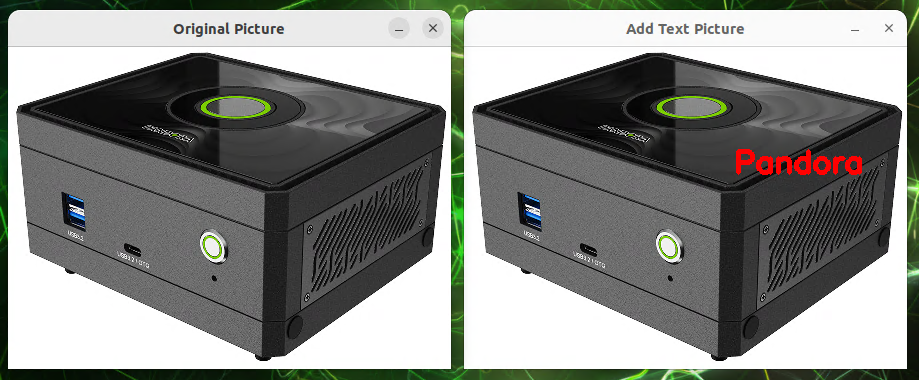
Run the code above, and you'll see two windows: one with your original picture, and another with the text "Pandora" written on it!
By learning the putText function, you can easily add text to your images, which is very useful for many applications, such as:
1. Image watermarks: Add your name or brand name to an image.
2. Image annotation: Add text descriptions for objects or areas in an image.
3. Creating custom images: For example, writing text directly on a birthday card or invitation.
4. Displaying image recognition results: After detecting faces or text, you can label them directly on the image.
Try changing the text parameter to write different messages. You can also adjust the org coordinate to make the text appear in different places. And of course, changing fontFace, fontScale, color, and thickness will give your text different fonts, sizes, colors, and widths!