5-5 画像への描画・追加
線の描画: 写真にクールな線を描画します!
画像を処理するだけでなく、画家のように画像に線を引けるアプリケーションが欲しいと思いませんか?OpenCVの ライン 関数は、あなたの「ラインブラシ」です!単純なマークアップであれ、特別な視覚効果であれ、画像に簡単に直線を引くことができ、とても便利です!
line: 画像の「線ブラシ」.
line 関数は, OpenCVで 画像に直線を描くために使われます.線の始点、終点、色、太さを指定するだけで、画像に線を引くことができます。
関数のプロトタイプとパラメータ:lineに線を引く方法を教える!
line関数は、線を引く方法を知るためにいくつかの "指示 "を必要とします:
pt1: cv2.typing.Point,
# This is the starting point (x, y) of the line segment.
pt2: cv2.typing.Point,
# This is the ending point (x, y) of the line segment.
color: cv2.typing.Scalar,
# This is the color of the line (in BGR format).
thickness: int = ...,
# This is the thickness of the line (in pixels).
lineType: int = ...,
# This is the line type (solid, dashed, etc.,
# usually you can use the default).
shift: int = ...)
# The number of fractional bits in the coordinates
# (usually you can use the default).
-> cv2.typing.MatLike: ...
# Returns the image with the line drawn on it!
戻り値:lineは、あなたが線を引いた絵を返します!
lineがうまく線を引いたら、新しい画像データを送り返す!
例:写真に赤い斜線を引く!
では、絵の左上から右下に向かって赤い線を引くプログラムを書いてみよう!
import cv2 as cv
# Set the path to the original image file.
# Don't forget to replace 'Pandora.png' with your own image!
file_path = "Pandora.png"
# Read the image using OpenCV's imread function.
source_picture = cv.imread(file_path)
# Check if the image was loaded successfully.
if source_picture is None:
print(f"Warning: Oops! Couldn't load the image.")
print(f"Please check if the path is correct: {file_path}")
else:
# --- Create a "canvas copy" of the image ---
# We create a "copy" of the original image called `modified_image`.
# This way, when we draw on `modified_image`,
# we don't affect the original `source_picture`.
# You'll be able to see a side-by-side comparison of the original and
# the modified image!
modified_image = source_picture.copy()
# --- Draw a red line segment on the image! ---
# The cv.line function will draw a line on `modified_image`.
# (0, 0): The starting point of the line, which is the top-left corner of the image.
# (1024, 344): The ending point of the line. This will depend on your image size.
# You can try changing it to
# (modified_image.shape[1]-1, modified_image.shape[0]-1)
# to draw a perfect diagonal line!
# (0, 0, 255): The color of the line. In OpenCV's BGR format, this is pure red.
# 2: The thickness of the line, set to 2 pixels wide here.
cv.line(modified_image, (0, 0), (1024, 344), (0, 0, 255), 2)
# --- Image display loop ---
# Enter an infinite loop to continuously display the image windows.
while True:
# Display the original image.
cv.imshow("Original Picture", source_picture)
# Display the image with the line drawn on it.
cv.imshow("Picture with Line", modified_image) # Clearer window name!
# The cv.waitKey(1) function pauses the program for
# 1 millisecond to check for a key press.
key = cv.waitKey(1)
# If the ESC key (number 27) is pressed, exit the loop and end the display.
if key & 0xFF == 27:
break
# --- Release resources ---
# Finally, close all image windows created by OpenCV to free up computer resources.
cv.destroyAllWindows()
プログラミングの結果

上のコードを実行すると、2つのウィンドウが表示されます。1つは元の絵、もう1つは赤い線が引かれた絵です!
line関数を覚えたら、写真を使っていろいろ面白いことができます:
- ポイントをマークする: 重要なオブジェクトやエリアをマークするために写真に線を引く。
- 図形を作る: 三角形や四角形などの幾何学図形を(複数の線を組み合わせて)描く。
- 解析の 補助**:** コンピュータ・ビジョンのタスクでは、アルゴリズムの結果を視覚化するために線を引きます。
pt1 と pt2 の座標を変えて、異なる位置や向きの線を描いてみたり、色や太さを変えて、異なる色や太さの線を描くこともできます!
画像に矩形を追加: 画像に矩形を描きます!
素敵な写真を撮ったとき、その写真に何か重要な印をつけたり、ある部分を強調したいと思ったことはありませんか?それなら、画像に「矩形を描く」ことができます! OpenCVでは ,矩形 関数は「ペイントブラシ」であり,簡単に画像に矩形のボックスを追加することができます.
矩形: 写真の「フレームペン」!
OpenCVでは ,矩形 関数を用いて画像上に矩形を描画します.矩形の左上隅と右下隅の座標、色、太さを指定するだけで、矩形は画像上に枠を描画します。
関数のプロトタイプとパラメータ:rectangleにボックスの描画方法を指示する!
rectangle関数は、どのようにボックスを描画するかを知るために、いくつかの "指示 "を必要とする:
def rectangle(img: cv2.typing.MatLike,
pt1: cv2.typing.Point,
# This is the top-left corner's coordinate (x, y).
pt2: cv2.typing.Point,
# This is the bottom-right corner's coordinate (x, y).
color: cv2.typing.Scalar,
# This is the color of the rectangle's border (in BGR format).
thickness: int = ...,
# This is the thickness of the border (in pixels).
lineType: int = ...,
# This is the line type (solid, dashed, etc.,
# usually you can use the default).
shift: int = ...)
# The number of fractional bits in the coordinates
# (usually you can use the default).
-> cv2.typing.MatLike: ... # Returns the image with the box drawn on it!
戻り値:rectangleは、あなたがボックスを描いた絵をあなたに返す!
rectangleがあなたのために矩形を描くことに成功したら、新しい画像データをあなたに送ります。
例:写真に青い矩形を描く!
では、絵の上に青い四角形を描くプログラムを書いてみよう!
import cv2 as cv
# Set the path to the original image file.
file_path = "Pandora.png"
# Read the image using OpenCV's imread function.
source_picture = cv.imread(file_path)
# Check if the image was loaded successfully.
if source_picture is None:
print(f"Warning: Couldn't load the image. Please check the path: {file_path}")
else:
# --- Create a "canvas copy" of the image ---
# We create a "copy" of the original image called `modified_image`.
# This way, when we draw on `modified_image`,
# we don't affect the original `source_picture`.
# You'll be able to see a side-by-side comparison of the original and
# the modified image!
modified_image = source_picture.copy()
# --- Draw a blue rectangle on the image! ---
# The cv.rectangle function will draw a box on `modified_image`.
# (30, 30): The top-left corner's coordinate (x=30, y=30).
# (30 + 632, 30 + 200): The bottom-right corner's coordinate.
# This means starting from the top-left corner,
# it extends 632 pixels to the right and 200 pixels down.
# So the actual bottom-right coordinate is (662, 230).
# (255, 0, 0): The color of the rectangle's border.
# In OpenCV's BGR format, this is pure blue.
# 8: The thickness of the border, set to 8 pixels wide here.
cv.rectangle(modified_image, (30, 30), (30 + 632, 30 + 200),
(255, 0, 0), 8)
# --- Image display loop ---
# Enter an infinite loop to continuously display the image windows.
while True:
# Display the original image.
cv.imshow("Original Picture", source_picture)
# Display the image with the rectangle drawn on it.
cv.imshow("Picture with Rectangle", modified_image) # Clearer window name!
# The cv.waitKey(1) function pauses the program for
# 1 millisecond to check for a key press.
key = cv.waitKey(1)
# If the ESC key (number 27) is pressed, exit the loop and end the display.
if key & 0xFF == 27:
break
# --- Release resources ---
# Finally, close all image windows created by OpenCV to free up computer resources.
cv.destroyAllWindows()
プログラミングの結果
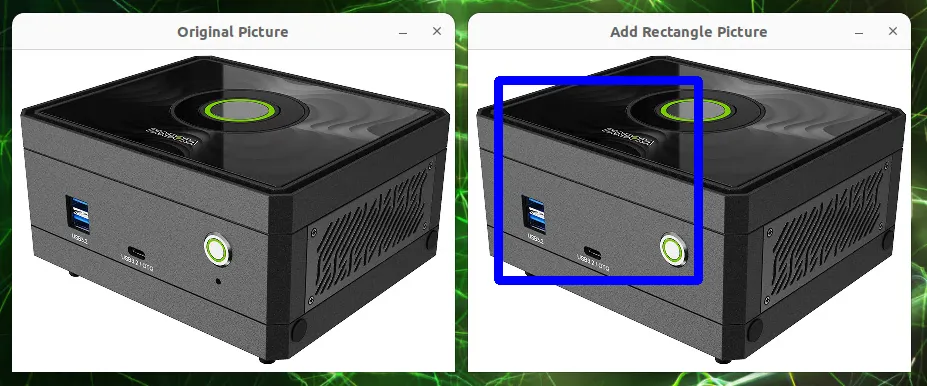
上のコードを実行すると、2つのウィンドウが表示されます。1つは元の画像で、もう1つは青い四角形が描かれた画像です!
矩形関数を学んだことで、例えば、写真に多くの便利なマークを付けることができます:
- 顔やオブジェクトのマーク:顔や特定のオブジェクトを検出したら、長方形で囲みます。
- 興味のある部分を強調する:写真上にボックスを描いて、特定の部分に見る人の注意を引く。
- グラフィカル・インターフェイスの作成: 写真上にボタンや領域として簡単なボックスを描きます。
pt1とpt2の座標を変えて、大きさや位置の異なる長方形を描いてみましょう。また、色や太さを変えて、ボックスの色や太さを変えることもできます!
画像に丸をつける:画像にかわいい丸をつけましょう!
画像に丸いアクセントをつけたり、写真に丸い形を追加したいですか?地図上で場所を丸で囲むように、OpenCVの 円 関数はあなたの「円定規」です!画像に簡単に円を描くことができるので、オブジェクトにラベルを付けたり、特殊効果を作成したりするのに便利です!
circle: 画像の「円定規」!
OpenCVのcircle 関数は、画像上に円を描くために使われます。円の中心の座標、半径、色、線の太さを指定するだけで、画像上に円を描いてくれます。
関数のプロトタイプとパラメータ:円を描く方法をcircleに伝える!
circle関数は、円を描く方法を知るためにいくつかの "指示 "を必要とする:
def circle(img: cv2.typing.MatLike,
center: cv2.typing.Point,
# This is the center's coordinate (x, y).
radius: int,
# This is the radius of the circle (in pixels).
color: cv2.typing.Scalar,
# This is the color of the circle's border (in BGR format).
thickness: int = ...,
# This is the thickness of the border (in pixels).
lineType: int = ...,
# This is the line type (solid, dashed, etc., usually you can use the default).
shift: int = ...)
# The number of fractional bits in the coordinates (usually you can use the default).
-> cv2.typing.MatLike: ... # Returns the image with the circle drawn on it!
戻り値:circleはあなたに円の絵を与える!
circleがあなたのために円を描くことに成功したら、新しい画像データを送り返す!
例:写真に緑の円を描く!
では、絵の上に緑の円を描くプログラムを書いてみよう!
import cv2 as cv
# Set the path to the original image file.
file_path = "Pandora.png"
# Read the image using OpenCV's imread function.
source_picture = cv.imread(file_path)
# Check if the image was loaded successfully.
if source_picture is None:
print(f"Warning: Oops! Couldn't load the image. ")
print("Please check if the path is correct: {file_path}")
else:
# --- Create a "canvas copy" of the image ---
# We create a "copy" of the original image called `modified_image`.
# This way, when we draw on `modified_image`,
# we don't affect the original `source_picture`.
# You'll be able to see a side-by-side comparison of the original and
# the modified image!
modified_image = source_picture.copy()
# --- Draw a green circle on the image! ---
# The cv.circle function will draw a circle on `modified_image`.
# (410, 172): The center's coordinate (x=410, y=172).
# 50: The radius of the circle, set to 50 pixels here.
# (0, 255, 0): The color of the circle's border. In OpenCV's BGR format,
# this is pure green.
# 5: The thickness of the border, set to 5 pixels wide here.
cv.circle(modified_image, (410, 172), 50, (0, 255, 0), 5)
# --- Image display loop ---
# Enter an infinite loop to continuously display the image windows.
while True:
# Display the original image.
cv.imshow("Original Picture", source_picture)
# Display the image with the circle drawn on it.
cv.imshow("Picture with Circle", modified_image) # Clearer window name!
# The cv.waitKey(1) function pauses the program for
# 1 millisecond to check for a key press.
key = cv.waitKey(1)
# If the ESC key (number 27) is pressed, exit the loop and end the display.
if key & 0xFF == 27:
break
# --- Release resources ---
# Finally, close all image windows created by OpenCV to free up computer resources.
cv.destroyAllWindows()
プログラミングの結果
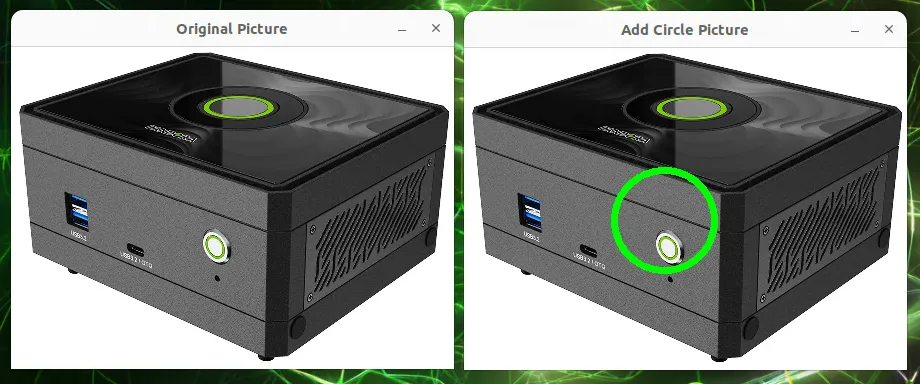
上のコードを実行すると、2つのウィンドウが表示されます:1つは元の写真、もう1つは緑の円が描かれた写真です!
円の機能を覚えると、写真に便利なマークを付けることができます:
- 目や丸いものをマークする:目やボールが検出されたら、丸で囲む。
- ターゲットを示す:ゲームやアプリケーションで、ターゲットの位置を丸で示します。
- 写真にキュートな装飾を加える:写真に丸いデザイン要素を加えてみましょう。
中心の座標を変更して円をさまざまな位置に表示したり、半径を変更して円を大きくしたり小さくしたり、もちろん色や太さを変更してさまざまな色や太さの円にすることもできます!
画像に楕円を追加:あなたの写真にエレガントな楕円を表示させます!
線、長方形、円を画像に描くことはすでに学びましたが、もっと面白い形にチャレンジしてみませんか?OpenCVの 楕円 関数は、あなたの "楕円ブラシ "です。様々な大きさ、向き、色の楕円を簡単に写真に描くことができ、不規則なオブジェクトをマークしたり、形をデザインしたりするのに便利です!
楕円: 写真用の楕円ブラシです!
楕円 関数は、 OpenCVで 画像上に楕円を描くために使用されます。楕円の中心や大きさに加え、「長軸」と「短軸」、「回転角度」という概念もあるため、円を描くよりも少し複雑です。しかし、OpenCVはこれを簡単に行うことができるのでご心配なく!
関数のプロトタイプとパラメータ:楕円をどのように描くかを ellipse に伝えます!
ellipse関数は、楕円の描き方を知るためにいくつかの "指示 "を必要とします:
pt1: cv2.typing.Point,
# This is the starting point (x, y) of the line segment.
pt2: cv2.typing.Point,
# This is the ending point (x, y) of the line segment.
color: cv2.typing.Scalar,
# This is the color of the line (in BGR format).
thickness: int = ...,
# This is the thickness of the line (in pixels).
lineType: int = ...,
# This is the line type (solid, dashed, etc.,
# usually you can use the default).
shift: int = ...)
# The number of fractional bits in the coordinates
# (usually you can use the default).
-> cv2.typing.MatLike: ...
# Returns the image with the line drawn on it!
戻り値:ellipseは楕円の絵を与える!
ellipseがあなたのために楕円を描くことに成功したら、新しい画像データを送り返します。
例:回転するマゼンタ色の楕円を画像上に描く!
それでは、マゼンタ色の楕円を絵の上に描くプログラムを書いてみましょう!
import cv2 as cv
# Set the path to the original image file.
file_path = "Pandora.png"
# Read the image using OpenCV's imread function.
source_picture = cv.imread(file_path)
# Check if the image was loaded successfully.
if source_picture is None:
print(f"Warning: Couldn't load the image. Please check the path: {file_path}")
else:
# --- Create a "canvas copy" of the image ---
# We create a "copy" of the original image called `modified_image`.
# This way, when we draw on `modified_image`,
# we don't affect the original `source_picture`.
# You'll be able to see a side-by-side comparison of the original and the
# modified image!
modified_image = source_picture.copy()
# --- Draw a magenta ellipse on the image! ---
# The cv.ellipse function will draw an ellipse on `modified_image`.
# (650, 172): The center's coordinate (x=650, y=172).
# (100, 130): The half-axis lengths of the ellipse.
# This means the horizontal half-axis is 100 pixels long and
# the vertical is 130.
# (Note: The order here is (x-axis radius, y-axis radius),
# not necessarily major/minor, it depends on the `angle`.)
# 90: The rotation angle of the ellipse, set to 90 degrees counter-clockwise here.
# 0: The starting angle for drawing, starting from 0 degrees.
# 360: The ending angle, ending at 360 degrees, which means a full ellipse is drawn.
# (255, 0, 255): The color of the ellipse's border. In OpenCV's BGR format,
# this is magenta.
# 5: The thickness of the border, set to 5 pixels wide here.
cv.ellipse(modified_image, (650, 172), (100, 130), 90, 0, 360,
(255, 0, 255), 5)
# --- Image display loop ---
# Enter an infinite loop to continuously display the image windows.
while True:
# Display the original image.
cv.imshow("Original Picture", source_picture)
# Display the image with the ellipse drawn on it.
cv.imshow("Picture with Ellipse", modified_image) # Clearer window name!
# The cv.waitKey(1) function pauses the program for
# 1 millisecond to check for a key press.
key = cv.waitKey(1)
# If the ESC key (number 27) is pressed, exit the loop and end the display.
if key & 0xFF == 27:
break
# --- Release resources ---
# Finally, close all image windows created by OpenCV to free up computer resources.
cv.destroyAllWindows()
プログラミングの結果
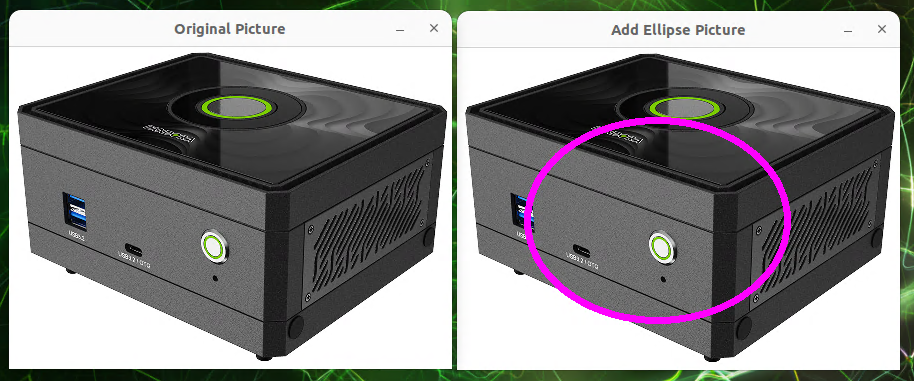
上のコードを実行すると、2つのウィンドウが表示されます。1つは元の画像で、もう1つはマゼンタ色の楕円が描かれています!
楕円関数を学んだ後は、例えば、もっと多くの図形を写真に描くことができます:
- 不規則なオブジェクトをマークする:オブジェクトが円や正方形でない場合、楕円はそれをマークするためのより良い方法です。
- 特別なデザイン要素を作成する: あなたの写真に、より美的な幾何学的パターンを追加します。
- 光や遠近効果をシミュレートする: 楕円の長さと角度を調整して、異なる視野角の錯覚を作り出します。
中心、軸、角度のパラメータを変更して、異なる位置、サイズ、回転角度の楕円を描いてみることができます。もちろん、色と太さを変更することで、異なる色と太さの楕円を作成することもできます!
画像に多角形を追加:画像にどんな形でも描けます!
写真に線、長方形、円を描くことはすでに学びましたが、もっと自由な形、不規則な形を描きたい場合はどうしますか?それは,紙に鉛筆で好きなものを描くようなものです.OpenCV の polylines 関数は,あなたの「多角形ペインター」です.この関数を使うと、一連の点を結んで画像上に多角形を描くことができるので、複雑なオブジェクトにラベルを付けたり、カスタムパターンを描いたりするのに便利です!
polylines: 写真の「多角形ペインター」!
ポリライン 関数は、 OpenCVで1つまたは複数のポリゴンを画像上に描画するために使用されます。多角形とは、始点と終点で結ばれた複数の直線で構成される絵のことです。多角形を構成するすべての頂点の座標を与えることで,簡単に多角形を描くことができます.
関数のプロトタイプとパラメータ:polylinesに多角形の描画方法を指示する!
polylines関数は、多角形の描き方を知るためにいくつかの「命令」を必要とします:
def polylines(img: cv2.typing.MatLike,
pts: _typing.Sequence[cv2.typing.MatLike],
# This is the "list of vertices" for the polygon.
# It needs a list containing one or more point arrays.
isClosed: bool,
# This is a boolean (True/False) that decides whether
# the last point should be connected back to the first one,
# forming a closed shape.
color: cv2.typing.Scalar,
# This is the color of the polygon's lines (in BGR format).
thickness: int = ...,
# This is the thickness of the polygon's lines (in pixels).
lineType: int = ...,
# This is the line type (solid, dashed, etc.,
# usually you can use cv.LINE_AA for smoother lines).
shift: int = ...)
# The number of fractional bits in the coordinates
# (usually you can use the default).
-> cv2.typing.MatLike: ... # Returns the image with the polygon(s) drawn on it!
戻り値:polylinesは多角形の画像を返す!
polylinesは多角形の描画に成功すると、新しい画像データを送ってくれます。
例:黄色い五角形を描画する!
では、黄色い五角形を描くプログラムを書いてみよう!
import cv2 as cv
import numpy as np # We need NumPy to handle the point coordinates
# Set the path to the original image file.
file_path = "Pandora.png"
# Read the image using OpenCV's imread function.
source_picture = cv.imread(file_path)
# Check if the image was loaded successfully.
if source_picture is None:
print(f"Warning: Oops! Couldn't load the image. ")
print(f"Please check if the path is correct: {file_path}")
else:
# --- Create a "canvas copy" of the image ---
# We create a "copy" of the original image called `modified_image`.
# This way, when we draw on `modified_image`,
# we don't affect the original `source_picture`.
# You'll be able to see a side-by-side comparison of the original and
# the modified image!
modified_image = source_picture.copy()
# --- Define the "vertices" coordinates of the polygon ---
# These points will be connected in order to form the sides of the polygon.
# The coordinates must be of integer type (np.int32).
pts = np.int32([
[285, 215], # First point
[354, 175], # Second point
[415, 227], # Third point
[381, 300], # Fourth point
[305, 295] # Fifth point
])
# --- Adjust the data format of the points ---
# The polylines function expects the points to be in a format like this:
# [[[x1,y1]], [[x2,y2]], ...].
# So we need to use the reshape function to adjust the point array.
# `(-1, 1, 2)` means:
# -1: Let NumPy automatically calculate the number of points.
# 1: Treat each point group as a separate array
# (used for drawing multiple disconnected polygons).
# 2: Each point has two coordinates, x and y.
pts = pts.reshape((-1, 1, 2))
# --- Draw a yellow polygon on the image! ---
# The cv.polylines function will draw a polygon on `modified_image`.
# `[pts]`: Here we wrap `pts` in square brackets to indicate
# we have only one polygon to draw.
# `True`: `isClosed` is set to True, which means the last point will
# be connected to the first,
# forming a closed pentagon.
# `(0, 255, 255)`: The color of the polygon's lines. In OpenCV's BGR format,
# this is yellow.
# `5`: The thickness of the lines, set to 5 pixels wide here.
# `cv.LINE_AA`: Use "anti-aliasing" mode to draw smoother, nicer-looking lines.
cv.polylines(modified_image, [pts], True, (0, 255, 255), 5, cv.LINE_AA)
# --- Image display loop ---
# Enter an infinite loop to continuously display the image windows.
while True:
# Display the original image.
cv.imshow("Original Picture", source_picture)
# Display the image with the polygon drawn on it.
cv.imshow("Picture with Polygon", modified_image) # Clearer window name!
# The cv.waitKey(1) function pauses the program for
# 1 millisecond to check for a key press.
key = cv.waitKey(1)
# If the ESC key (number 27) is pressed, exit the loop and end the display.
if key & 0xFF == 27:
break
# --- Release resources ---
# Finally, close all image windows created by OpenCV to free up computer resources.
cv.destroyAllWindows()
プログラミングの結果
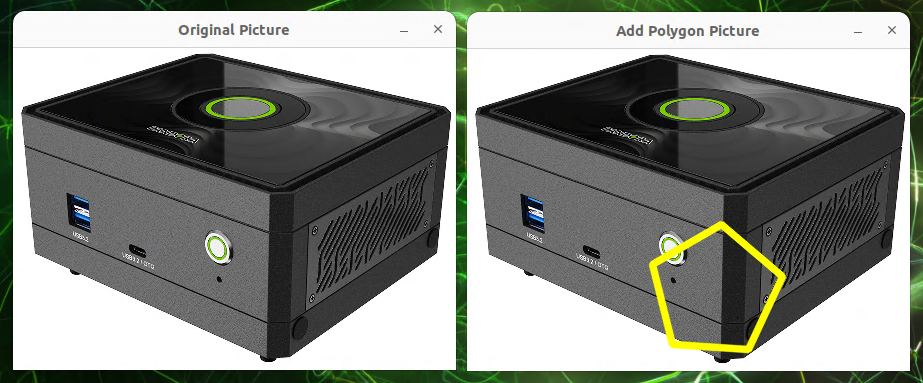
上のコードを実行すると、2つのウィンドウが表示されます。1つは元の絵で、もう1つは黄色い五角形が描かれた絵です!
ポリライン関数を学んだことで、直線で構成された複雑な図形を画像上に描くことができるようになりました:
- 不規則な領域をマーク: 地図上の国の境界線や人体の輪郭など、不規則な形状のオブジェクトを丸で囲みます。
- カスタムパターンデザイン:画像上にユニークな幾何学パターンやデザイン要素を描画します。
- ゲームマップの描画:歩行可能なエリアや障害物の境界線を定義します。
座標や点の数を変えてさまざまな形状のポリゴンを描いてみたり、isClosedパラメータを変更して開いたポリゴン(閉じていないポリゴン)と閉じたポリゴンの違いを確認したりできます!
画像にテキストを追加する:画像にメッセージを書き込む!
透かしやキャプション、画像内のオブジェクトの説明など、画像に直接テキストを追加する方法を疑問に思ったことはありませんか?写真に日付やメッセージを書き込むように,OpenCVの putText 関数はあなたの「テキストペン」です.画像に簡単にテキストを書き込むことができるので、画像ラベルの作成やカスタム画像の作成に便利です!
putText: 画像用の「テキストペン」!
OpenCVのputText 関数は、画像上にテキストを描画するために使用されます。テキストの内容、テキストの開始位置、フォント、サイズ、色を指定するだけで、画像にテキストを書き込んでくれます!
text: str,
# This is the "text content" you want to write (a string).
org: cv2.typing.Point,
# This is the starting coordinate (x, y) of the text's bottom-left corner.
fontFace: int,
# This is the "font type" of the text.
fontScale: float,
# This is the "scaling factor" of the text
# (the larger the number, the bigger the text).
color: cv2.typing.Scalar,
# This is the color of the text (in BGR format).
thickness: int = ...,
# This is the thickness of the text strokes (in pixels).
lineType: int = ...,
# This is the line type (usually you can use the default).
bottomLeftOrigin: bool = ...)
# Decides if the text origin is the bottom-left corner
# (usually you can use the default).
-> cv2.typing.MatLike: ... # Returns the image with the text written on it!
戻り値:putTextは、文字が書かれた絵をあなたに与えます!
putText が画像に文字を書き込んだら、新しい画像データを送り返します!
例:画像に "Pandora "と書く!
では、画像に "Pandora "と書いて赤くするプログラムを書いてみましょう!
import cv2 as cv
# Set the path to the original image file.
file_path = "Pandora.png"
# Read the image using OpenCV's imread function.
source_picture = cv.imread(file_path)
# Check if the image was loaded successfully.
if source_picture is None:
print(f"Warning: Oops! Couldn't load the image.")
print(f"Please check if the path is correct: {file_path}")
else:
# --- Create a "canvas copy" of the image ---
# We create a "copy" of the original image called `modified_image`.
# This way, when we write on `modified_image`,
# we don't affect the original `source_picture`.
# You'll be able to see a side-by-side comparison of the original and
# the modified image!
modified_image = source_picture.copy()
# --- Write text on the image! ---
# The cv.putText function will write text on `modified_image`.
# 'Pandora': The text content we want to write.
# (270, 125): The starting coordinate (x=270, y=125) of the text's
# bottom-left corner.
# cv.FONT_HERSHEY_SIMPLEX: We've chosen to use this common and simple font.
# 1.0: The font scaling factor, set to 1.0x size here.
# (0, 0, 255): The color of the text. In OpenCV's BGR format, this is pure red.
# 3: The thickness of the text strokes, set to 3 pixels wide here.
cv.putText(modified_image, 'Pandora', (270, 125), cv.FONT_HERSHEY_SIMPLEX,
1.0, (0, 0, 255), 3)
# --- Image display loop ---
# Enter an infinite loop to continuously display the image windows.
while True:
# Display the original image.
cv.imshow("Original Picture", source_picture)
# Display the image with the text written on it.
cv.imshow("Picture with Text", modified_image) # Clearer window name!
# The cv.waitKey(1) function pauses the program for
# 1 millisecond to check for a key press.
key = cv.waitKey(1)
# If the ESC key (number 27) is pressed, exit the loop and end the display.
if key & 0xFF == 27:
break
# --- Release resources ---
# Finally, close all image windows created by OpenCV to free up computer resources.
cv.destroyAllWindows()
プログラミングの結果
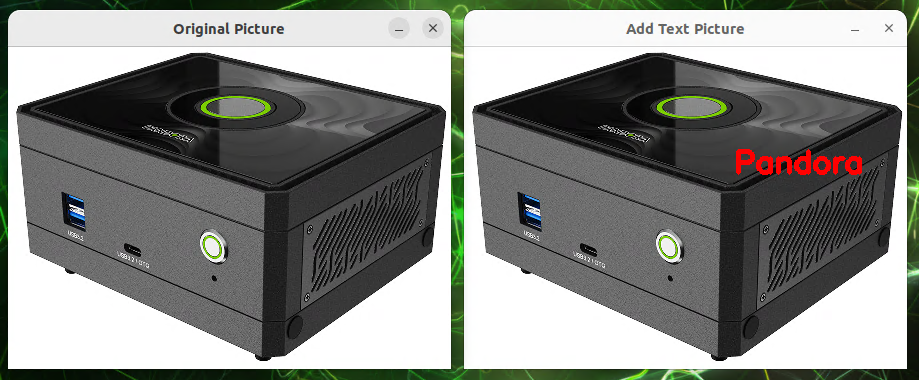
上のコードを実行すると、2つのウィンドウが表示されます。1つは元の画像で、もう1つは「Pandora」と書かれた画像です!
putText関数を覚えると、写真に簡単にテキストを追加することができます:
- 画像の透かし:画像に名前やブランド名を追加する。
- 画像の注釈:画像内のオブジェクトや領域にテキストの説明を追加します。
- 例えば、誕生日カードや招待状に直接書き込むことができます。
- 画像認識結果表示: 顔やテキストを検出した後、画像に直接マークを付けます。
もちろん、fontFace、fontScale、color、th太さを変更することで、異なるフォント、サイズ、色、太さのテキストを作成することもできます!