9-8 RTSP Stream Server Example Tutorial
Welcome to the network streaming chapter of the NexVDO SDK practical tutorial! In previous chapters, we learned how to capture frames, take snapshots, and save video to a local hard drive. However, in many practical application scenarios (such as security surveillance centers, remote medical surgery live broadcasting, or drone video transmission), we need to "broadcast in real-time" the video to the network so that remote computers or mobile phones can also watch it synchronously.
To solve this need, the NexVDO SDK provides an extremely powerful Broadcast Server Engine. Developers do not need to delve into complex underlying network protocols; with just a few lines of code, your device can instantly transform into a professional RTSP stream server!
© Blender Foundation | Big Buck Bunny | CC BY 3.0
➤ Core Concept: Why does streaming require "hardware compression"? ( The battle between bandwidth and data volume )
Before we start writing code, there is an important concept to clarify. Many beginners often have a misconception when doing video streaming: "Can I just throw the video captured by the capture card directly onto the network?" The answer is: Absolutely not!
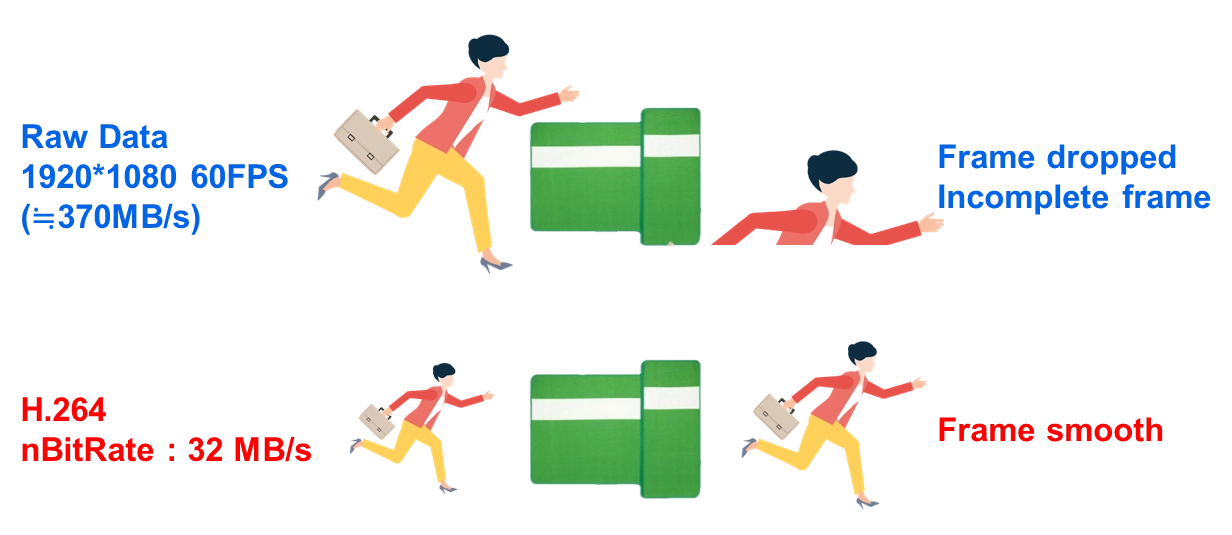
Let's do a simple math problem: An uncompressed raw video ( Raw Data ) with a 1920x1080 resolution at 60 frames per second ( 60FPS ) will generate a massive data volume of up to about 370 MB/s. However, the bandwidth limit of our common local area networks is generally only around 100 MB/s.
If you try to force a massive 370 MB/s of data into a network cable with only 100 MB/s bandwidth, the result will be an instant network paralysis, and the video viewed remotely will suffer from severe "Frame dropped" or even "Incomplete frame".
This is why we need the "compression" feature of the Broadcast Server Engine! By calling the underlying hardware encoder through the NexVDO SDK, we can compress the original 370 MB/s uncompressed video into a lightweight stream of only 32 MB/s ( or even lower ) using the H.264 format. In this way, the video can easily and smoothly shuttle through the 100 MB/s network channel, achieving perfect smooth playback.
After understanding this physical limitation, you will understand why setting the video and audio compression format is the most critical step in starting the RTSP server in the upcoming API implementation!
Today, we will combine the Callback feeding mechanism we learned earlier to build an RTSP live streaming application that allows all devices in the local area network to connect and watch!
➤ For Callback concepts, you can review : 9-5 Status Callback and Image Snapshot Example
Understanding Core APIs - Broadcast Server Engine
The logic for establishing an RTSP server is actually very similar to the Share Record feature from the previous chapter : "Create Engine ➔ Set Properties ➔ Start ➔ Feed Data in Callback".

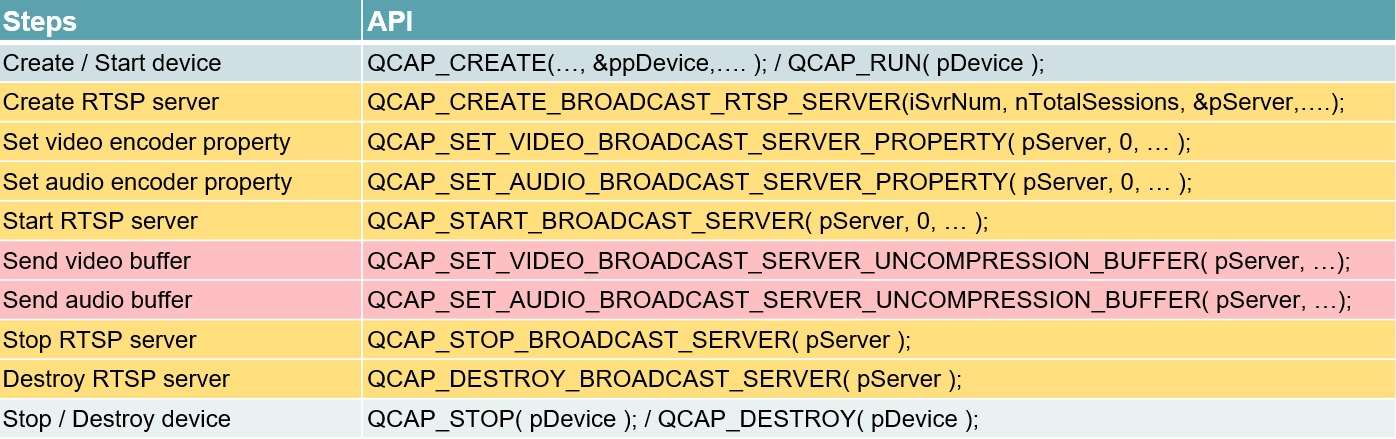
The standard usage sequence is as follows :
1. QCAP_CREATE_BROADCAST_RTSP_SERVER :Create the RTSP server engine.
2. QCAP_SET_VIDEO_BROADCAST_SERVER_PROPERTY :Set the video compression properties of the server.
3. QCAP_SET_AUDIO_BROADCAST_SERVER_PROPERTY : Set the audio compression properties of the server.
4. QCAP_START_BROADCAST_SERVER :Start the RTSP server engine.
5. QCAP_SET_VIDEO_BROADCAST_SERVER_UNCOMPRESSION_BUFFER :Continuously feed uncompressed video Buffers in the Callback.
6. QCAP_SET_AUDIO_BROADCAST_SERVER_UNCOMPRESSION_BUFFER :Continuously feed uncompressed audio Buffers in the Callback.
7. QCAP_STOP_BROADCAST_SERVER :Stop the RTSP server engine.
8. QCAP_DESTROY_BROADCAST_SERVER :Destroy ( Release ) the RTSP server engine.
Core Concept : The Division of Labor Between Server and Client
Before officially diving into the code, we must first clarify the two core roles in network streaming : Server and Client.
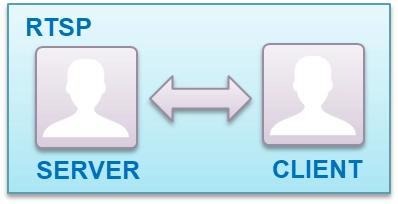
1. RTSP Server ( The protagonist of today ) : The program we are about to develop using the NexVDO SDK plays the role of the "Server". Its task is like a TV station; it must first "CREATE RTSP SERVER" and "Set properties for encoder" for video and audio. After the server starts, it must continuously feed audio and video data to the broadcast engine. The main job of the server is to prepare the video frames and wait for others to connect on the network.
2. RTSP Client ( Viewer ) : This represents the remote audience, the party receiving the stream. It can be a VLC player on a remote computer, or the ffplay playback tool we will use later to verify the results. The Client doesn't need to handle complex capturing and compression; it only needs to know the server's IP address and Port number to connect, "pull", and play high-quality real-time video.
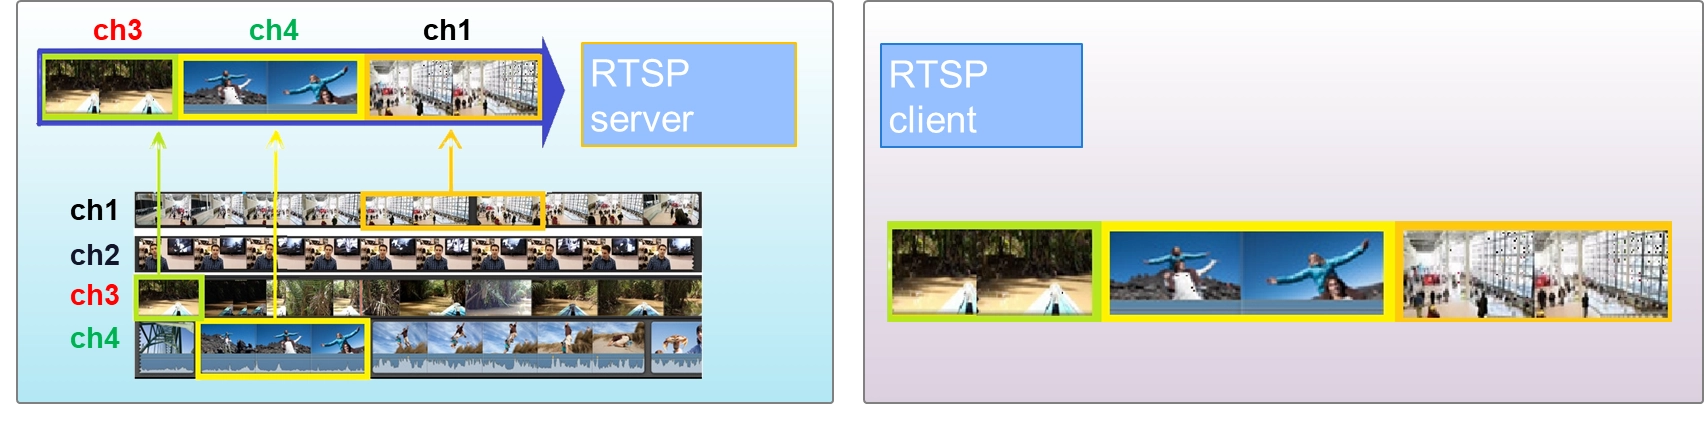
[Developer's Summary] : Because our implementation goal today is to "Create an RTSP Server", all the APIs you will see next revolve around how to start the server, set encoding properties, and feed data for the server to operate. Once you understand the role you play, the logic will become very clear when calling these APIs!
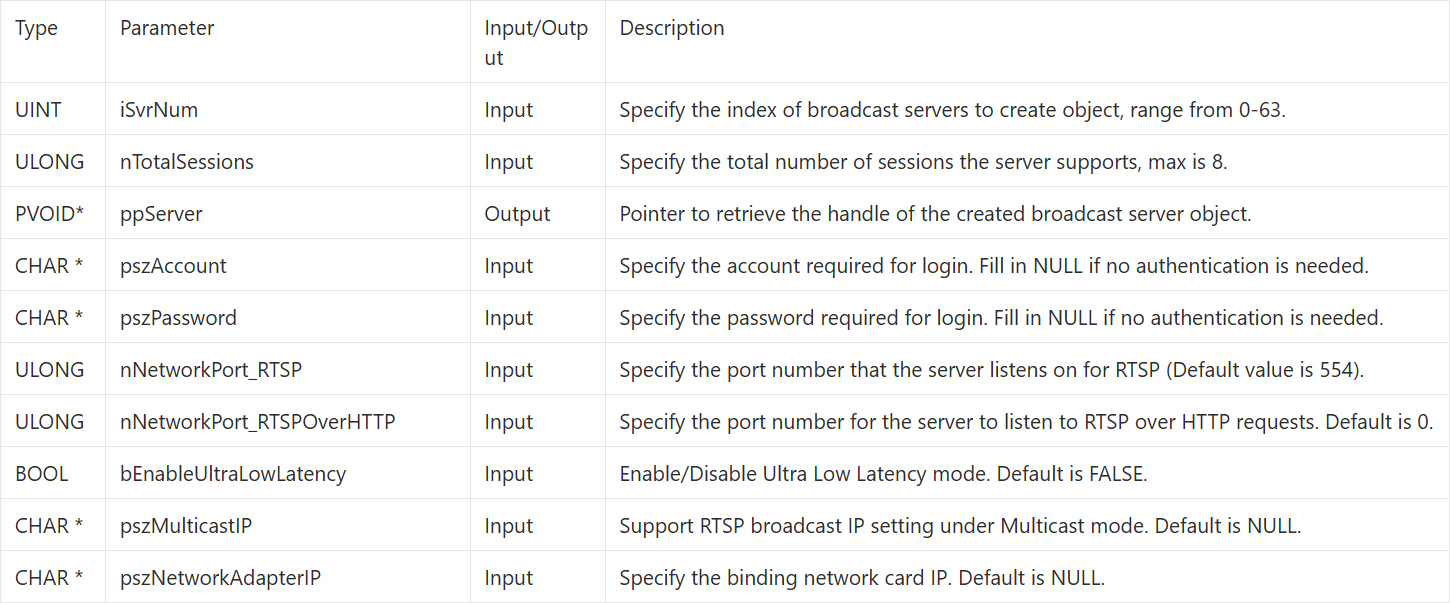
QCAP_CREATE_BROADCAST_RTSP_SERVER
This API is used to initialize the server object. Here, we can set the account, password, and Port number required for the connection.
➤ Developer Tip : The connection URL format will be rtsp://account:password@IP:Port/session0.mpg. Although the default RTSP Port is 554, it is recommended that developers use a custom Port such as 8554 to avoid conflicts with third-party software!
QCAP_SET_VIDEO_BROADCAST_SERVER_PROPERTY
Before the server broadcasts, you must set how the video will be compressed.
⚠️ Pitfall Guide : To comply with strict RTSP network protocol standards, the video format must be set to H.264 or H.265.

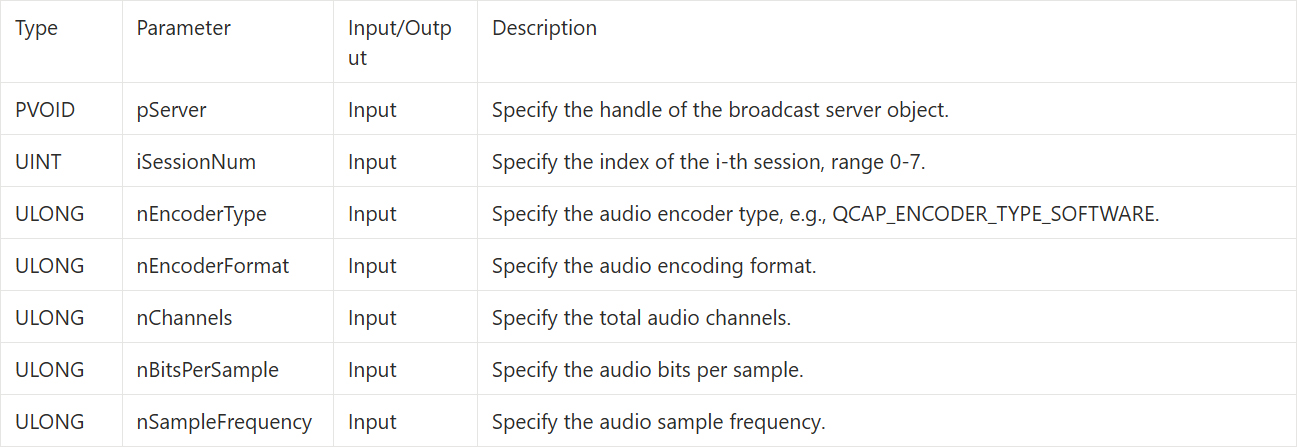
QCAP_SET_AUDIO_BROADCAST_SERVER_PROPERTY
Before the server broadcasts, you must set how the audio will be compressed.
⚠️ Pitfall Guide : To comply with strict RTSP network protocol standards, the audio format must be set to AAC.
QCAP_START_BROADCAST_SERVER
After completing the codec settings, we can officially start the server engine through this API.

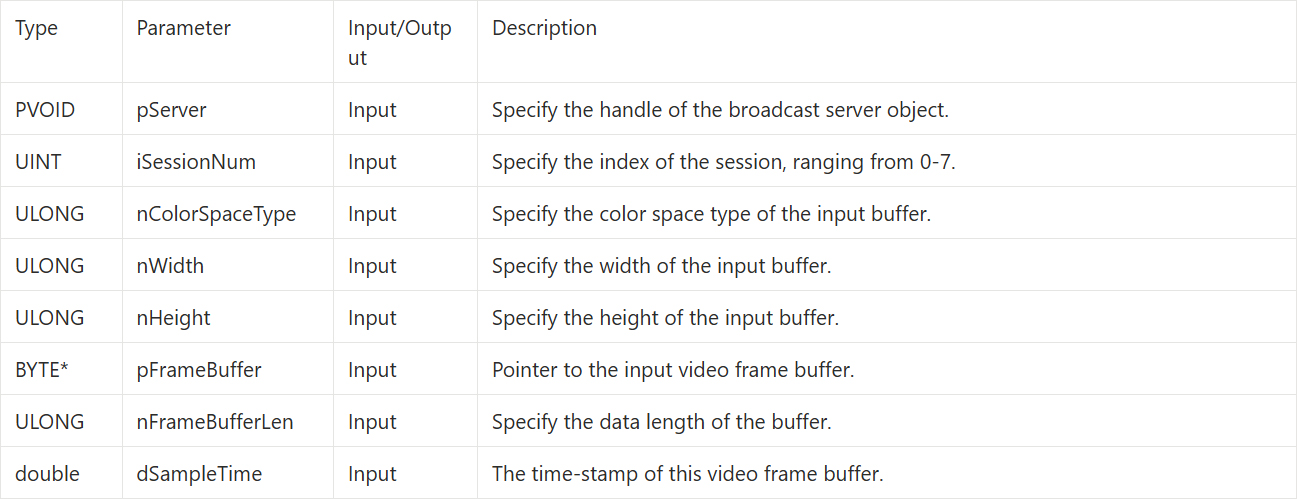
QCAP_SET_VIDEO_BROADCAST_SERVER_UNCOMPRESSION_BUFFER
➤ Developer Tip : If you need to crop the input video frame, please use the API version ending with _EX instead.
QCAP_SET_AUDIO_BROADCAST_SERVER_UNCOMPRESSION_BUFFER
➤ Developer Tip : If the audio format of the pFrameBuffer here differs from the format previously set in QCAP_SET_AUDIO_BROADCAST_SERVER_PROPERTY, the user must use the API version ending with _EX to tell the engine the actual format of the input audio!

QCAP_STOP_BROADCAST_SERVER
When you need to end the broadcast, call this API, and the SDK will stop streaming.

QCAP_DESTROY_BROADCAST_SERVER
When you need to completely end the broadcast, call this API, and the SDK will release the server engine.

Building the UI Display Interface
After getting to know the powerful broadcast server APIs, we officially enter the project implementation phase! To give our RTSP server flexibility, we need a graphical interface that allows users to customize the network Port number and control the server's start and stop with a single click.
Please open your mainwindow.ui file in Qt Creator and follow the steps below to perform a major makeover :
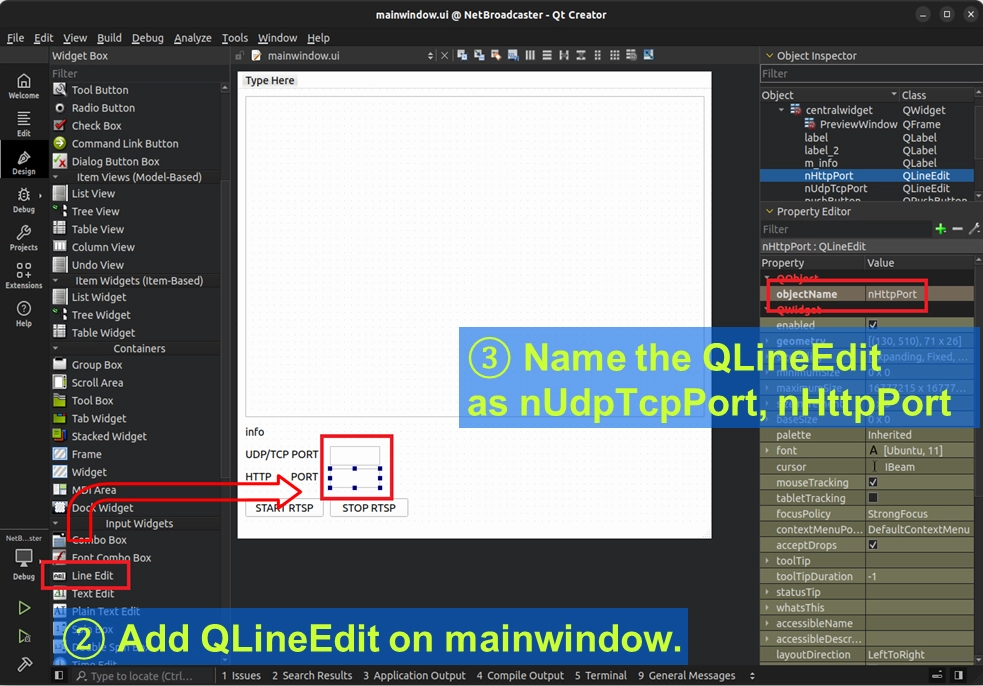
Adding Dedicated Input Boxes for Port Numbers ( QLineEdit )
To avoid hardcoding the network Port numbers in the code, we must add two text input boxes so users can dynamically adjust them on the interface:
• Please find QLineEdit ( single-line text input box ) in the UI toolbar on the left, and drag and drop two of them into the main window.
• Next, in the Property Editor in the lower right corner, precisely name the objectName property of these two input boxes as nUdpTcpPort ( responsible for RTSP connection ) and nHttpPort ( responsible for HTTP connection ), respectively.
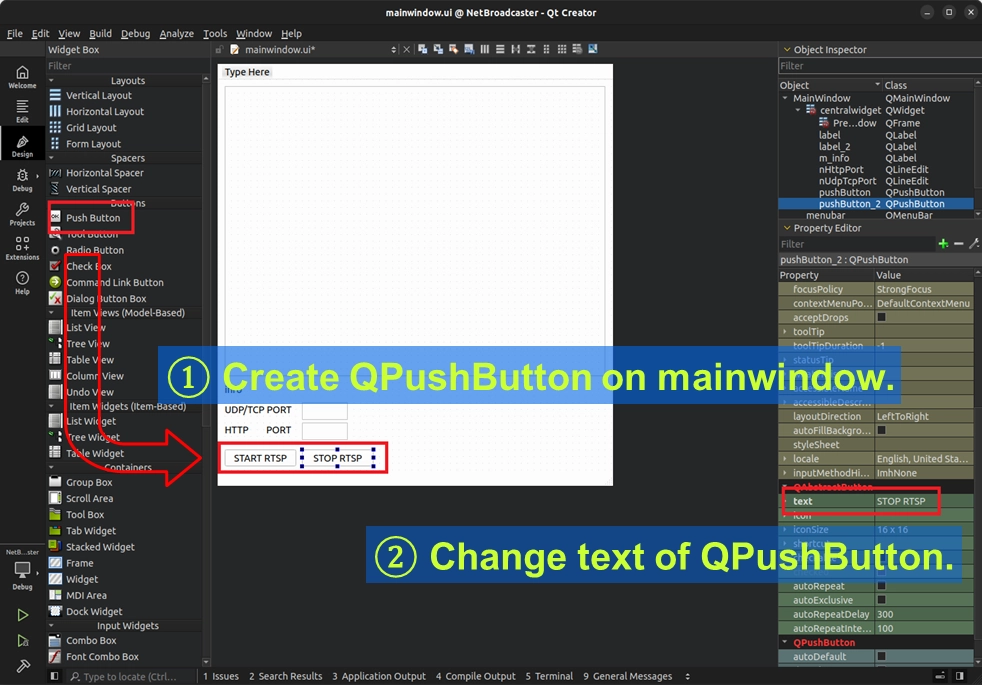
Creating RTSP Control Buttons ( QPushButton )
With the input boxes in place, we also need two core buttons to control the server's lifecycle:
• Please drag and drop two QPushButtons to the bottom of the interface.
• Change their text ( display text ) properties to "START RTSP" and "STOP RTSP", respectively.
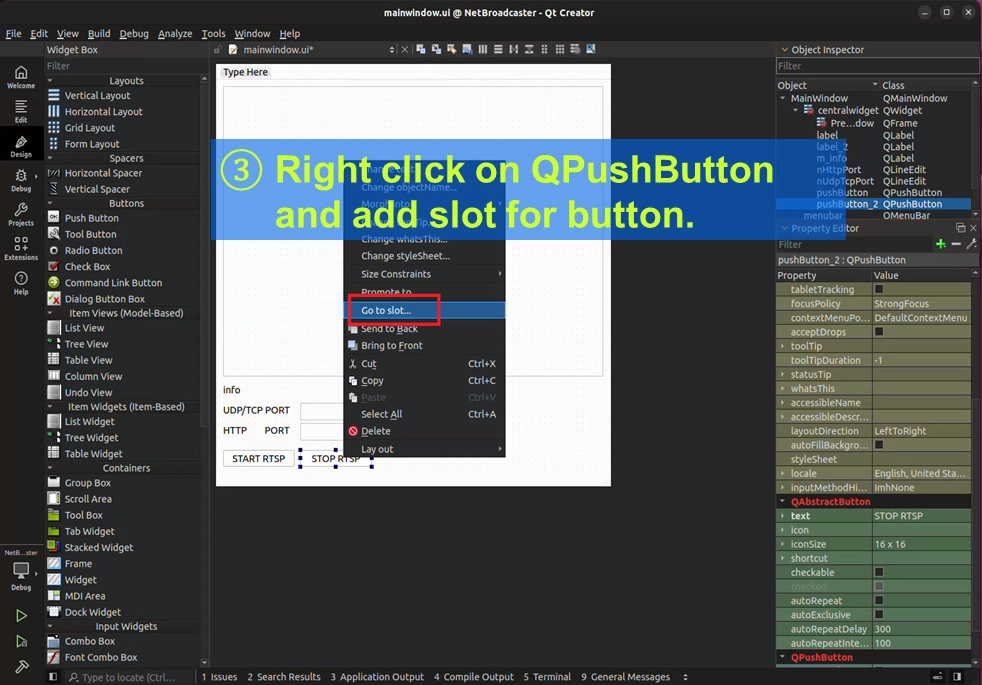
• After setting this up, right-click on each of the two buttons and select "Go to slot..." to let Qt Creator automatically generate dedicated click event blocks ( on_pushButton_clicked ) for us in mainwindow.cpp.
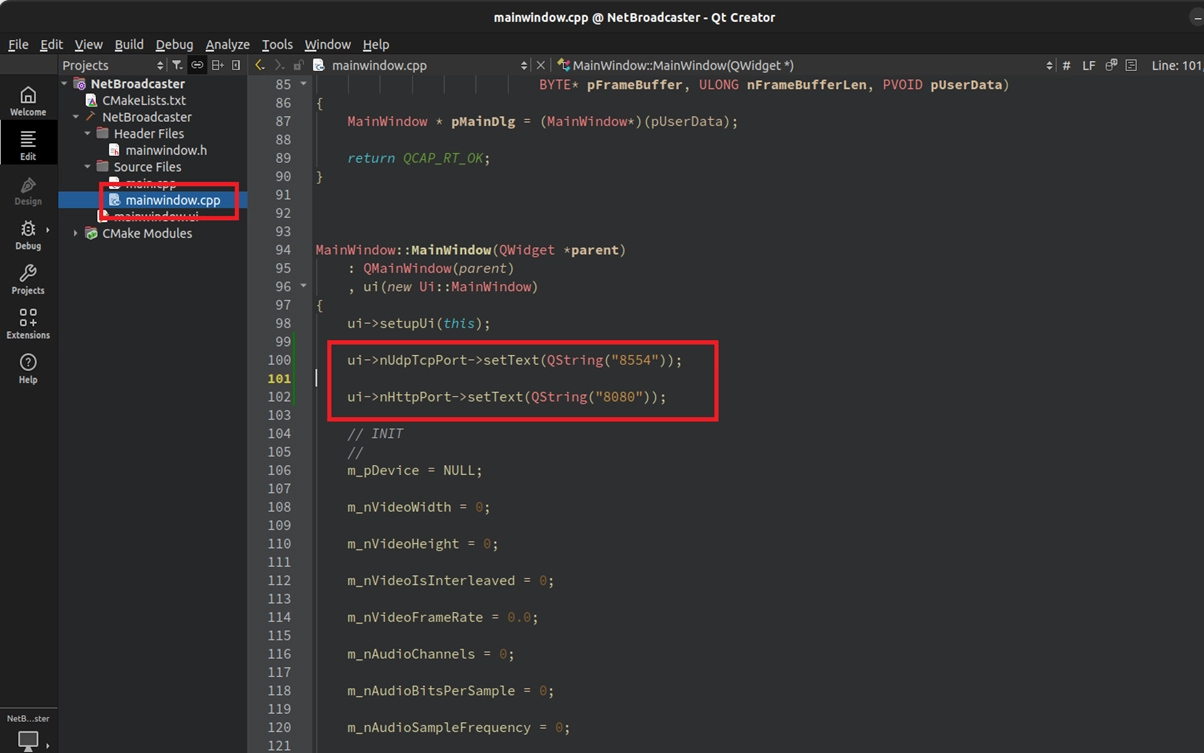
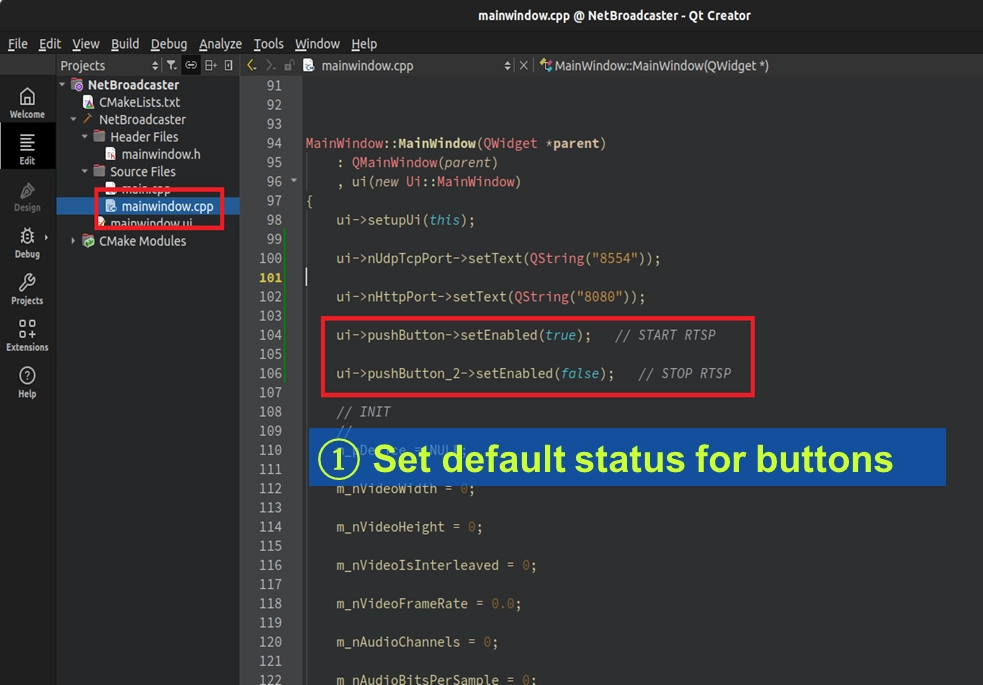
Setting Default Port Numbers in Code
It is quite inconvenient to re-enter the Port numbers every time the program is opened! We can directly assign default values to these input boxes when the program starts. Please open mainwindow.cpp, find the constructor MainWindow::MainWindow(...), and add the following code below ui->setupUi(this); :
Writing the Core Code
Please open mainwindow.cpp. We will write the code in three parts: "Starting the Server", "Stopping the Server", and "Feeding the Stream".
Variable Declaration and UI Fool-Proofing Mechanism
With the buttons ready, we must add two very important protection measures to the code. First, when the program just starts, the server is not yet open, so the "STOP RTSP" button should be in an unclickable, grayed-out state. Please open the constructor MainWindow::MainWindow(...) in mainwindow.cpp, and add the initial fool-proofing state of the buttons below the port number initialization :
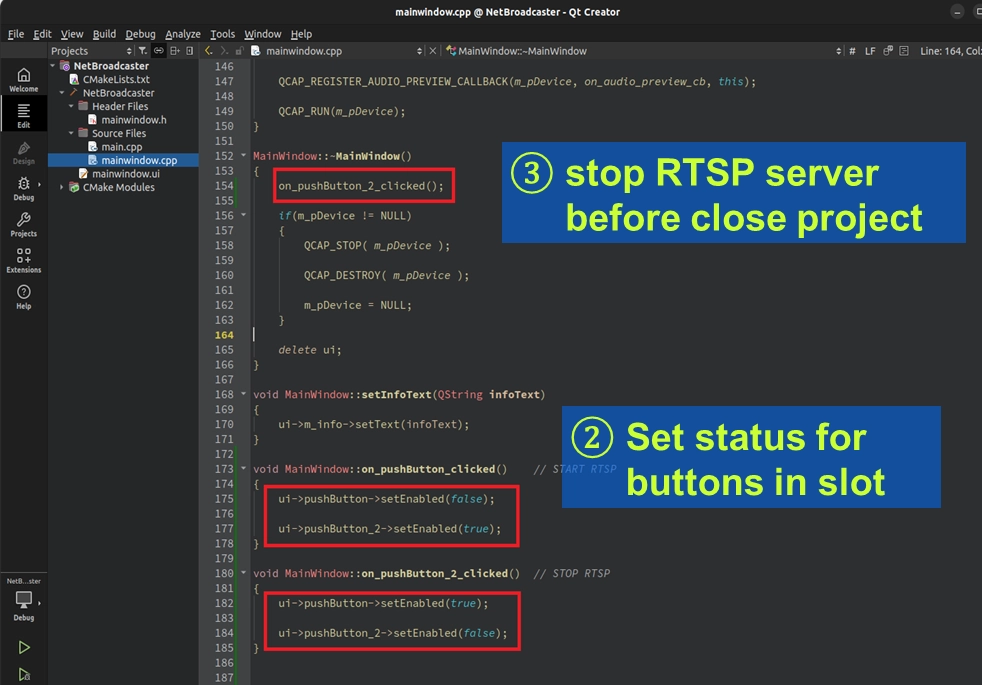
If the user directly clicks the "X" in the upper right corner to close the window while the server is running, the server object will become an orphan, causing the 8554 Port number to be permanently locked up by the system!
To prevent this tragedy, we must forcefully call the stop button's logic within the Destructor of the main window. Please find ~MainWindow() and add the following code :
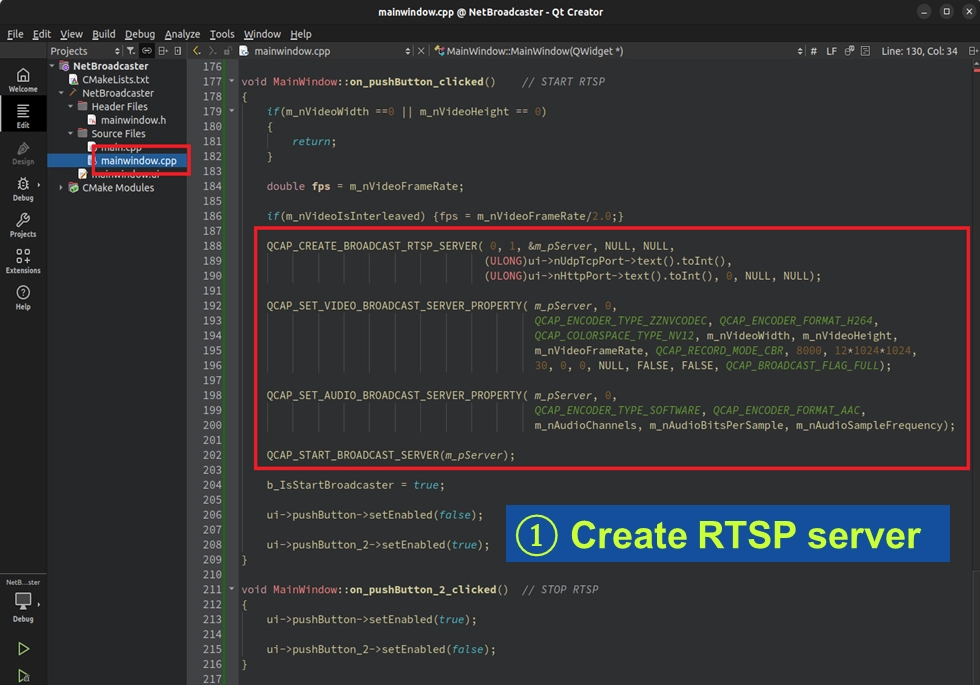
Implementation: START RTSP ( Start Server ) Button Logic
In the "START RTSP" slot function, we will follow the standard process introduced earlier: "Create ➔ Set Properties ➔ Start". The most special part is that we will dynamically read the Port numbers just set on the UI interface.
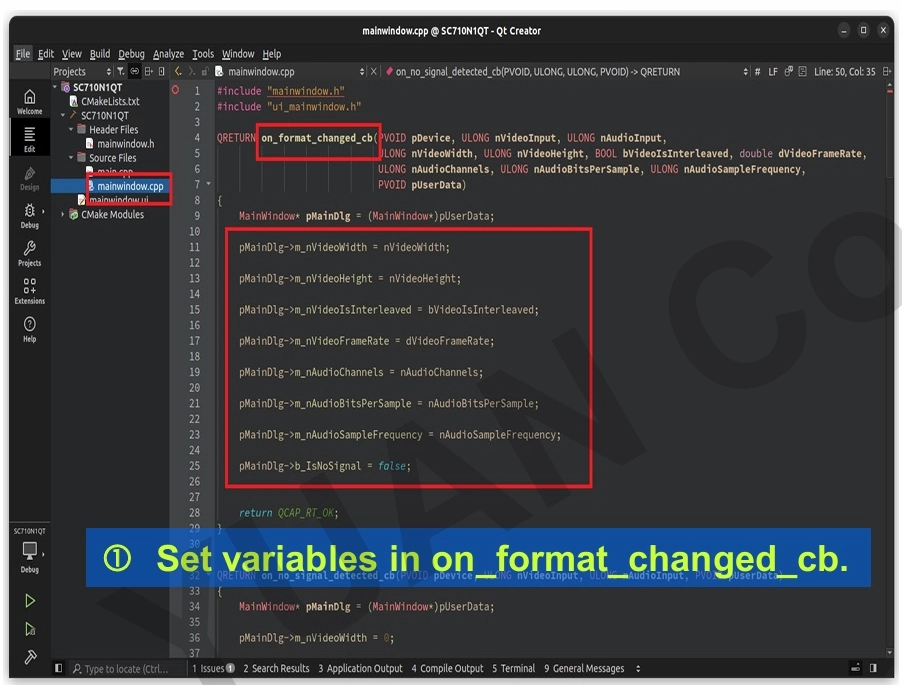
➤ Developer's Must-Learn "Parameter Linkage" Trick : In practical development, we strongly recommend that when the Format Changed Callback is triggered, you conveniently save the latest data into these variables. When you are ready to start the multi-stream engine and need to set complex codec parameters, you can directly feed these variables to the API! Doing this has three major benefits:
1. Complete manual fool-proofing : No need to "hardcode" the width, height, and frame rate in the code.
2. Perfectly match the input source : Ensure that the resolution received by the Encoder 100% matches the current hardware capture status.
3. Seamlessly adapt to dynamic changes : If the user switches to a camera with a different resolution halfway through, the parameters will automatically update on the next start!
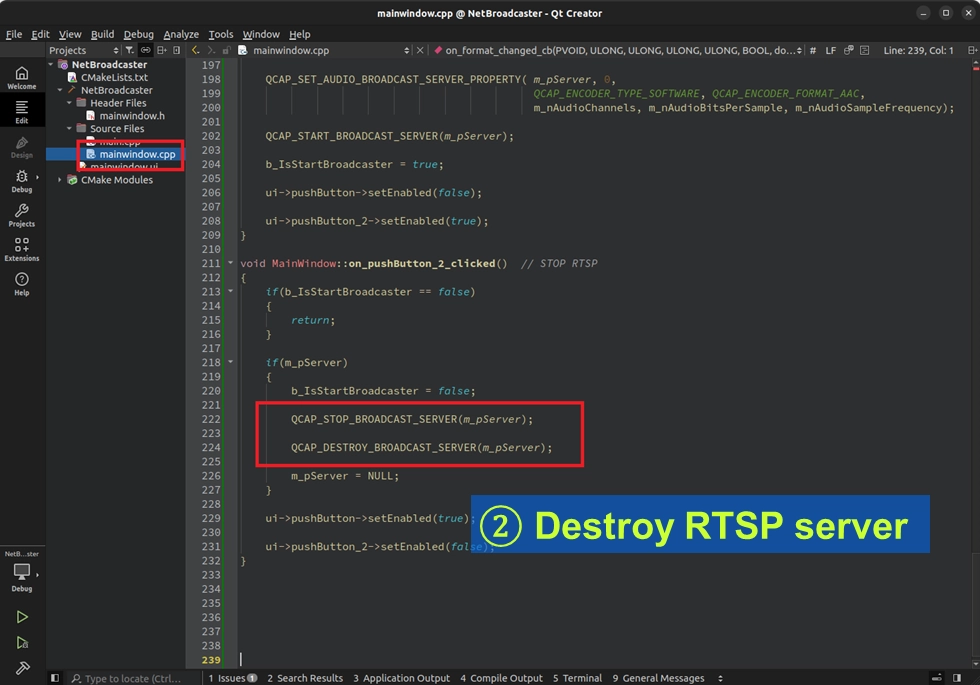
Implementation: STOP RTSP (Stop and Destroy Server) Button Logic
In the stop button, besides Stop, never forget to Destroy!
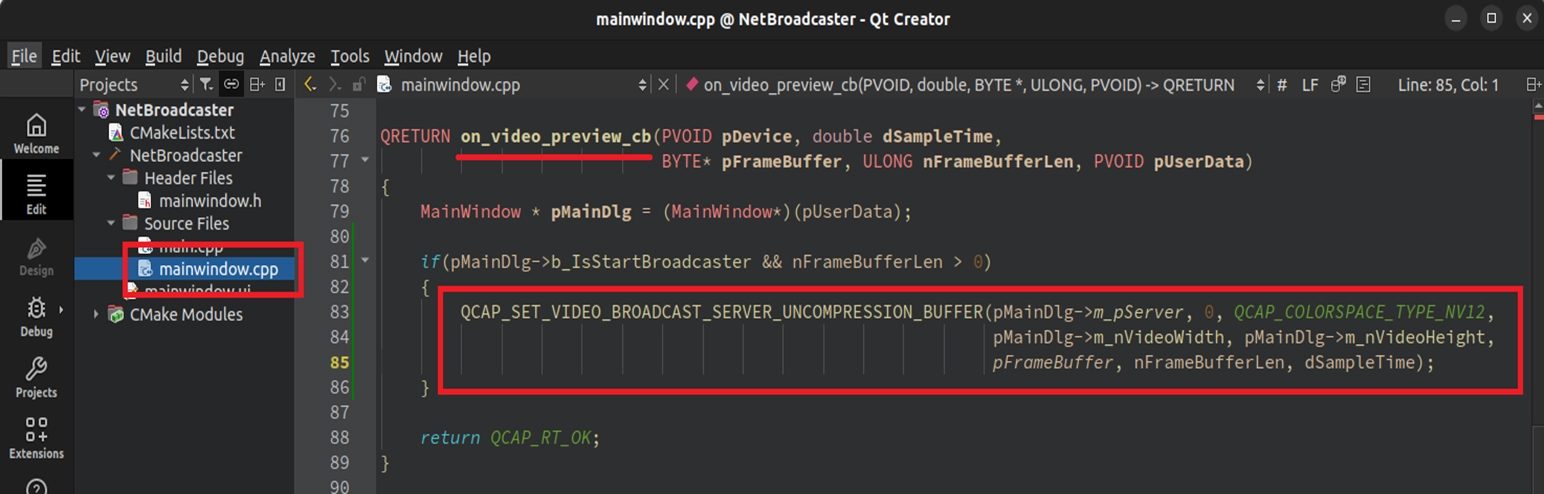
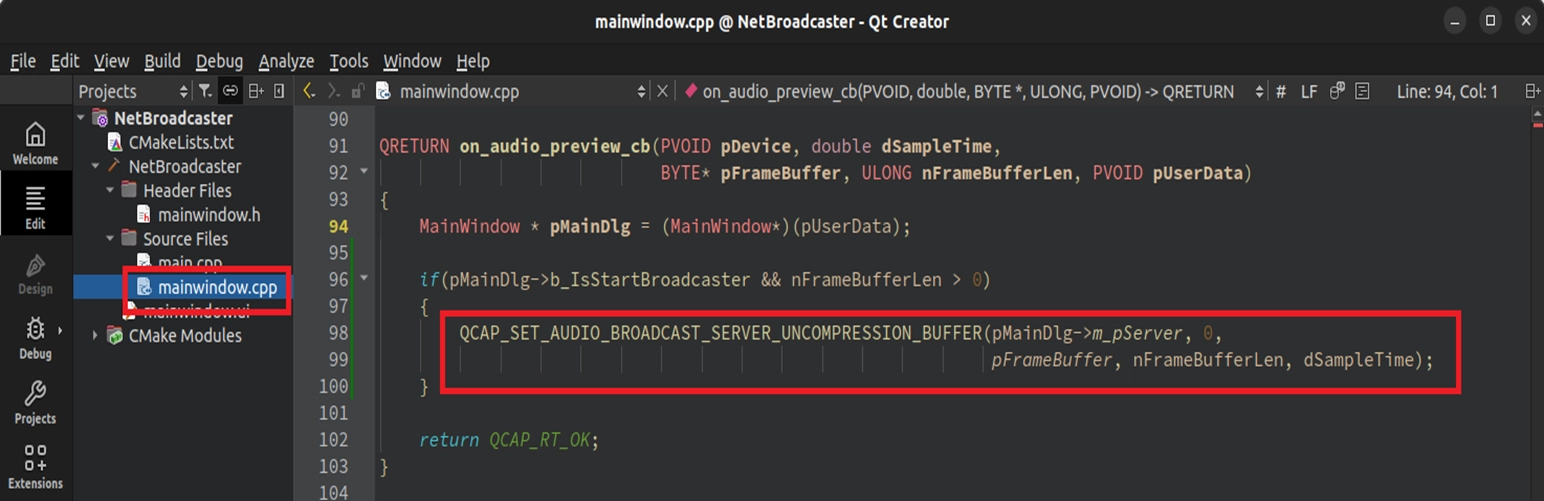
Feeding Network Video Frames in the Callback Switchboard
The server is set up, but there is no video frame inside it right now! We must return to the Callback switchboard dedicated to handling hardware signals and continuously feed every captured NV12 video frame and PCM audio to the server.
➤ For Callback concepts, you can review : 9-5 Status Callback and Image Snapshot Example
Final Verification
Congratulations on completing all the server-side ( Server ) code! Now we are going to play the role of the audience ( Client ) to test whether your computer has truly successfully transformed into a professional broadcast-grade streaming server.
Please click "Build and RUN" ( the green play button ) at the bottom left of Qt Creator to compile and execute the project. Then follow the steps below to witness the magic:
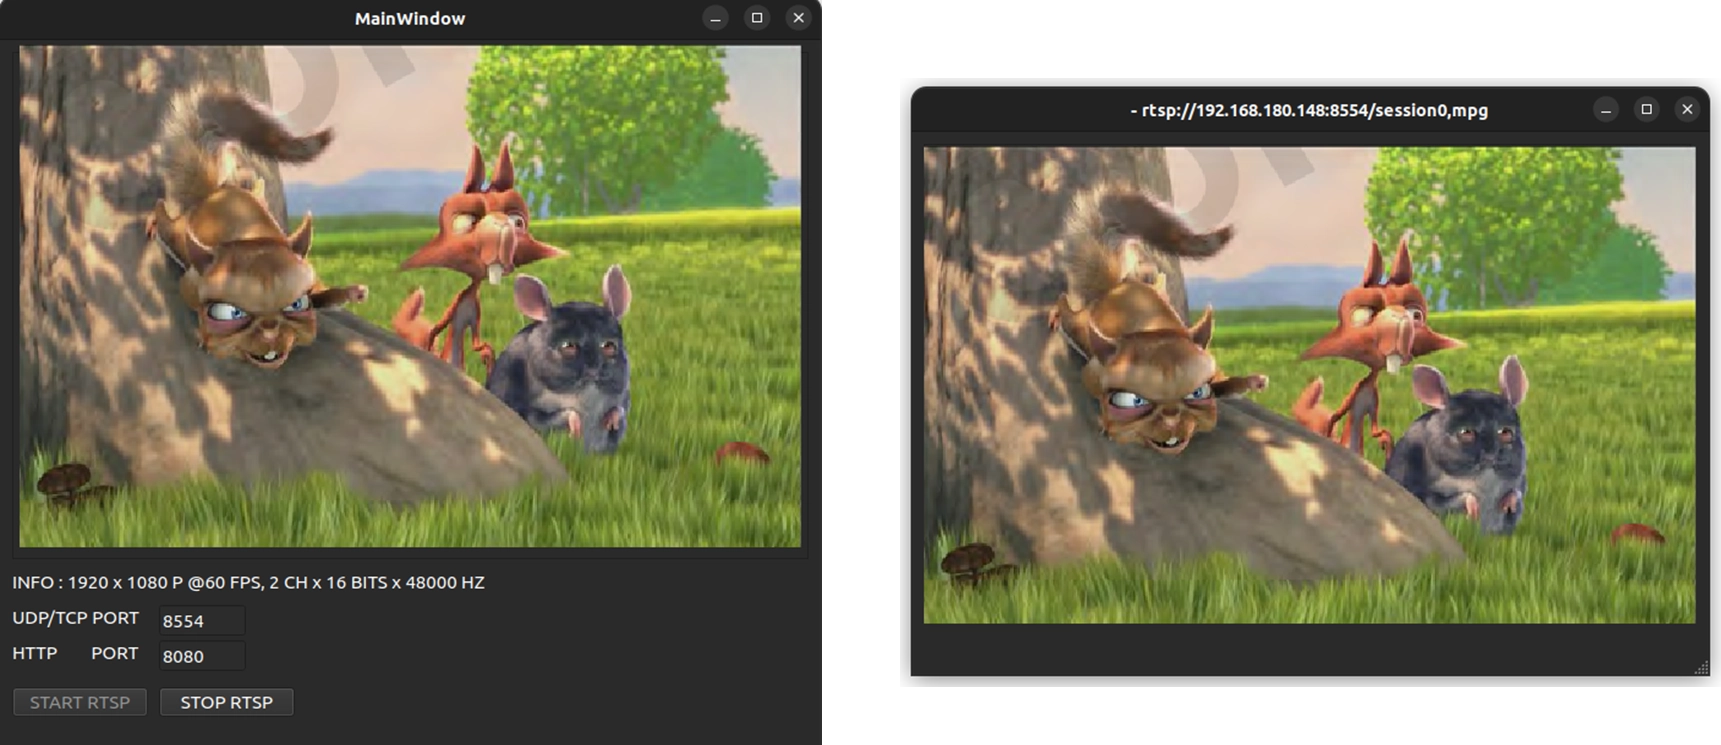
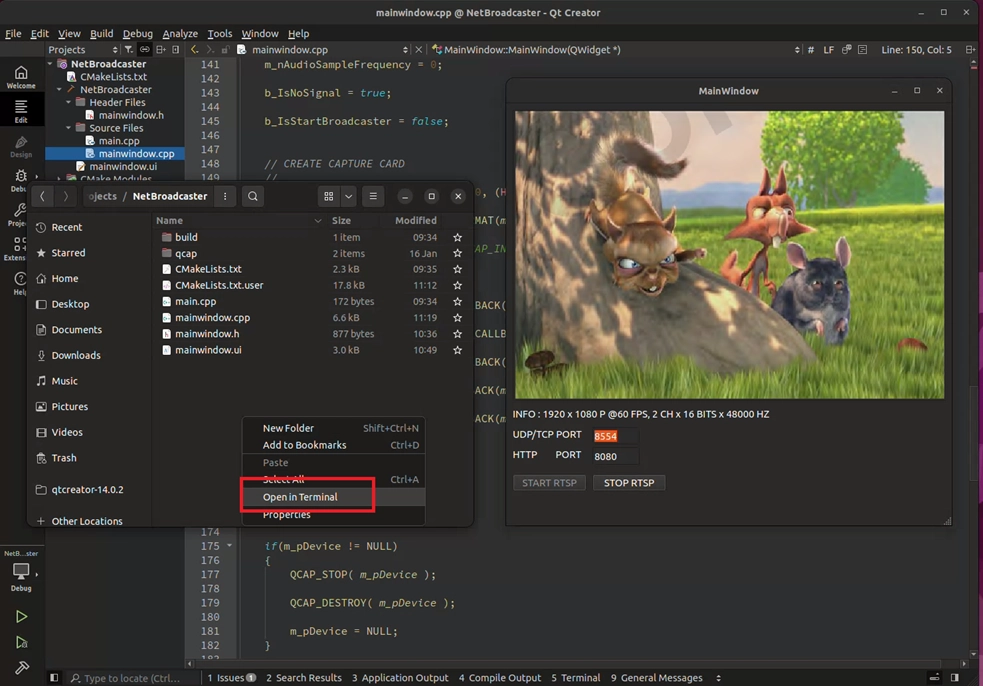
1. Start the Server : After confirming that the program has successfully captured the camera video, click the "START RTSP" button at the bottom left of the interface directly. At this time, your program has already started the network broadcast service in the background!
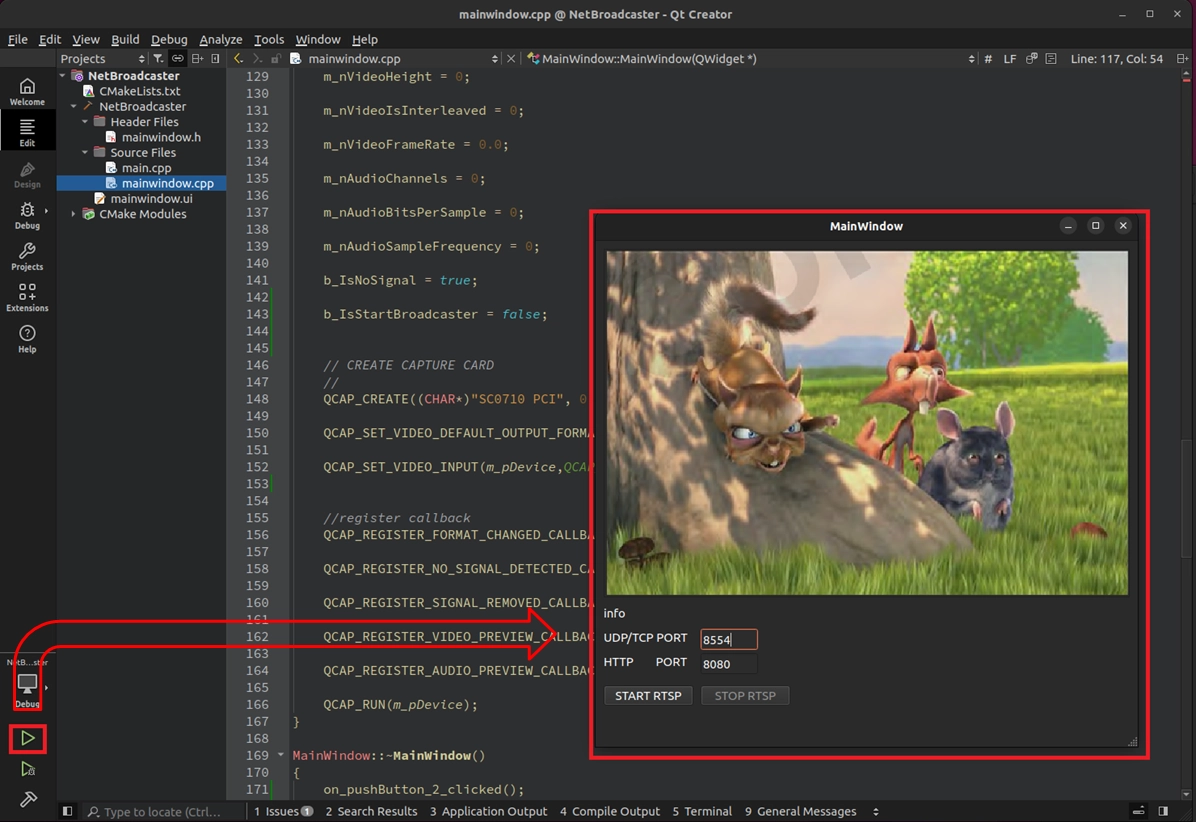
© Blender Foundation | Big Buck Bunny | CC BY 3.0
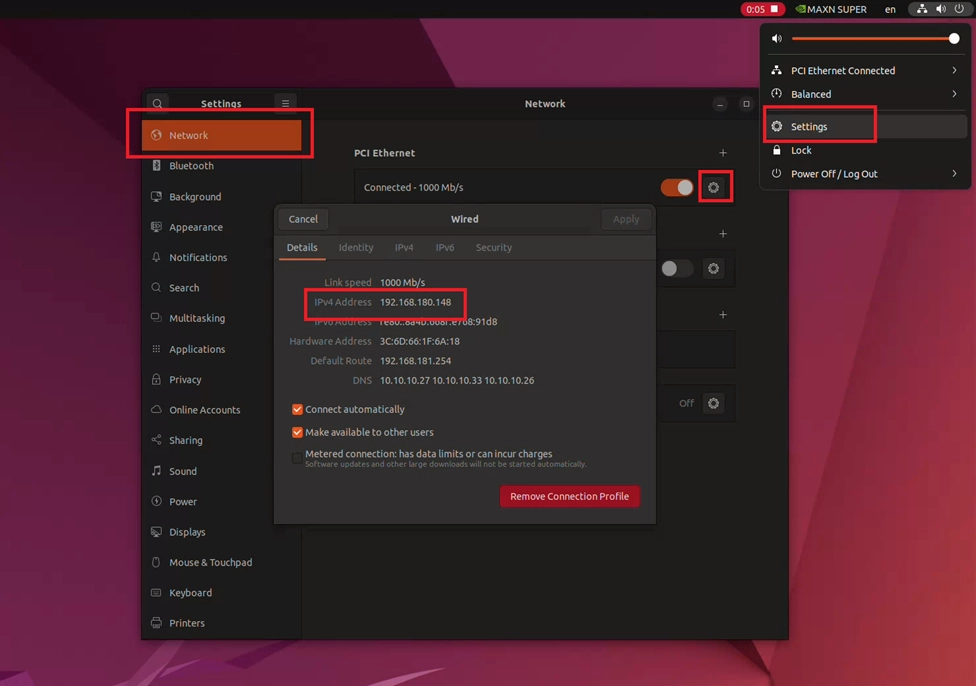
2. Query the Local IP Address : Please right-click on the desktop to open the Terminal, and enter ifconfig or ip a to query the current IP address of this development board ( e.g.: 192.168.180.148 ).
© Blender Foundation | Big Buck Bunny | CC BY 3.0
3. Play the Receiving End to Pull the Stream : In the system Terminal, use the powerful open-source playback tool ffplay to connect to your server. Please enter the following command ( please replace the IP with the real IP you just queried, the Port number is 8554, and the channel name is fixed as session0.mpg ):
➤ For ffmpeg installation, you can review: 9-6 Video/Audio Recording Example Tutorial
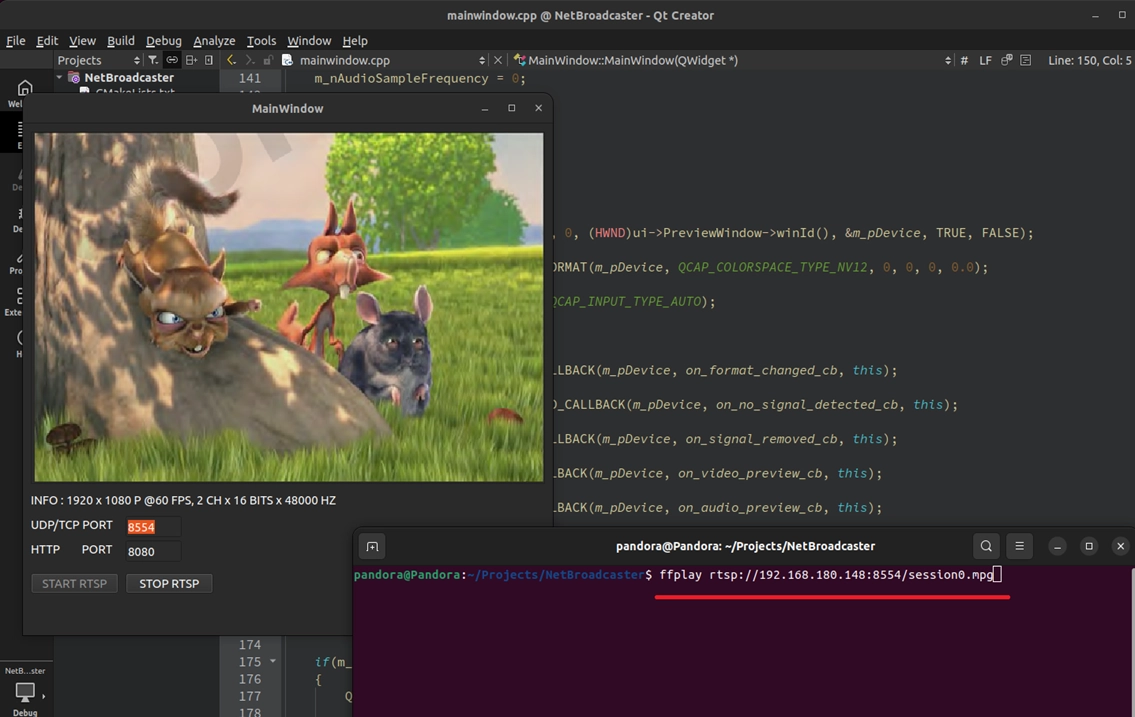
© Blender Foundation | Big Buck Bunny | CC BY 3.0
4. Enjoy the Results! Press the Enter key! If you see a high-definition streaming video that is perfectly synchronized with the main program and extremely smooth in the new pop-up window—Congratulations!
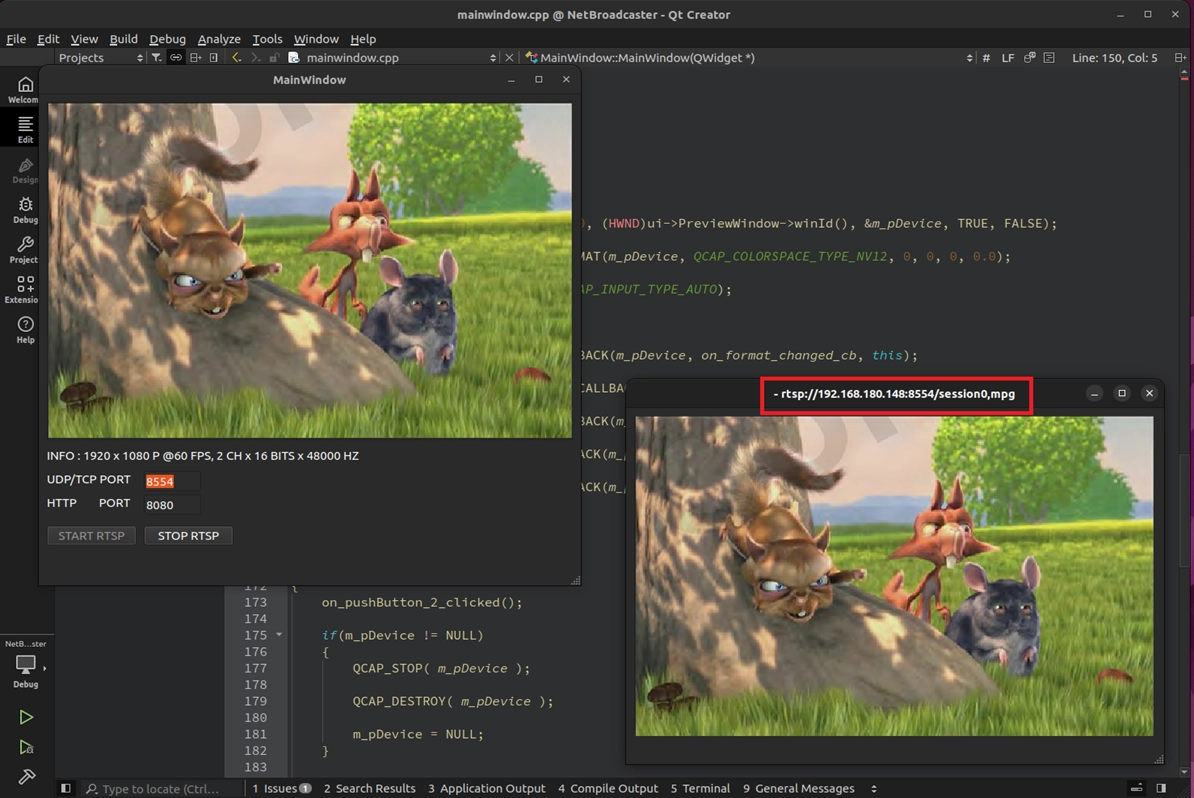
© Blender Foundation | Big Buck Bunny | CC BY 3.0
Are you ready for the next challenge? See you in the next lesson!