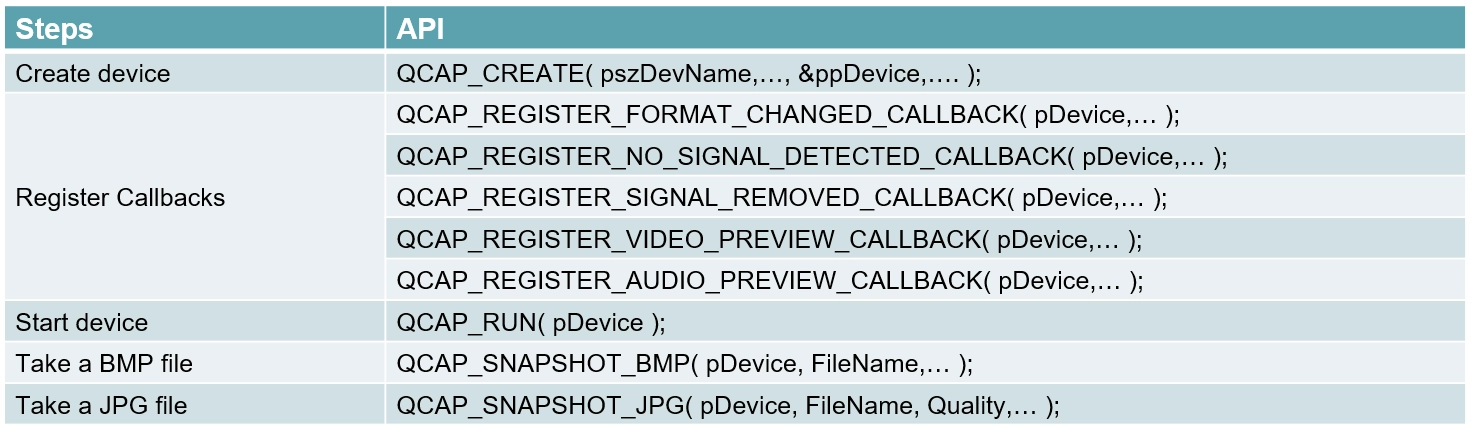
9-5 Callback and Image Snapshot Example
Make Your Program Smarter: Real-Time Video Status and One-Click Snapshot!
Welcome to Chapter 9-5! In the previous practical exercises, we have successfully displayed the capture card's video on the window. However, real-world audio and video development is often more complex: What if the user suddenly unplugs the cable? How does the program know if the signal resolution suddenly changes? Or, what should we do if we want to capture and save a wonderful moment?
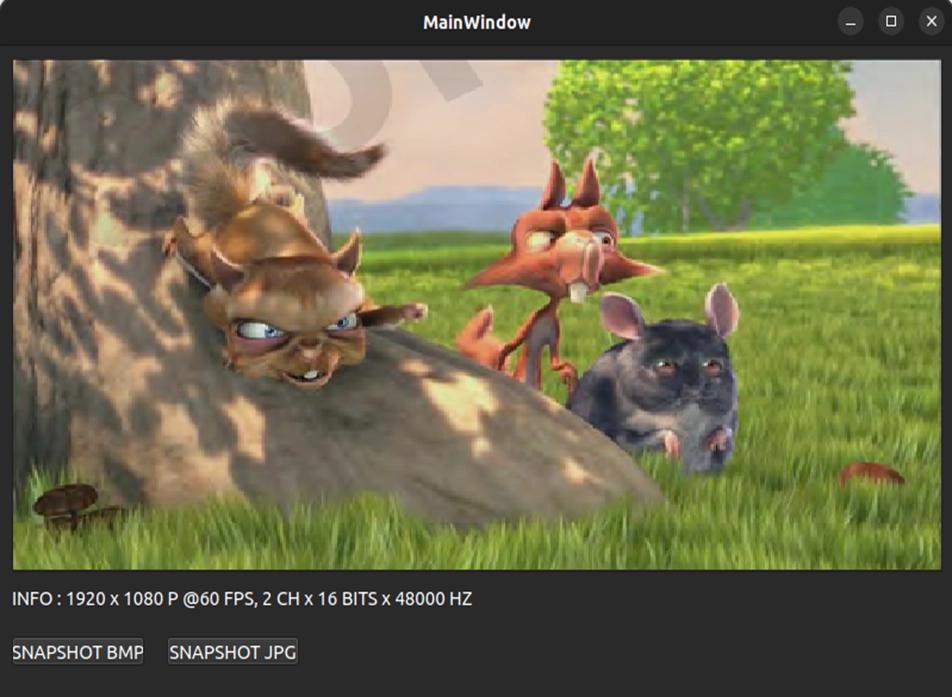
In this chapter, we will unlock two highly practical features of the NexVDO SDK: Callback and Snapshot. Let's first take a look at the final result we are going to achieve today :
© Blender Foundation | Big Buck Bunny | CC BY 3.0
We will add an information bar at the bottom of the window, which can display the current signal status in real-time ( such as resolution, FPS, and whether there is no signal ), along with two practical snapshot buttons. Are you ready? Let's get started!
Understanding Core APIs - Callback
Before we start coding, let's get to know today's main character:
A callback function is like an "informant" planted in your program. When a specific event occurs, the informant will proactively report back to you.
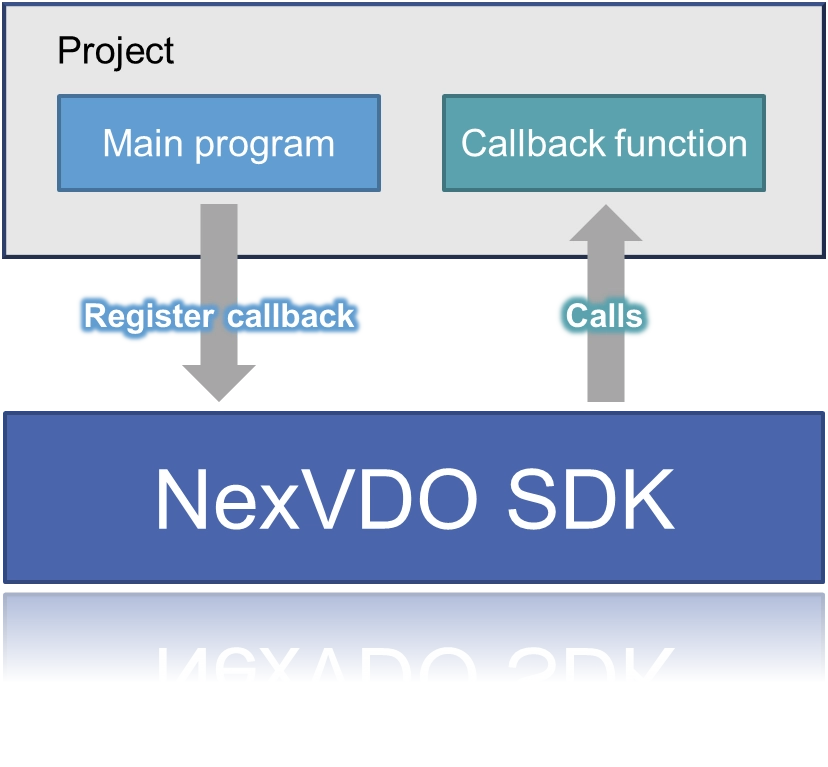
The NexVDO SDK provides two main types of Callbacks:
1. Event Callback : Adopts a "passive trigger" mechanism. It is only called by the system when specific events occur ( e.g., resolution change, signal removal, or no signal detected ).

2. Data Callback : Responsible for "real-time supply". Once started, it continuously provides the raw video/audio data captured from the underlying layer to your main program in real time.

When checking the user manual, you will notice that each Callback feature includes two very similar API names, for example:
• QCAP_REGISTER_FORMAT_CHANGED_CALLBACK
• PF_FORMAT_CHANGED_CALLBACK
What is the exact difference between these two? Simply put, one is for "registering contact info," and the other is "the format the informant uses to report back.”
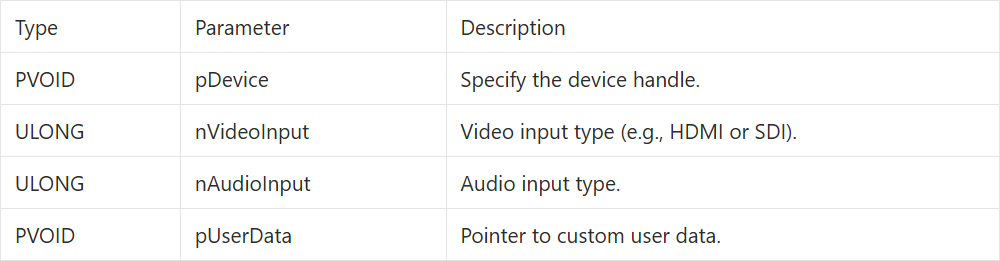
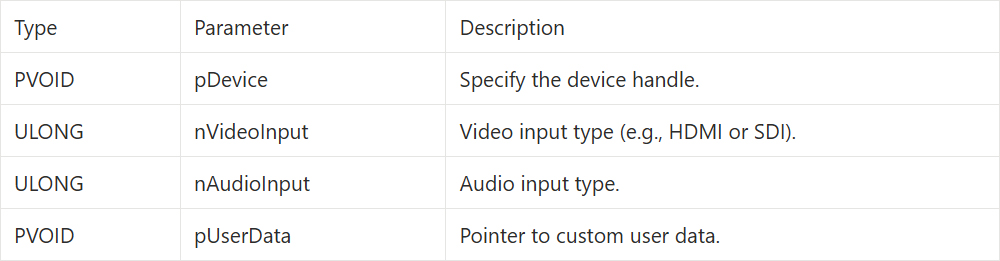
1. Registering Contact Info : QCAP_REGISTER_... ( Registration Function )
This function is proactively called by you. Its role is just like registering at the security guard's desk: "If you see a signal, please call me at this number." It only requires three basic parameters :

⚠️ Development Reminder: The Iron Rule of Registration Timing! Please keep in mind: All Callbacks must be registered AFTER QCAP_CREATE. Don't rush to assign your informants before the device is even created!

2. The Informant's Reporting Format:PF_... ( Callback Function Definition )
This is the function you actually need to implement in your code. When the newly registered event occurs, the SDK will automatically trigger this function and feed you a wealth of low-level information!
Today, we will focus on the three most commonly used "event informants". Below are their respective trigger timings and the intelligence parameters they will bring to you:
Event Callback - Video Format Changed
• Registration API :QCAP_REGISTER_FORMAT_CHANGED_CALLBACK
• Trigger Timing : This function is called when the system successfully detects a signal, or when the video input format changes.
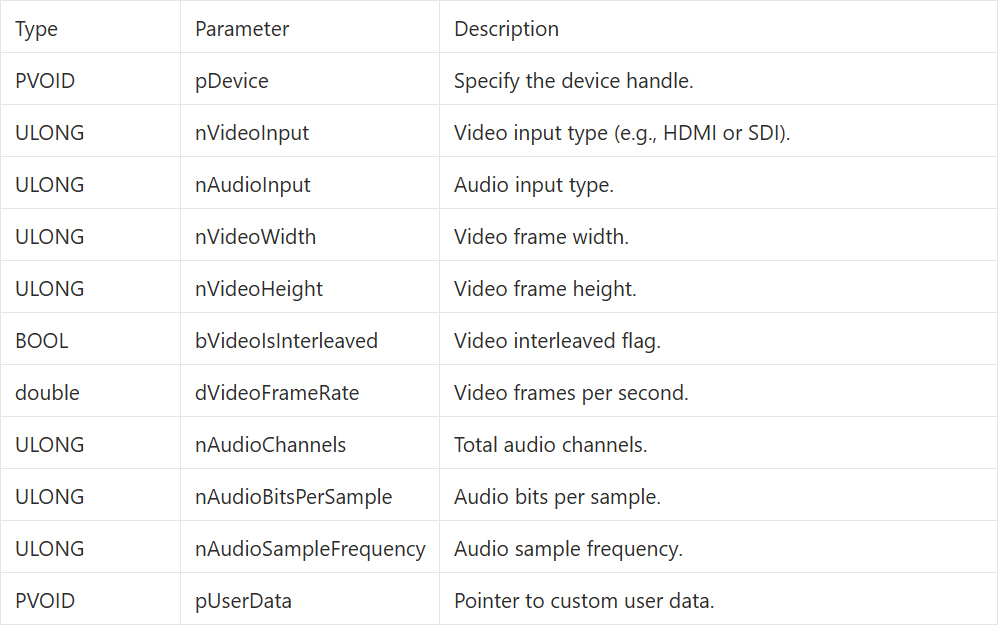
• Returned Intelligence Parameters ( PF_FORMAT_CHANGED_CALLBACK ) :This function returns very detailed video and audio parameters. We can extract the information we need directly from its parameters and display it on the screen :
Event Callback - No Valid Signal Detected
• Registration API :QCAP_REGISTER_NO_SIGNAL_DETECTED_CALLBACK
• Trigger Timing : This Callback is triggered when the device cannot detect any valid specified signal.
• Returned Intelligence Parameters ( PF_NO_SIGNAL_DETECTED_CALLBACK ) :
Event Callback - Signal Removed
• Registration API :QCAP_REGISTER_SIGNAL_REMOVED_CALLBACK
• Trigger Timing : This function is triggered immediately when the device is operating normally but the signal is suddenly lost due to an unexpected reason ( e.g., the user accidentally unplugs the HDMI/SDI cable ).
• Returned Intelligence Parameters ( PF_SIGNAL_REMOVED_CALLBACK ) :
Data Callback - Getting Video Data
• Registration API:QCAP_REGISTER_VIDEO_PREVIEW_CALLBACK
• Trigger Timing : This function is triggered immediately when the device captures each video frame, delivering the fresh raw video data right into your hands.
• Returned Intelligence Parameters ( PF_VIDEO_PREVIEW_CALLBACK ):
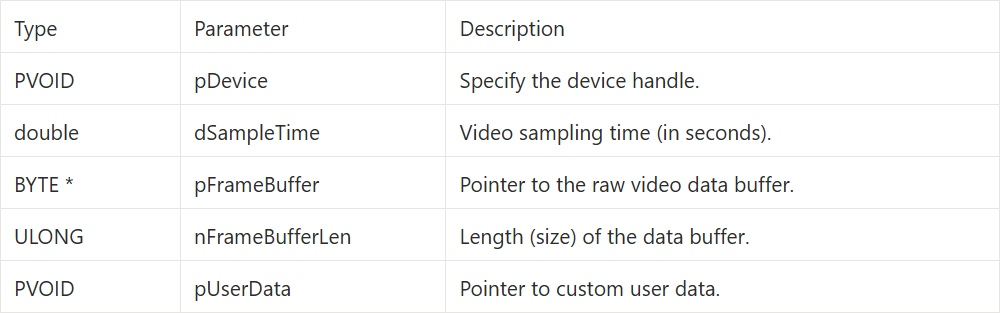
➤ Tip : There is a very practical hidden trick in this video callback function: if the pFrameBuffer passed to you by the system is NULL ( empty ) and nFrameBufferLen is 0, this means the capture card is currently not connected to any signal ! You can use this characteristic for fool-proofing ( error handling ).
Data Callback - Getting Audio Data
• Registration API :QCAP_REGISTER_AUDIO_PREVIEW_CALLBACK
• Trigger Timing : This function is triggered when the device captures audio, providing the raw audio data.
• Returned Intelligence Parameters ( PF_AUDIO_PREVIEW_CALLBACK ) :
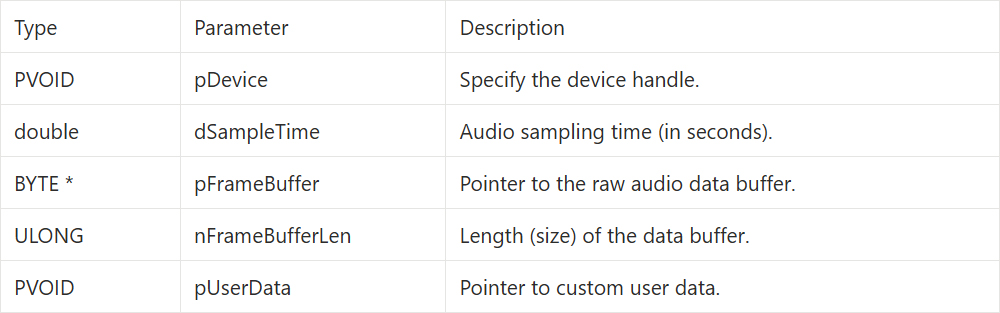
➤ Tip : Just like the video callback, when the audio pFrameBuffer is NULL and nFrameBufferLen is 0, it also indicates that there is currently no signal input.
Understanding Core APIs - Image Snapshot
After successfully displaying the capture card's video on the screen, the next most commonly used feature is definitely "saving a snapshot"! By simply calling the corresponding functions, you can easily output BMP, JPG, PNG, TIF, and even medical-grade DICOM ( DCM ) formats.
➤ Prerequisite for Snapshot : All snapshot APIs must be called only after the "device is successfully connected and there is a video signal input" to successfully capture an image.

Based on "whether it is compressed" and "whether cropping is supported," the SDK thoughtfully divides the snapshot feature into the following 4 core APIs. You can freely choose according to your needs :
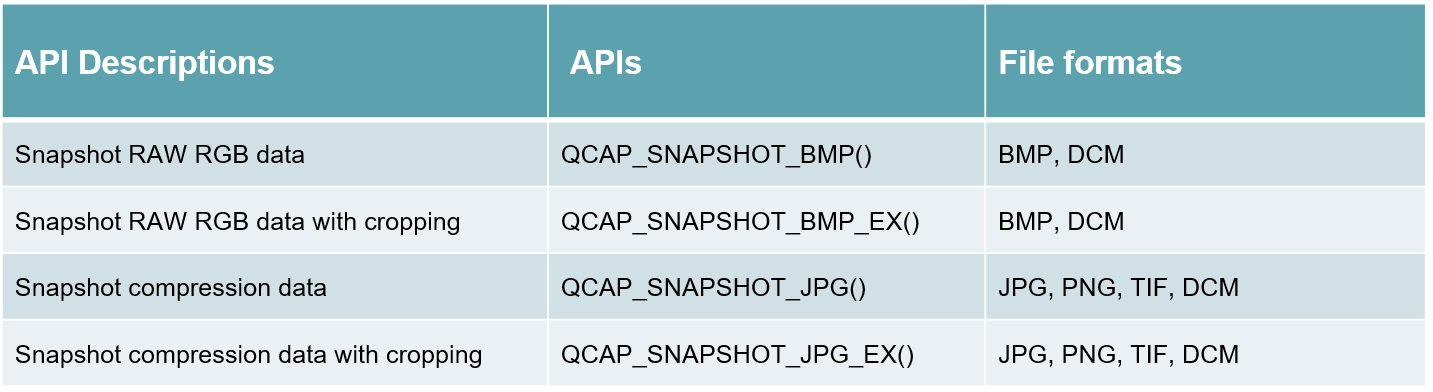
Basic Snapshot APIs: Full Screen Capture
If you only need to simply save the entire screen, you can use these two most basic APIs :
• QCAP_SNAPSHOT_BMP :Capture uncompressed raw images ( Supports BMP, DCM ).
• QCAP_SNAPSHOT_JPG :Capture compressed images to save space ( Supports JPG, PNG, TIF, DCM ).
The core parameters of these two APIs are as follows :
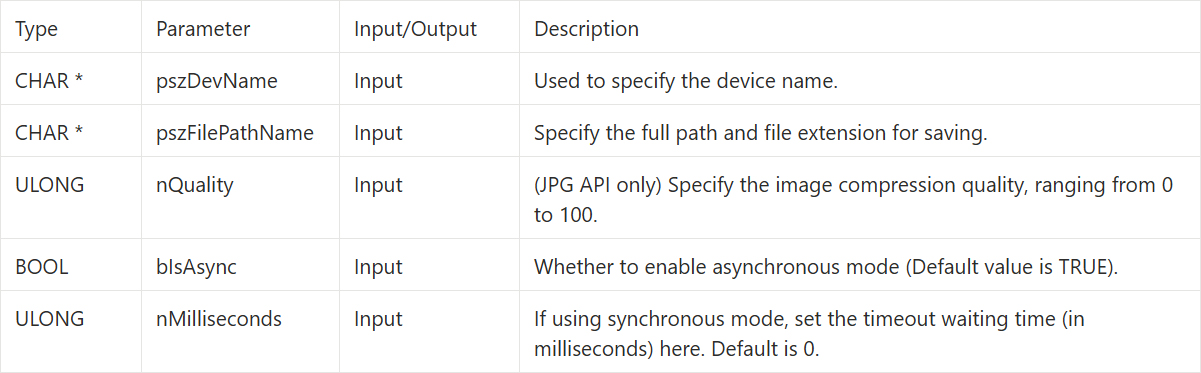
➤ Concept Clarification: What are Asynchronous and Synchronous?
In the parameters just mentioned, the SDK provides the bIsAsync parameter to solve the "UI freezing" issue :
• Asynchronous Mode : Set to TRUE ( default ). After the main program issues the snapshot command, it immediately continues execution, while the bottom layer silently saves the file in the background. The UI will absolutely not freeze due to the snapshot!
• Synchronous Mode : Set to FALSE. The main program must stop and wait until the file is completely saved before moving on.
➤ Recommendation : It is strongly recommended to keep the default TRUE to make the snapshot process silky smooth !

Advanced Snapshot APIs: Supporting Local Cropping and Scaling
If you want advanced features, you can also use the APIs ending with _EX ( e.g., QCAP_SNAPSHOT_JPG_EX ), which allows you to complete "cropping" and "scaling" directly while capturing the image.
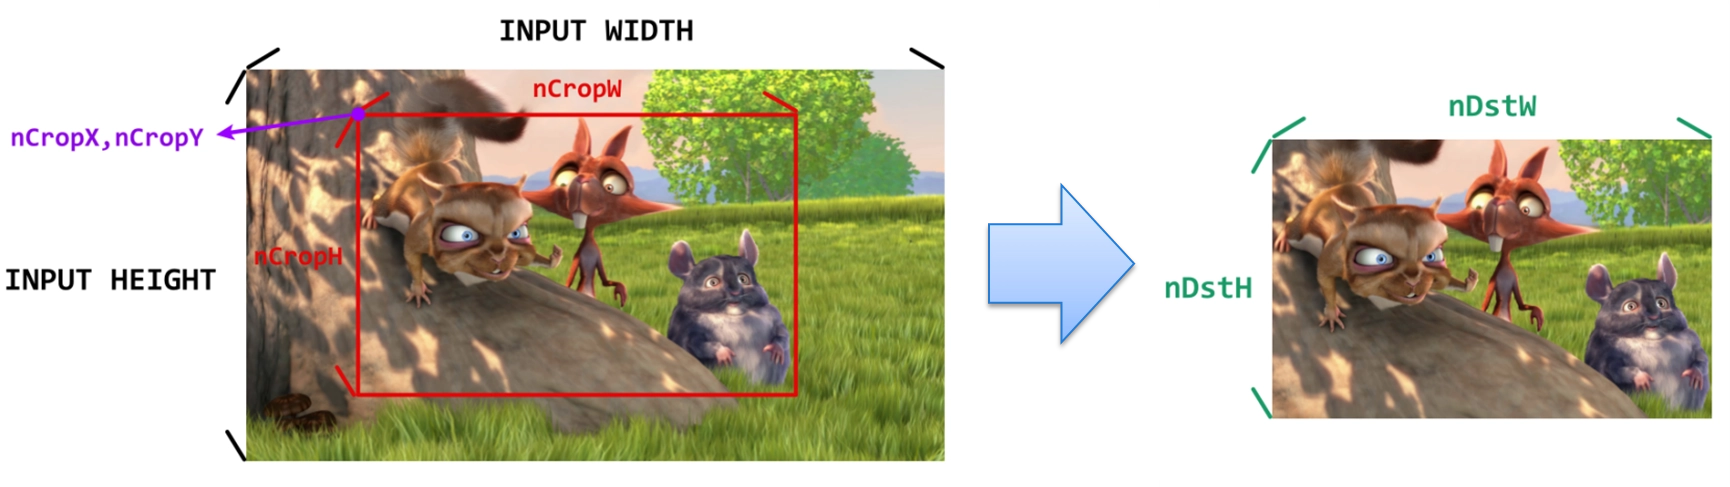
© Blender Foundation | Big Buck Bunny | CC BY 3.0
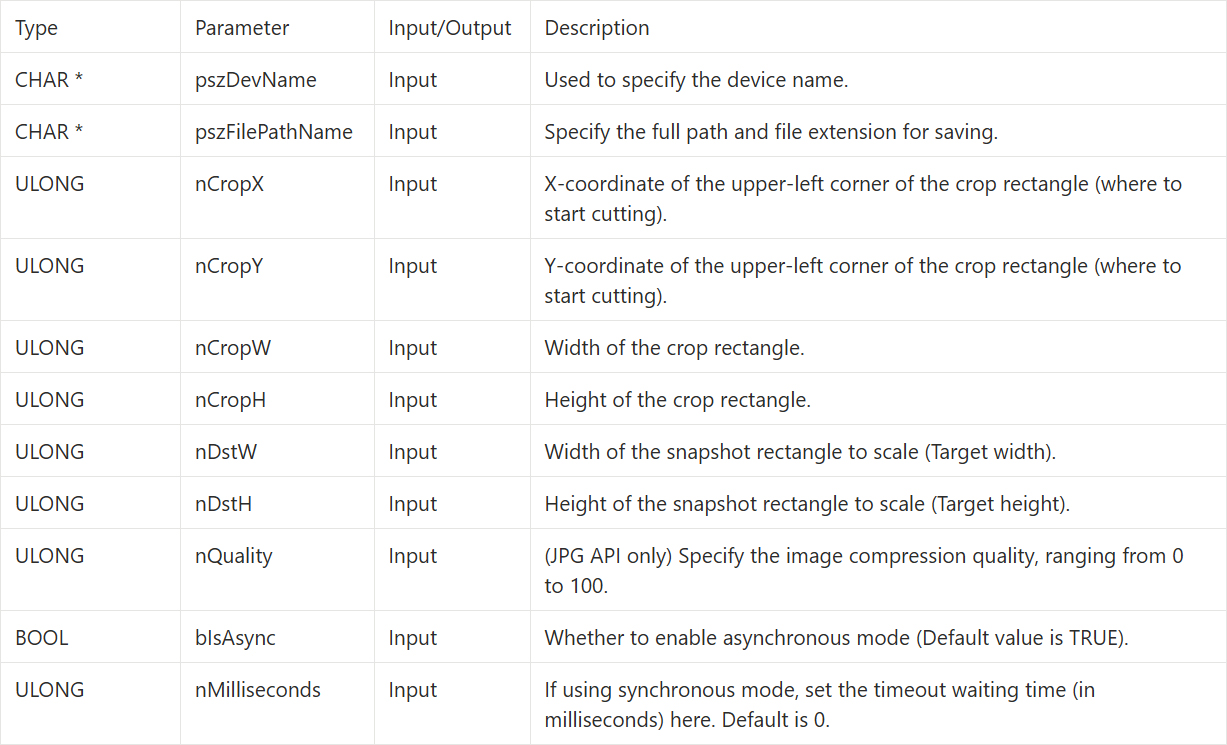
In addition to the basic file saving paths, the _EX version APIs add 6 key geometric parameters to precisely control the image :
Building the UI Display Interface
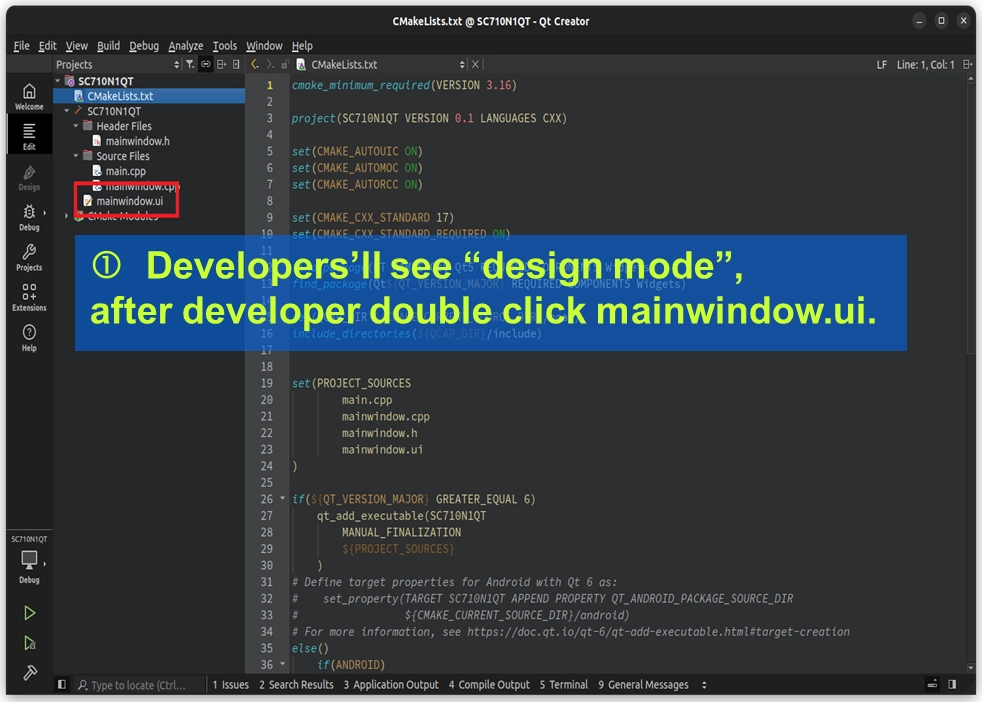
Here, we will directly reuse the Capture and Display Project we built in Chapter 9-4. To make the development workflow smoother, we will lay out all the necessary UI components at once, and then focus on handling the C++ code logic. Please double-click mainwindow.ui in the project directory on the left side of Qt Creator to enter Design Mode :
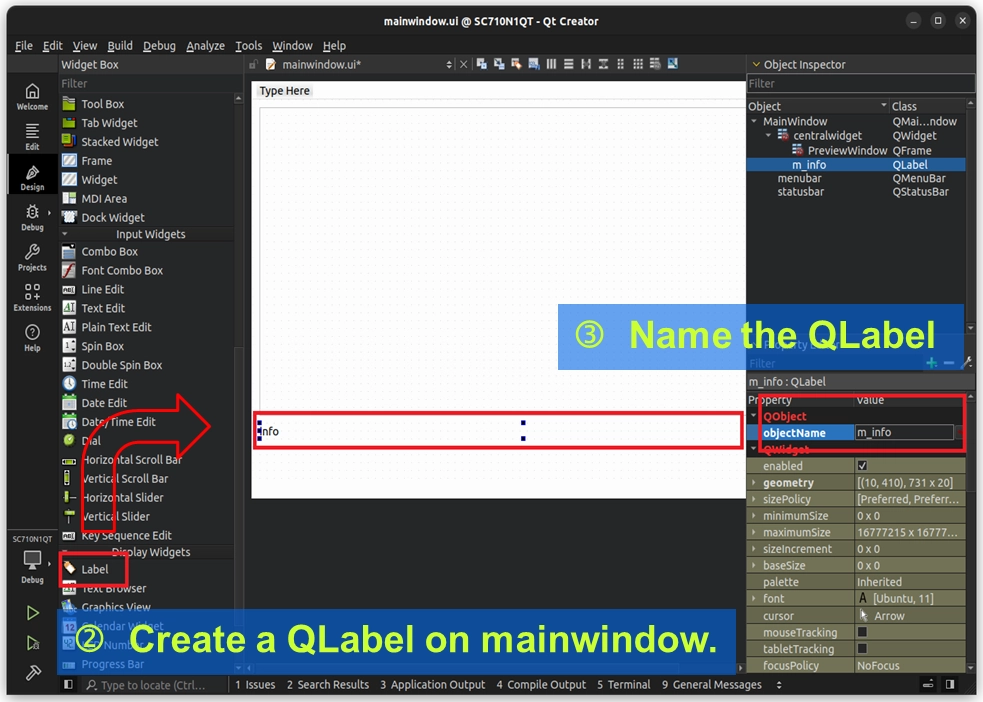
• Create Information Display Area ( Corresponding to the Callback feature )
First, we need to prepare a dedicated "broadcasting speaker" for our Callback informant, used to display the video resolution, FPS, or disconnection warnings reported from the bottom layer in real-time.
Drag and drop a QLabel from the Widgets Box on the left toolbar to a blank area on the screen.
In the Property Editor in the lower right corner, find the objectName property and change it to m_info. This is the exclusive code name we will use to call it in the code later !
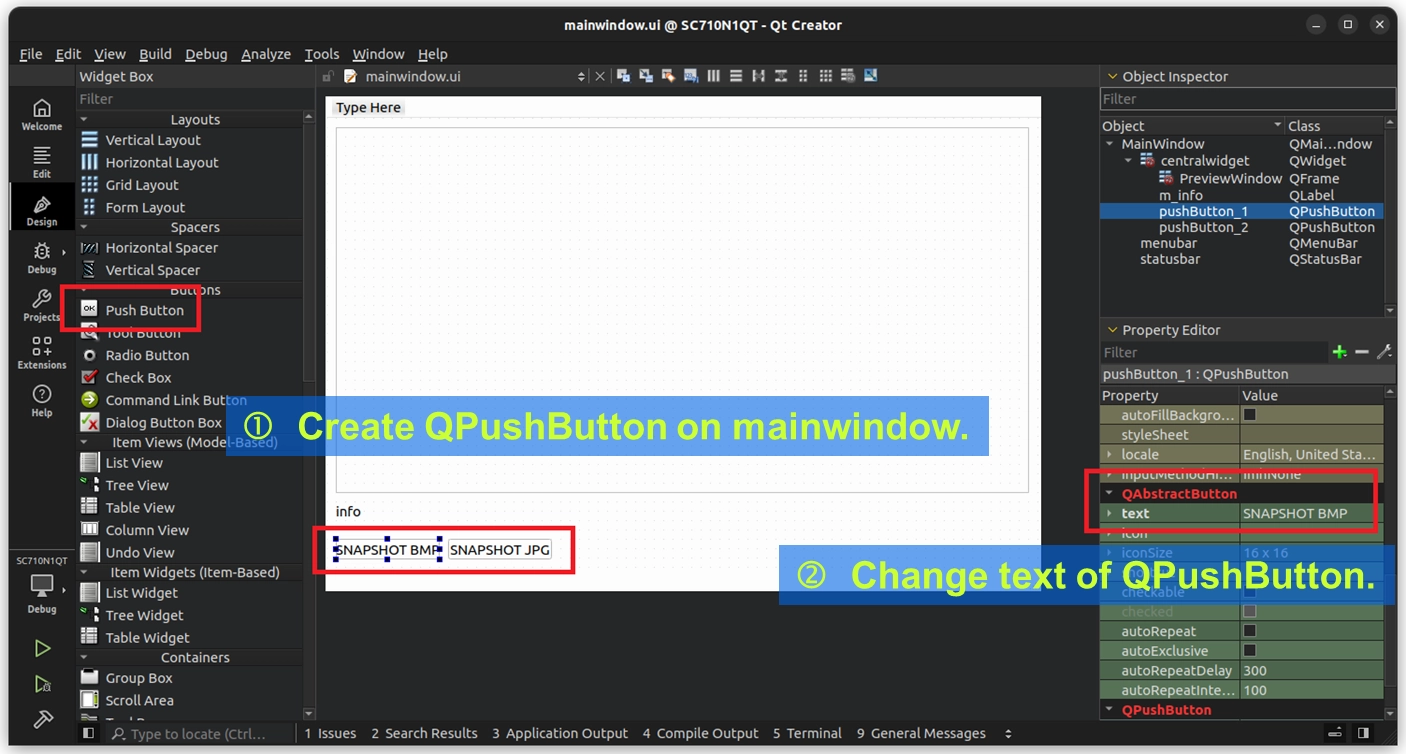
• Create Snapshot Buttons ( Corresponding to the Snapshot feature )
Next, we will provide the user with two physical buttons so they can trigger the snapshot feature at any time.
Drag and drop two QPushButtons from the Buttons category on the left toolbar onto the screen.
Find the text property in the Property Editor in the lower right corner ( or simply double-click the buttons directly ), and change the display text of these two buttons to SNAPSHOT BMP and SNAPSHOT JPG, respectively.
Awesome! Now our "development canvas" is ready: there is a dedicated label block to receive information, and two physical buttons to press.
Everything is set. Next, please switch back to mainwindow.cpp. We are going to officially inject soul into these UI components and connect them with the underlying APIs!
Writing the Core Code
With the canvas ready, please switch Qt Creator to Code Mode. We are going to open mainwindow.h and mainwindow.cpp to implement our logic !
Implementing the Callback Reporting Mechanism
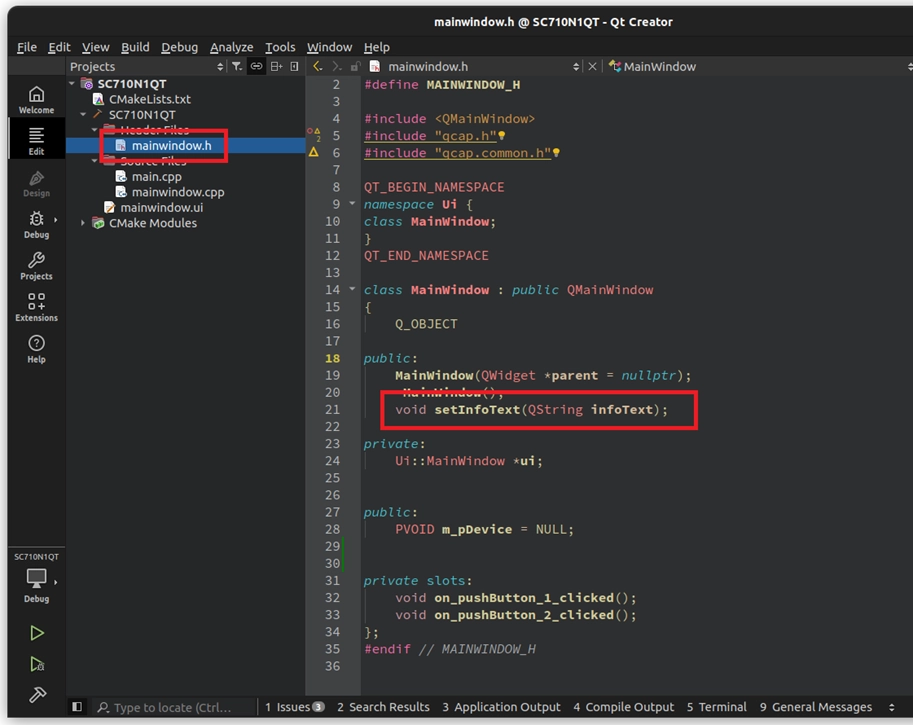
• Create the UI Update Function ( setInfoText )
Because Callbacks are triggered by the underlying SDK, we need an intermediary function to successfully display the information on the m_info label we just created. Please first open mainwindow.h and declare this function in the public section :
Next, open mainwindow.cpp to implement this function :
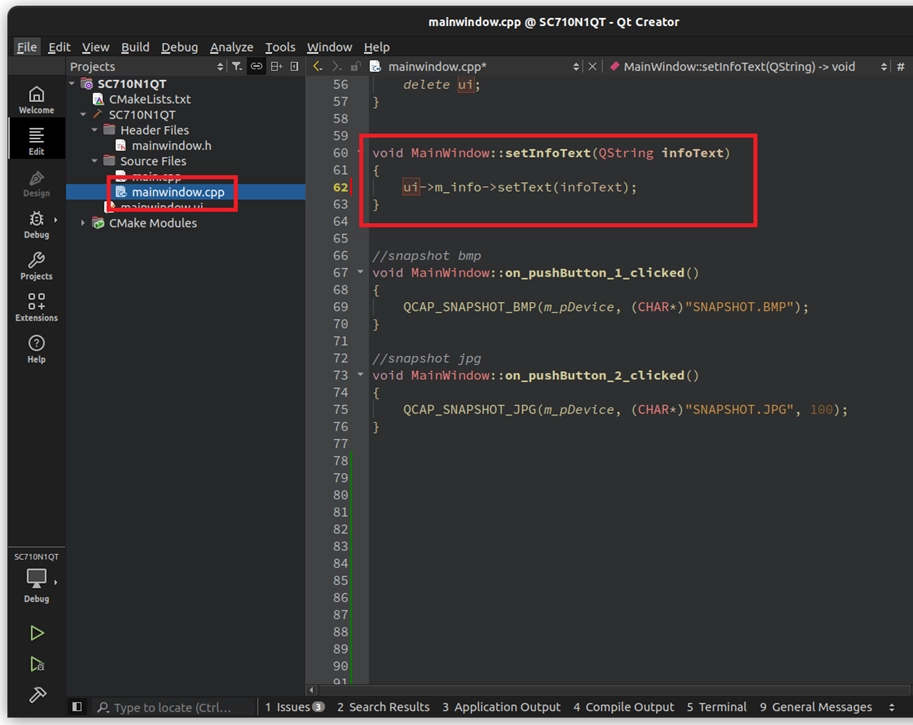
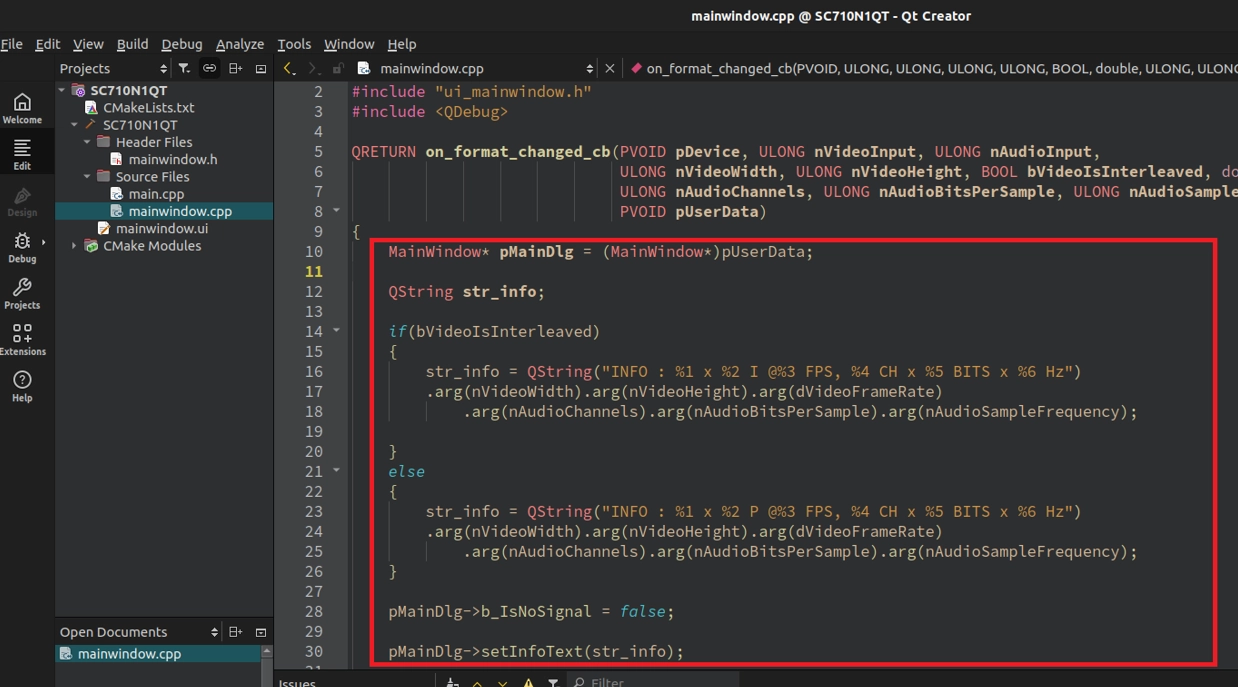
• Define the Actions of the Callback Informants ( PF_... )
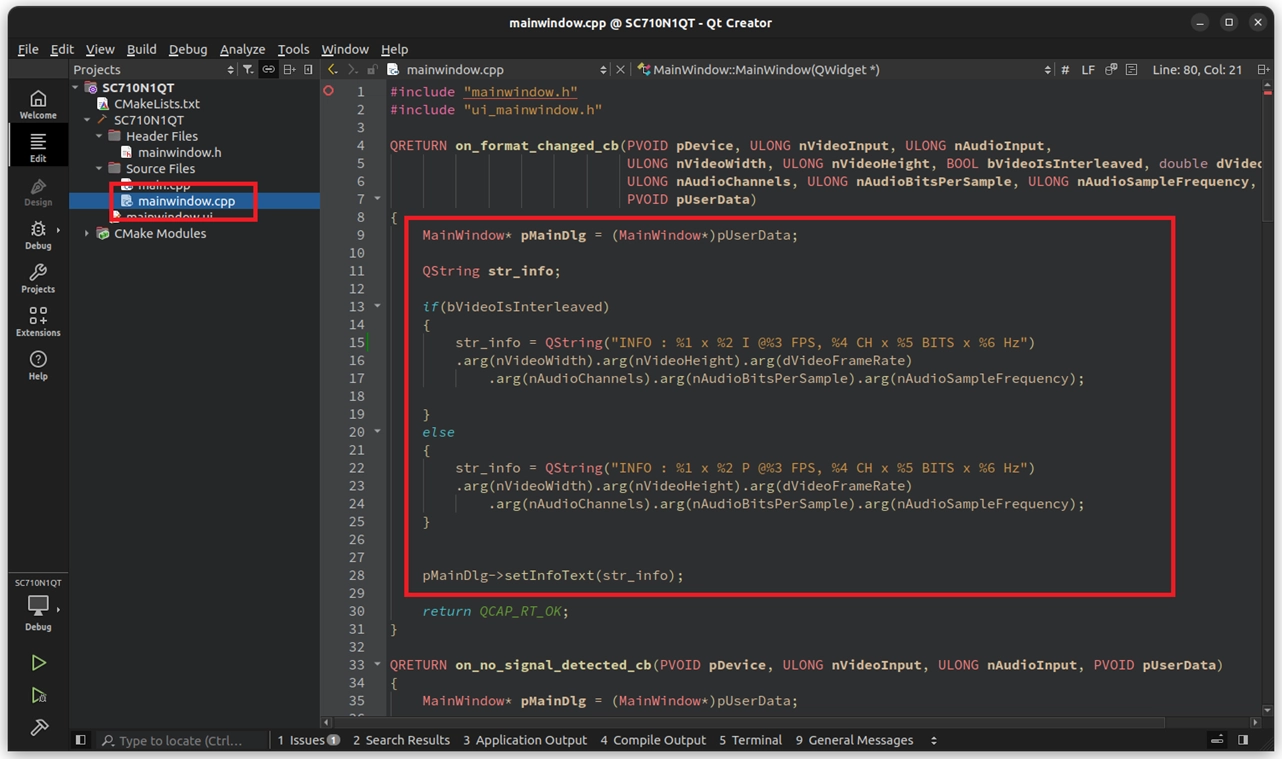
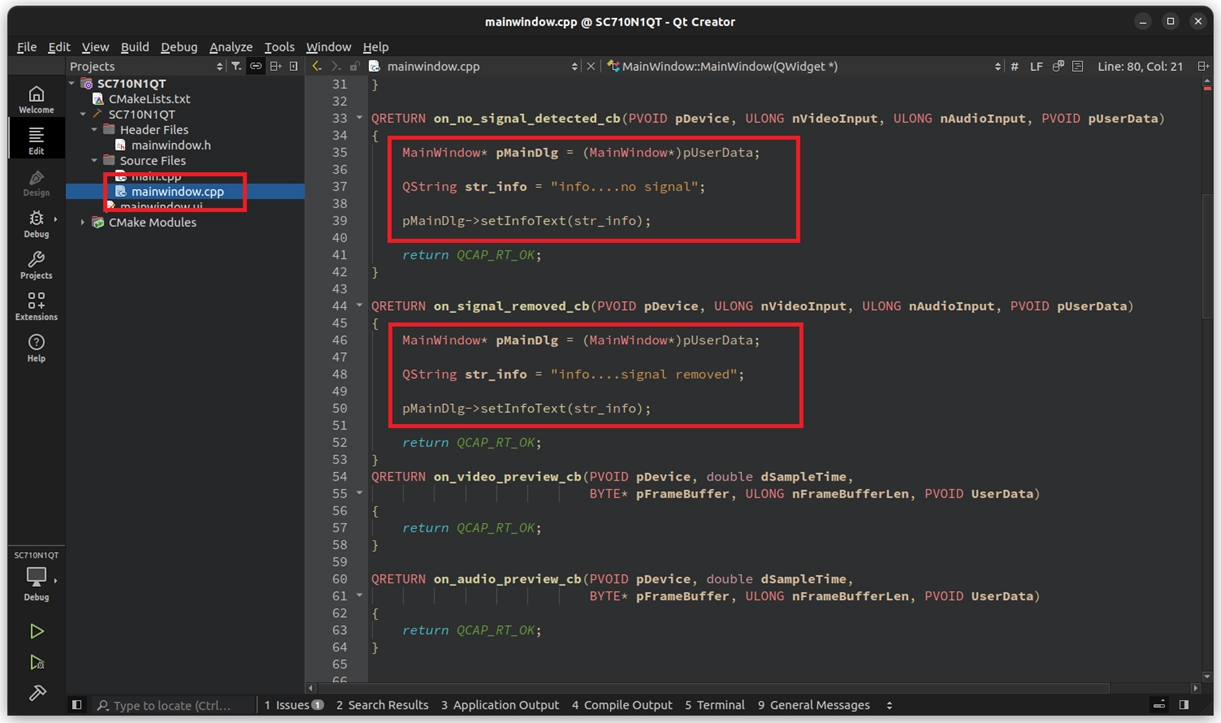
Next, we need to write our callback function definitions in the upper part of mainwindow.cpp ( before the MainWindow constructor ).
Here, we will use the pUserData trick mentioned earlier, casting it back to MainWindow, and thereby calling the newly written setInfoText function to update the screen :
• Register the Informants into the Lifecycle ( QCAP_REGISTER_... )
After defining the tasks, don't forget to bind them to the device. Please sequentially register these five Callbacks after QCAP_CREATE inside the MainWindow constructor :
// ... Omitted (QCAP_CREATE device creation) ...
// Sequentially register the five major Callbacks, remember to pass 'this' as the last
QCAP_REGISTER_FORMAT_CHANGED_CALLBACK(m_pDevice, on_format_changed_cb, this);
QCAP_REGISTER_NO_SIGNAL_DETECTED_CALLBACK(m_pDevice, on_no_signal_detected_cb, this);
QCAP_REGISTER_SIGNAL_REMOVED_CALLBACK(m_pDevice, on_signal_removed_cb, this);
QCAP_REGISTER_VIDEO_PREVIEW_CALLBACK(m_pDevice, on_video_preview_cb, this);
QCAP_REGISTER_AUDIO_PREVIEW_CALLBACK(m_pDevice, on_audio_preview_cb, this);
// ... Omitted (QCAP_RUN start device) ...
⚠️ Reminder : The QCAP_REGISTER_... APIs in this chapter must be written AFTER QCAP_CREATE and BEFORE QCAP_RUN ! And remember to pass this in the last parameter.
Before we continue coding for the snapshot buttons, let's test our hard work. Please click the green triangle play button ( Run ) at the bottom left of Qt Creator to build and run the current project.
When the window pops up and the capture card successfully receives the video signal, please move your eyes to the bottom left of the screen—you will be pleasantly surprised to find that the blank QLabel we dragged earlier is now accurately displaying the real-time information reported by the underlying informants !
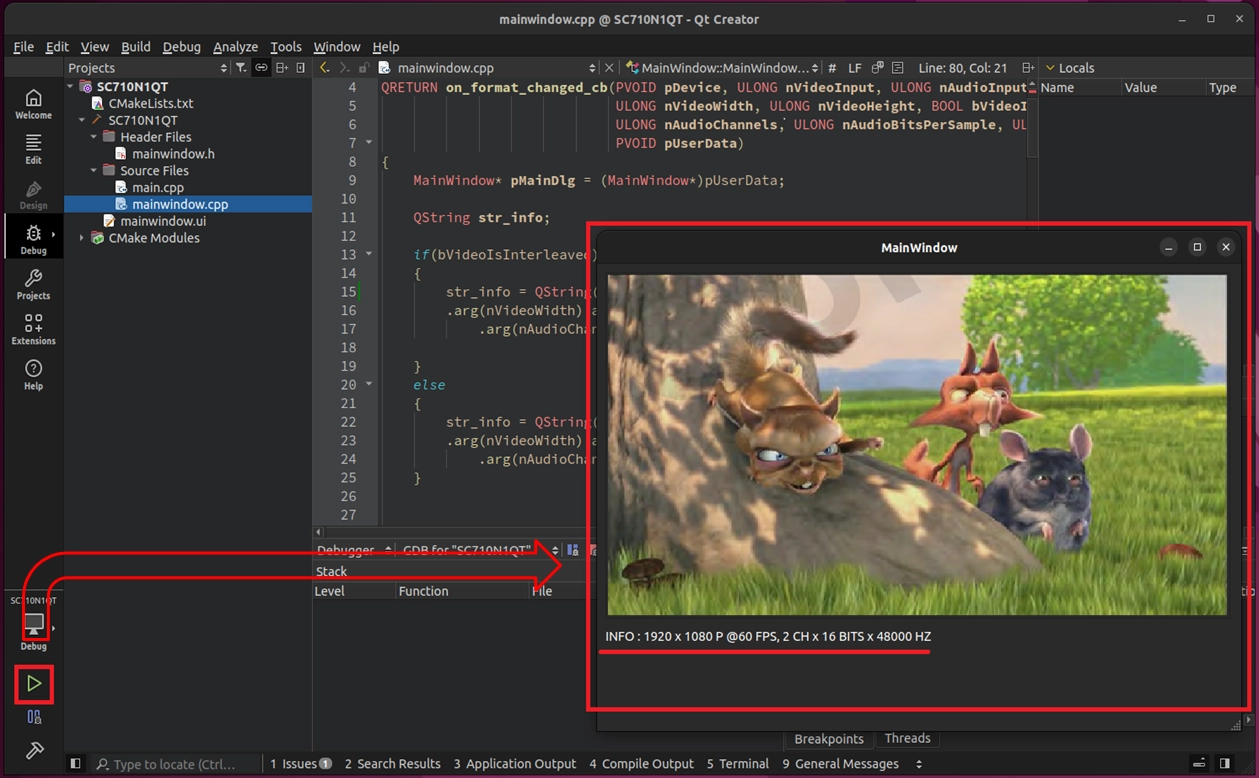
© Blender Foundation | Big Buck Bunny | CC BY 3.0
Implementing the Snapshot Button Feature
Our Callback has successfully started working. The final step is to give life to the two snapshot buttons on the screen!
In Qt development, to make a button respond after being clicked, we need to use the "Signals and Slots" mechanism. Please follow the steps below to bind the underlying Snapshot API to the buttons:
• Trigger auto-generated code : Please briefly switch back to the mainwindow.ui Design Mode. Right-click on the SNAPSHOT BMP button we created earlier ➔ select "Go to slot..." ➔ select
clicked().
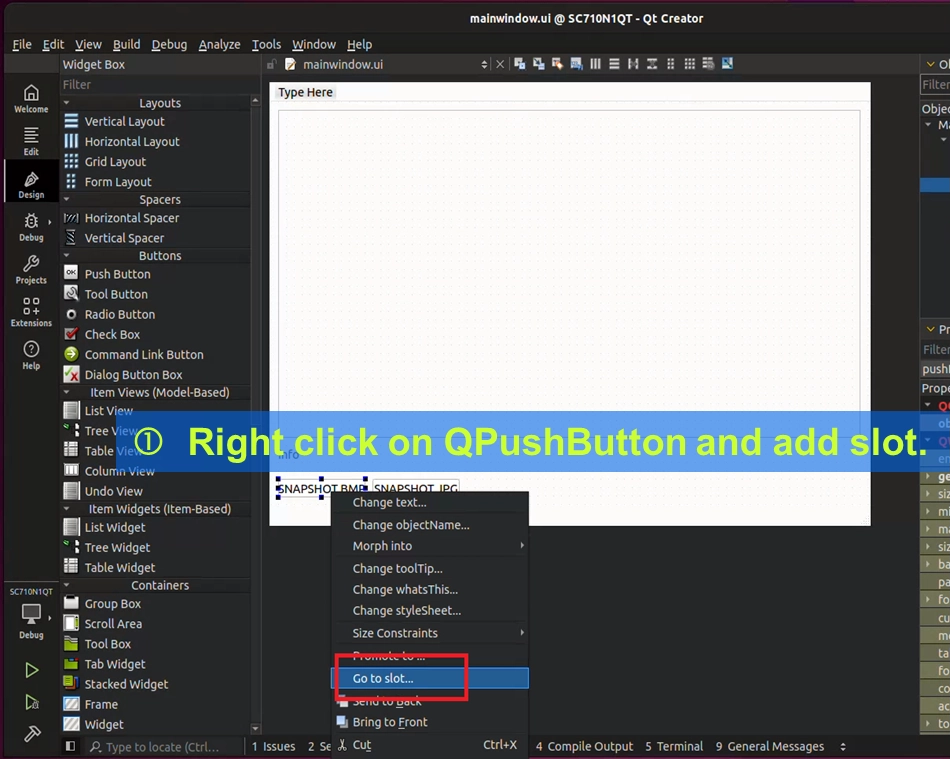
• At this point, Qt Creator will very thoughtfully jump the screen back to mainwindow.cpp automatically and prepare a blank function named on_pushButton_clicked() for you! We just need to call the API provided by the original manufacturer within this blank block.
After we excitedly drag the Snapshot buttons onto the UI, let's pause and think about a question: "What happens if the user's camera is not connected properly at all ( or is unplugged halfway through ), and the record or snapshot button is pressed at this time?"
The answer is: The program might crash because it cannot capture the video frame!
To solve this problem, we can use a fool-proofing switch ( flag ) named b_IsNoSignal . Its operating logic is very smart and is divided into the following three steps:
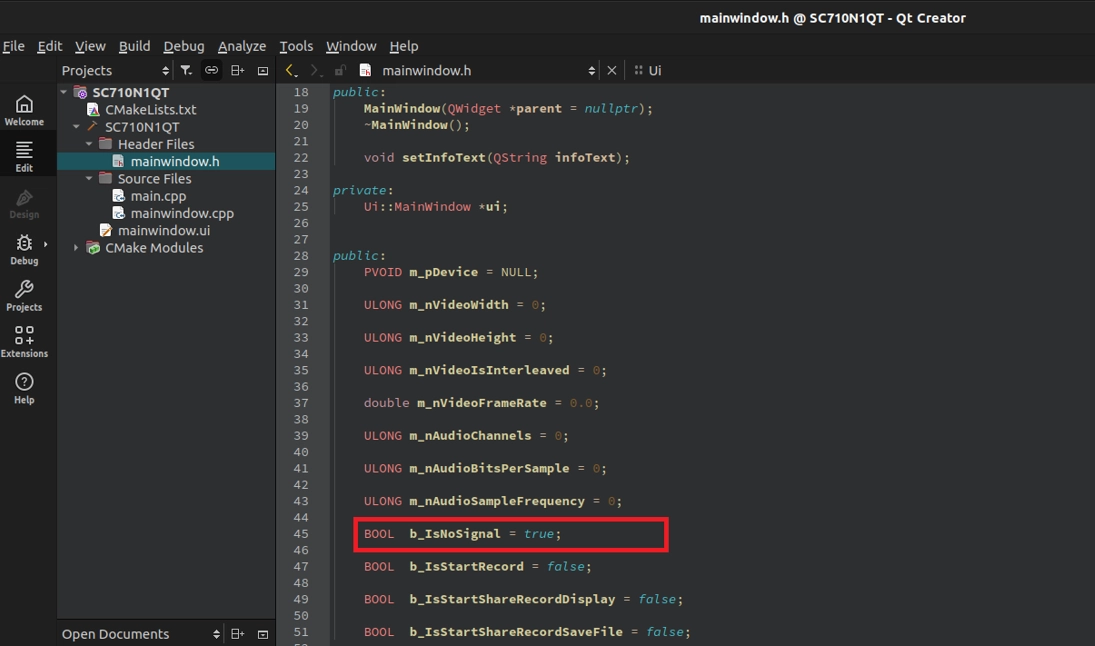
Declare and Initialize the Switch
First, we declare this variable in mainwindow.h, and when the program just starts ( in the constructor of mainwindow.cpp ), we set it to true by default ( meaning there is currently no signal ). This is because when the program is just opened and the hardware hasn't fully finished initializing, there is indeed no video frame.
Link with Callbacks
We let this variable automatically switch its state following the underlying "event signals":
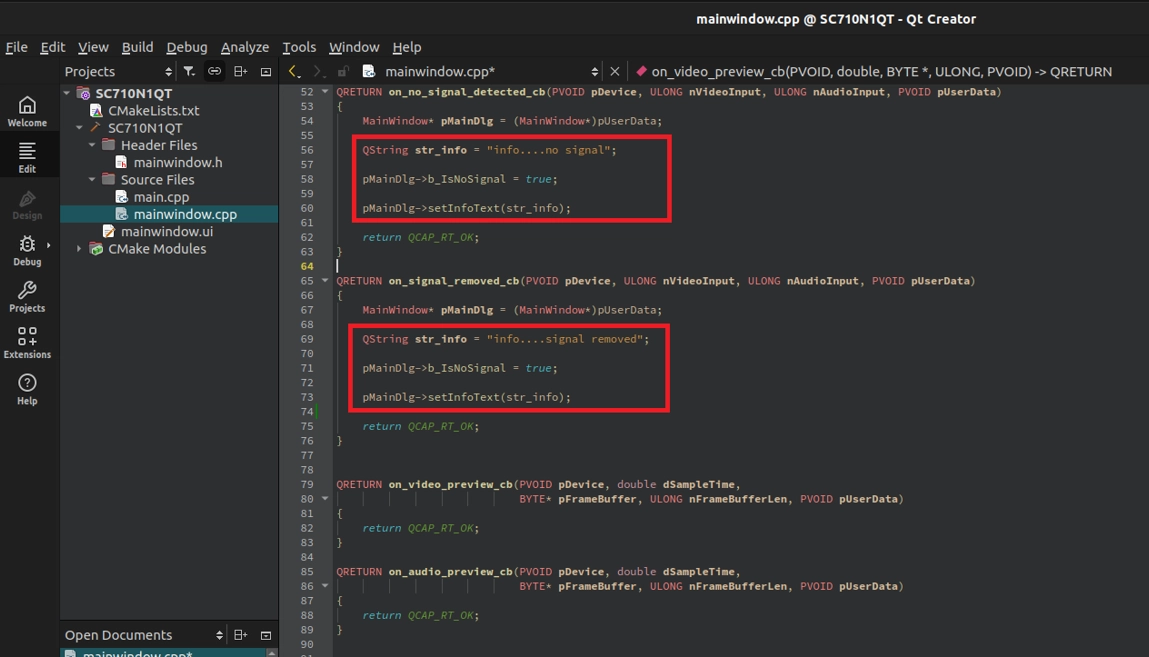
• When the signal is lost : If the camera is unplugged or no signal is detected, the SDK will trigger
on_no_signal_detected_cb or on_signal_removed_cb. Inside these two Callbacks, we set the variable back to pMainDlg->b_IsNoSignal = true; to declare "There is no video frame now!".
• When the signal is successfully connected : If the camera operates normally, the SDK will trigger
on_format_changed_cb ( meaning the resolution and other formats are captured ). At this time, we immediately change the variable to pMainDlg->b_IsNoSignal = false;, meaning "The video frame is ready!".
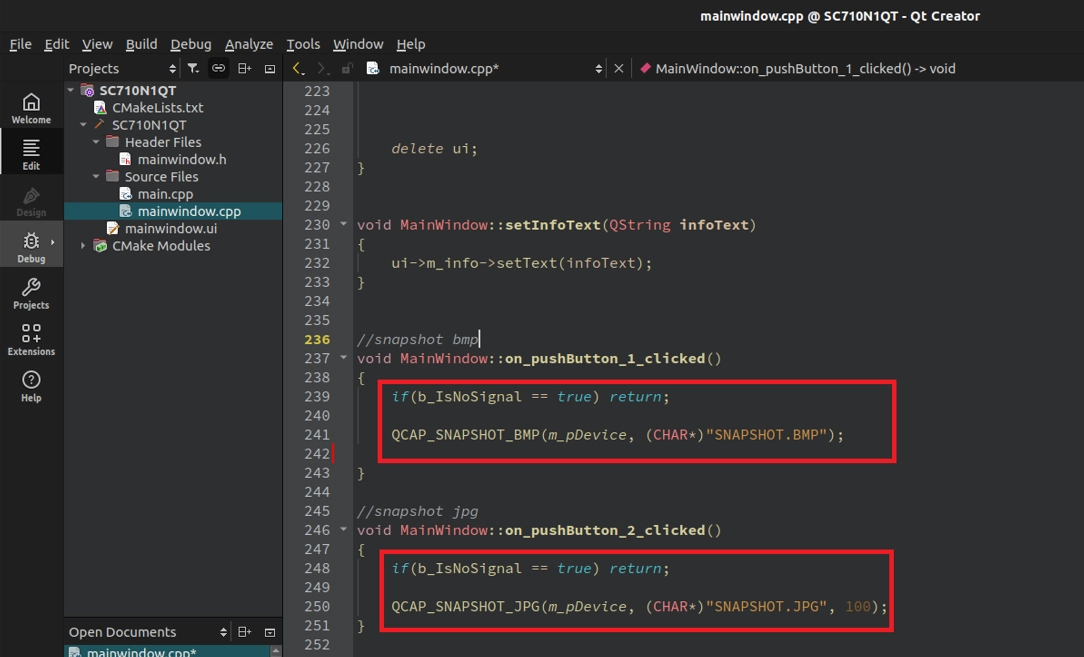
Adding a "Fool-Proofing Gate" to the Buttons
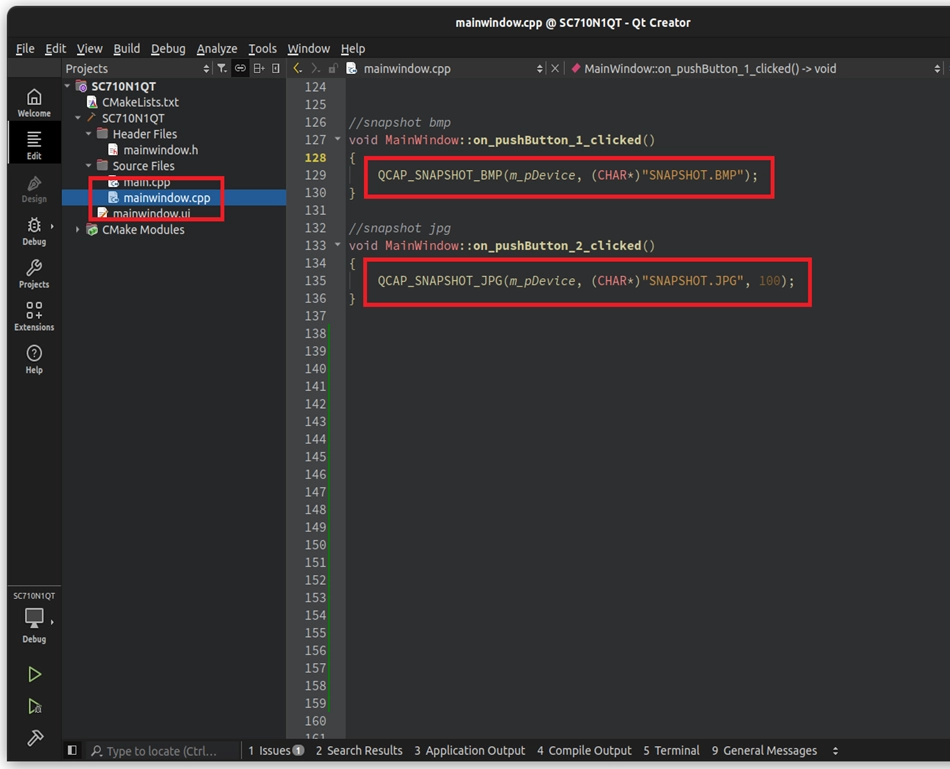
Finally, let's go back to the slot functions of the Snapshot buttons. Before executing the core APIs, we add a strict fool-proofing gate ( safety check ) :
Final Verification
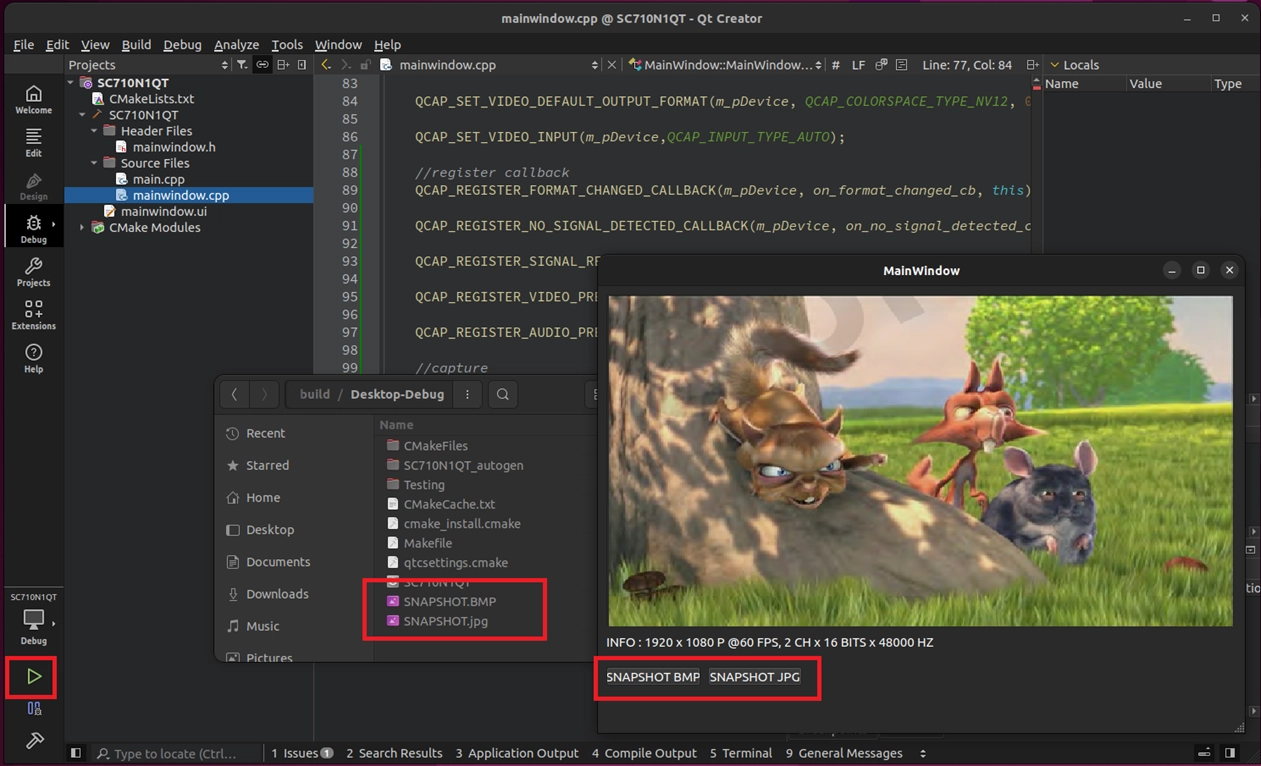
All the code has been written! Please click the green triangle play button ( Run ) at the bottom left of Qt Creator again to build and run the project.
After the video smoothly appears on the screen, go ahead and boldly press the SNAPSHOT BMP and SNAPSHOT JPG buttons at the bottom of the screen! You will find that the video remains very smooth without any freezing or stuttering.
➤ Treasure Hunt Time: Where did the captured images go? For beginners who are new to Qt, they often can't find the images they just saved. Because we only wrote relative paths in the code ( for example, "SNAPSHOT.JPG" ), the images will be saved in the build output folder of the Qt project.
• Please open your file explorer and go back one level up from your project's root directory.
• Look for a folder named build-SC710N1QT-Desktop-Debug ( the name may vary slightly depending on your project and compiler settings ).
• Once you click into it, you will see the freshly captured .BMP and .JPG snapshot files already sitting there !
Mission Accomplished ! Congratulations on successfully completing the advanced practical exercise of NexVDO SDK's Callback and Snapshot features !
© Blender Foundation | Big Buck Bunny | CC BY 3.0