7-3 DeepStream Environment
Learning Objectives
1. Understand the Positioning and Architecture of DeepStream
( 1 ) Understand that DeepStream is an AI streaming analytics toolkit built on the GStreamer framework and CUDA-X stack.
( 2 ) Recognize its core components ( decoding, preprocessing, batch merging, inference, tracking, display, and output ) and their hardware acceleration methods.
2. Master DeepStream's Input and Output Pipelines
( 1 ) Be able to explain how DeepStream receives input from sources such as USB/CSI cameras, video files, and RTSP streams.
( 2 ) Be able to describe how it ultimately outputs object detection and classification results in the form of visuals, files, or RTSP metadata.
3. Familiarize with DeepStream's Development and Deployment Process
( 1 ) Obtain credentials on NVIDIA NGC, launch the official DeepStream Docker container, and run examples.
Introduction to DeepStream
DeepStream is a streaming analytics toolkit used to build AI-powered applications. It takes streaming data from sources such as USB/CSI cameras, video files, or RTSP streams as input, and uses AI and computer vision to generate insights from pixels for better understanding of the environment.
 DeepStream supports application development using C/C++ and Python bindings, and comes with several reference applications in both C/C++ and Python. It is built on top of multiple NVIDIA libraries in the CUDA-X stack, such as CUDA, TensorRT, the NVIDIA Triton™ Inference Server, and multimedia libraries.
DeepStream is built using the open-source GStreamer framework and provides an optimized graph-based architecture. The diagram below illustrates a typical video analytics application, showing the flow from input video to output insights. Each individual block represents a different plugin used in the process. At the bottom are the various hardware engines utilized by the entire application. Optimized memory management with zero memory copy between plugins and the use of various accelerators ensures maximum performance.
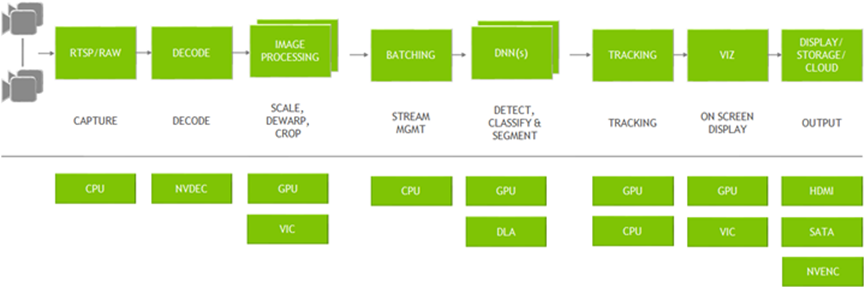
DeepStream provides building blocks in the form of GStreamer plugins that can be used to construct efficient video analytics pipelines. Currently, there are over 20 plugins that support hardware acceleration for various tasks.
1. Streaming data sources can include RTSP, local files, or cameras. These are captured by the CPU and passed to NVDEC for decoding. The plugin used for this step is Gst-nvvideo4linux2.
2. After decoding, optional image preprocessing can be performed—for example, using Gst-nvdewarper for fisheye or 360-degree image correction, or Gst-nvvideoconvert for color format conversion. These plugins use the GPU or VIC for acceleration.
3. Batch processing is handled by Gst-nvstreammux, which combines multiple frames into a batch to improve inference efficiency.
4. Inference can be accelerated using TensorRT, or performed via the Triton Inference Server using models built with TensorFlow, PyTorch, and other frameworks.
5. Post-inference, object tracking is supported via the Gst-nvtracker plugin, which offers various trackers balancing performance and accuracy.
6. To visualize bounding boxes, masks, and labels, the Gst-nvdsosd plugin is used.
7. Output results can be rendered on-screen, saved locally, streamed via RTSP, or metadata can be sent to the cloud.
The DeepStream reference app allows users to configure any type and number of input sources. Users can also choose the type of neural network used for inference. A built-in inference plugin is provided for object detection, which can be chained with another inference plugin for image classification. There is also an option to configure an object tracker. For output, users can choose to render on a display, save the output as a file, or stream the video via RTSP.
Environment
The following steps explain how to quickly set up and run a container using NVIDIA DeepStream, as well as how to run the DeepStream reference app:
1. Log in to the NVIDIA NGC Catalog and go to the setup page. ( https://org.ngc.nvidia.com/setup )
2. Click "Generate API Key".
 3. Click "Generate Personal Key".
 4. Enter the Key Name, Expiration, and Services Included, then click Generate Personal Key.
 5. Use the generated key to log in.
➤ For the installation of Docker-related tools, you can review: [ Chapter 6-2: Docker Installation ]
# Enter the container’s interactive shell
docker exec -it
# Run a single command in the container
docker exec
6. Create /etc/docker/daemon.json (requires sudo privileges)
{
"runtimes": {
"nvidia": {
"args": [],
"path": "nvidia-container-runtime"
}
},
"default-runtime": "nvidia"
}
7. Restart Docker
sudo systemctl restart docker
8. The DeepStream environment uses an NVIDIA-provided Docker image to create a Docker container.
ls /tmp/.X11-unix/
# Execute if X0.
export DISPLAY=:0
# Execute if X1.
export DISPLAY=:1
xhost +
sudo docker run -it --rm --network=host --runtime nvidia \
-e DISPLAY=$DISPLAY \
-w /opt/nvidia/deepstream/deepstream-7.0 \
-v /tmp/.X11-unix/:/tmp/.X11-unix \
nvcr.io/nvidia/deepstream:7.0-samples-multiarch
9. Install the required packages (within the Docker container).
(1) If a container is deleted and then a new one is created, it must be installed.
bash /opt/nvidia/deepstream/deepstream/user_additional_install.sh
apt-get install ffmpeg -y
Reference:
[ NVIDIA DeepStream SDK Developer Guide — DeepStream documentation ] ( https://docs.nvidia.com/metropolis/deepstream/dev-guide/ )