9-7 Share Recording Example Tutorial
In the previous chapter, we used the basic recording APIs. However, in many professional applications ( such as broadcast directing or medical surgery split-screen display ), we often need to simultaneously perform "preview display" and "independent recording" on the same video source, and even add specific text prompts on the screen.
To solve this need, the NexVDO SDK provides the powerful Share Record feature. It allows developers to freely allocate the destination of video and audio just like a director. Today, we will combine the Callback mechanism we learned earlier to build an application that supports "dual-window display," "independent recording," and "OSD text overlay"!
© Blender Foundation | Big Buck Bunny | CC BY 3.0
Understanding Core APIs - Share Recording
To start the Share Record engine, we need to divide "acquiring video" and "processing video" into two stages. We will get the raw uncompressed data in the Callback, and then "feed" it to the Share Record engine for processing.

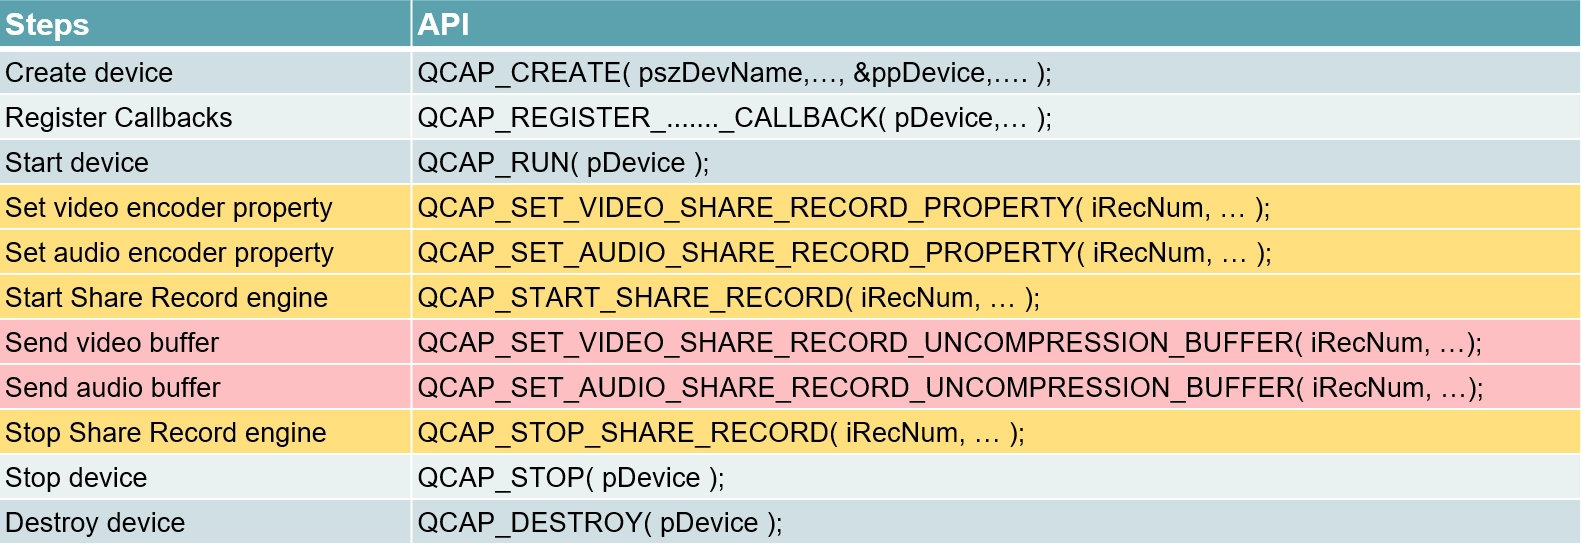
The standard usage sequence is as follows :
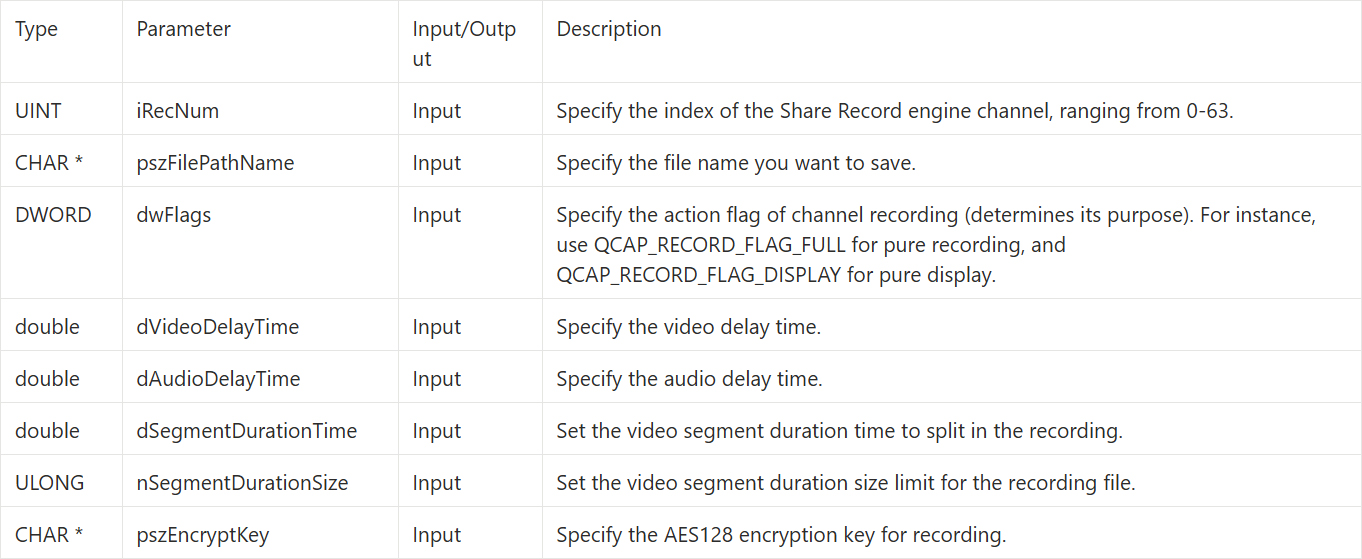
1. QCAP_SET_VIDEO_SHARE_RECORD_PROPERTY :Set Share Record video properties.
2. QCAP_SET_AUDIO_SHARE_RECORD_PROPERTY :Set Share Record audio properties.
3. QCAP_START_SHARE_RECORD :Start the Share Record engine.
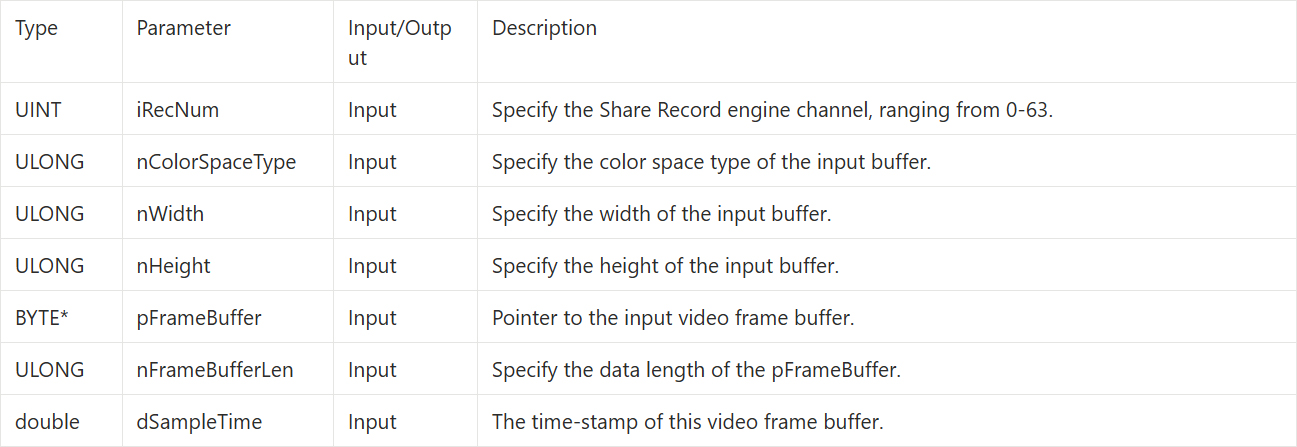
4. QCAP_SET_VIDEO_SHARE_RECORD_UNCOMPRESSION_BUFFER :Continuously feed uncompressed video Buffers in the Callback.
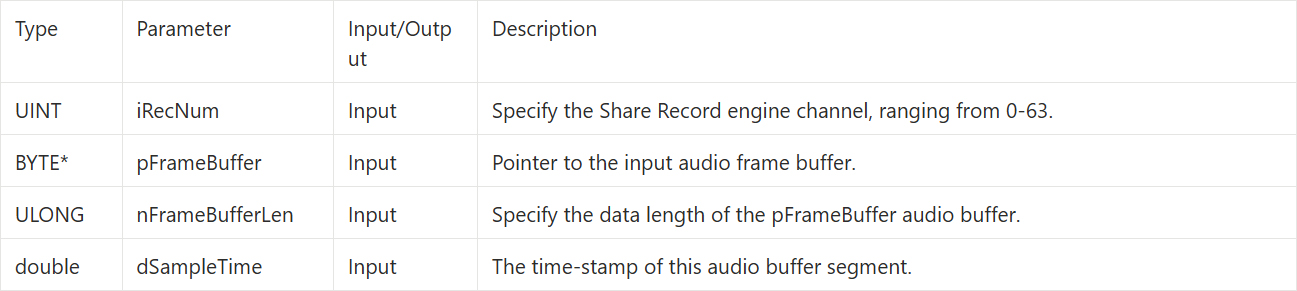
5. QCAP_SET_AUDIO_SHARE_RECORD_UNCOMPRESSION_BUFFER :Continuously feed uncompressed audio Buffers in the Callback.
6. QCAP_STOP_SHARE_RECORD :Stop the Share Record engine.
Core Concept: Share Record's "Video Branching"
Before diving into the detailed API parameters, we must first understand how the Share Record engine actually works at the bottom layer. Why do we say : "It is not just a recorder, but also a renderer"?
Please see the conceptual diagram below :

As shown in the figure, the traditional recording method is "one capture card bound to one recording file." But in multi-view or professional directing scenarios, we might have multiple video sources simultaneously ( e.g., ch1, ch2, ch3, ch4 in the figure ).
Through the Share Record engine, developers can transform into "professional directors". We feed all the raw frames ( Buffers ) from these sources into the engine, and then the engine can freely "branch ( divert )" and "recombine" these frames according to your commands. You can arbitrarily decide which display screen to independently output ch3, ch4 , or ch1 to, or which independent recording files to save them as!
This is the greatest charm of Share Record : perfectly decoupling "frame capture" from "rendering/recording", giving developers the ultimate freedom in video allocation!
After understanding this branching concept, you will understand why in the upcoming APIs, we need to frequently specify iRecNum ( engine channel ). To achieve the dual-track parallel of "display" and "recording", the SDK provides up to 64 independent Share Record channels ( iRecNum ranges from 0 to 63 ). In today's implementation, we will allocate channel 0 for display and channel 1 for exclusive recording.
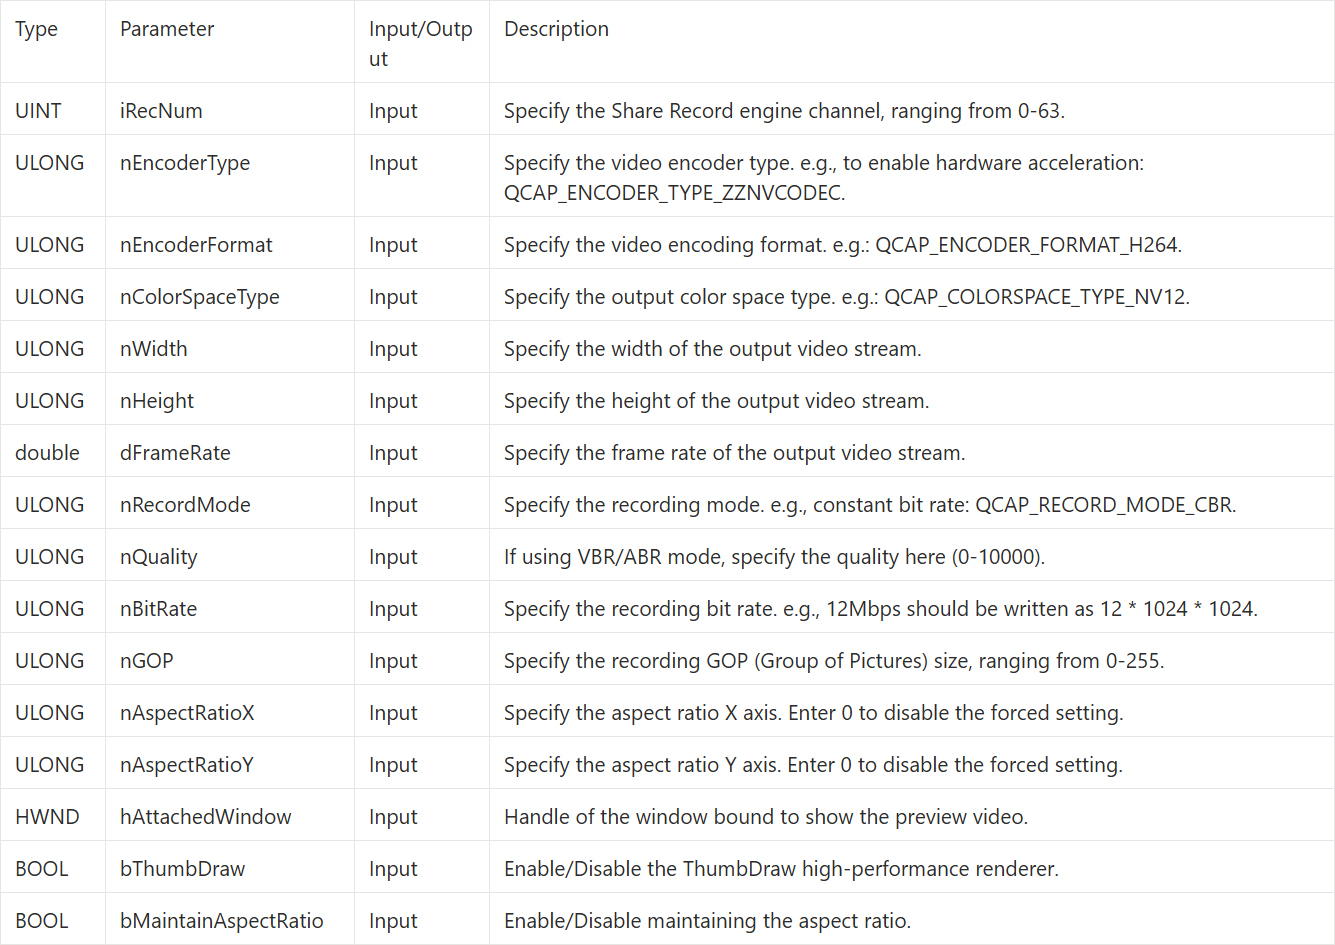
QCAP_SET_VIDEO_SHARE_RECORD_PROPERTY
This API is similar to the previous basic recording API, but adds settings specifically for "output display and color space.”
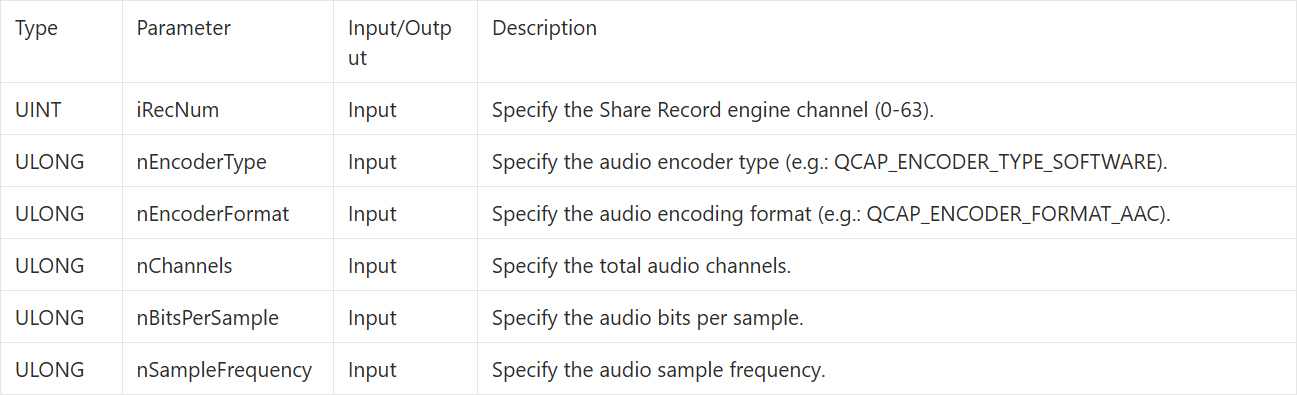
QCAP_SET_AUDIO_SHARE_RECORD_PROPERTY
After the video is set up, next we set the audio encoding and frequency.
QCAP_START_SHARE_RECORD
In addition to basic branching and recording functions, this API also supports advanced settings such as video/audio delay, automatic file segmentation, and AES128 file encryption.
QCAP_SET_VIDEO_SHARE_RECORD_UNCOMPRESSION_BUFFER
➤ Developer Tip : If you need to crop the input video frame, please use the API version ending with _EX instead.
QCAP_SET_AUDIO_SHARE_RECORD_UNCOMPRESSION_BUFFER
➤ Developer Tip : If the audio format of the pFrameBuffer here differs from the format previously set in QCAP_SET_AUDIO_SHARE_RECORD_PROPERTY , the user must use the API version ending with _EX to tell the engine the actual format of the input audio!
QCAP_STOP_SHARE_RECORD
When this Share Record channel is no longer needed, you must call this API to stop the engine and release resources.

Understanding Core APIs - Text Overlay
With a perfect branching engine, we can also use NexVDO's built-in OSD engine to add various text prompts or watermarks to the output video. The SDK provides up to 512 independent OSD layers ( 0~511 ) for developers to deploy freely.
To perfectly overlay a string of text, the standard process is a "two-step approach": first get the boundary size of the text, and then draw the text and color.
© Blender Foundation | Big Buck Bunny | CC BY 3.0
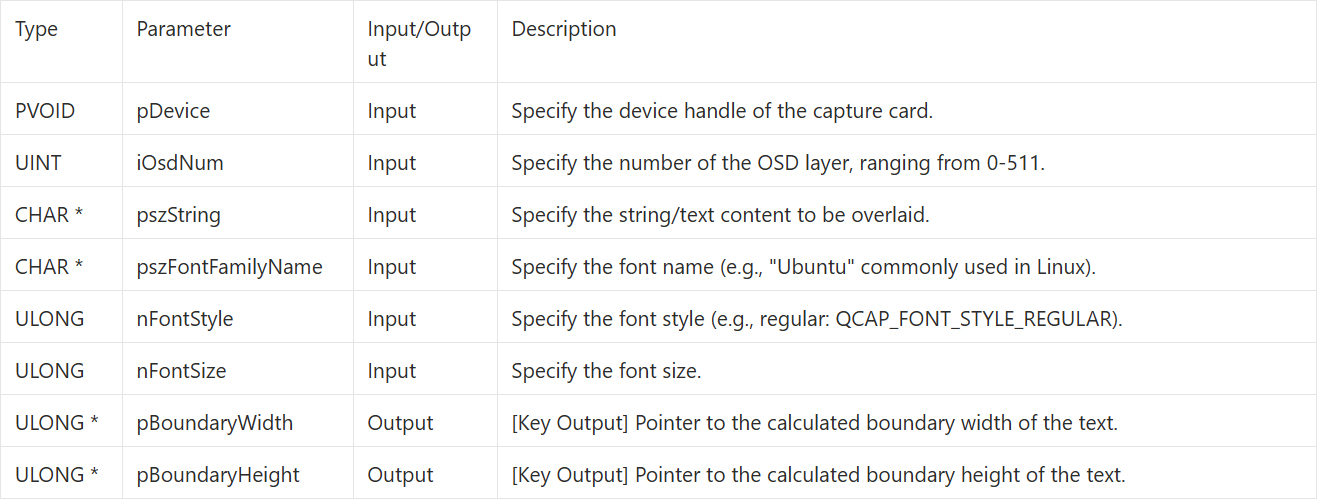
[Step 1: Get Text Boundary API - QCAP_GET_OSD_TEXT_BOUNDARY] Before actually drawing the text, we must first tell the engine what font and size we want to use, so the system can calculate how much width and height this string of text will occupy.
QCAP_GET_OSD_TEXT_BOUNDARY
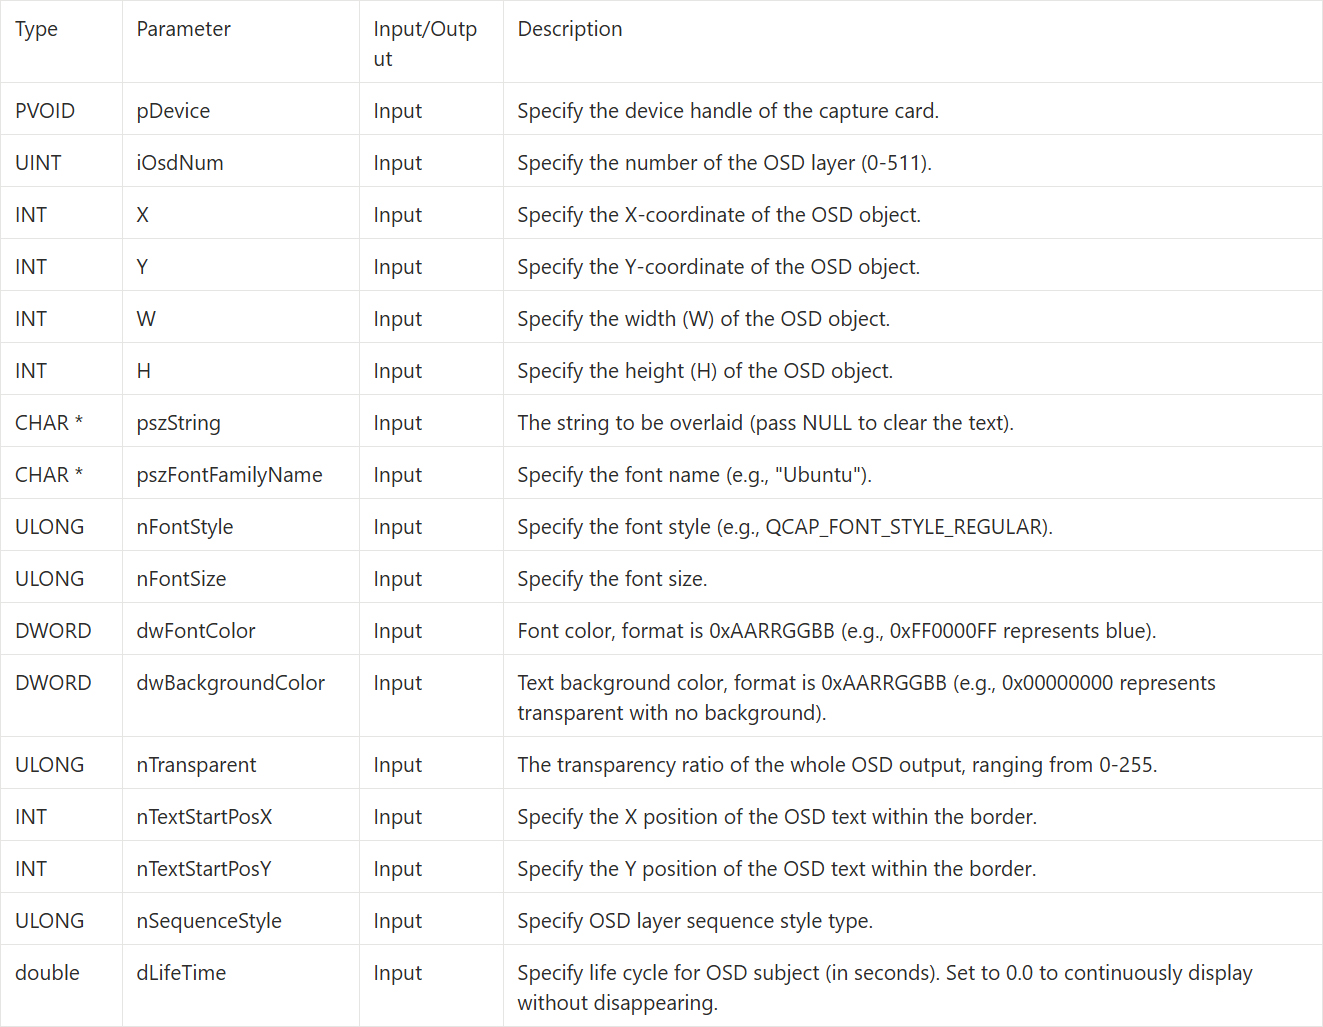
QCAP_SET_OSD_TEXT
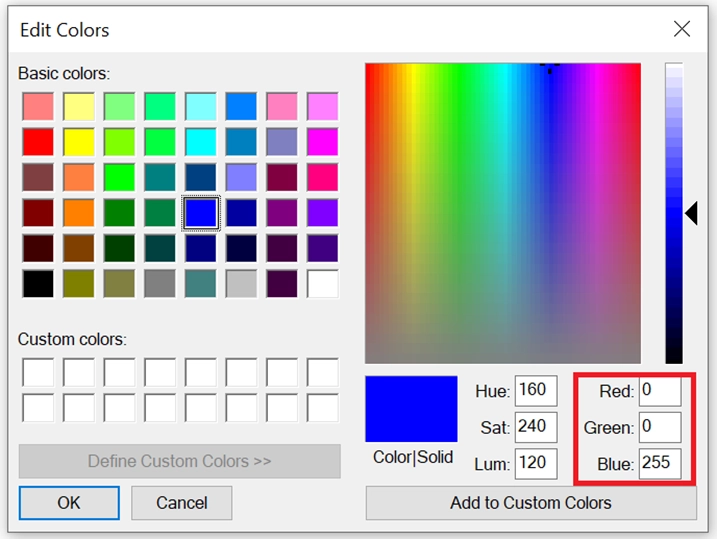
Step 2 : After getting the width and height boundaries of the text to be overlaid, we can accurately draw the text at the specified X/Y coordinates. The most special thing about this API is that it supports the hexadecimal color format with an Alpha transparency channel ( 0xAARRGGBB ).
Here we emphasize a key lifecycle : Developers can use this API to overlay text at any time after calling QCAP_CREATE to create the device. This means you don't need to wait for the video to officially start or begin recording to pre-hang watermarks or prompt text on the screen!
➤ Developer Tip : When the recording ends, or when you want to clear the OSD text on that layer, simply pass NULL to the pszString parameter to turn off the OSD!
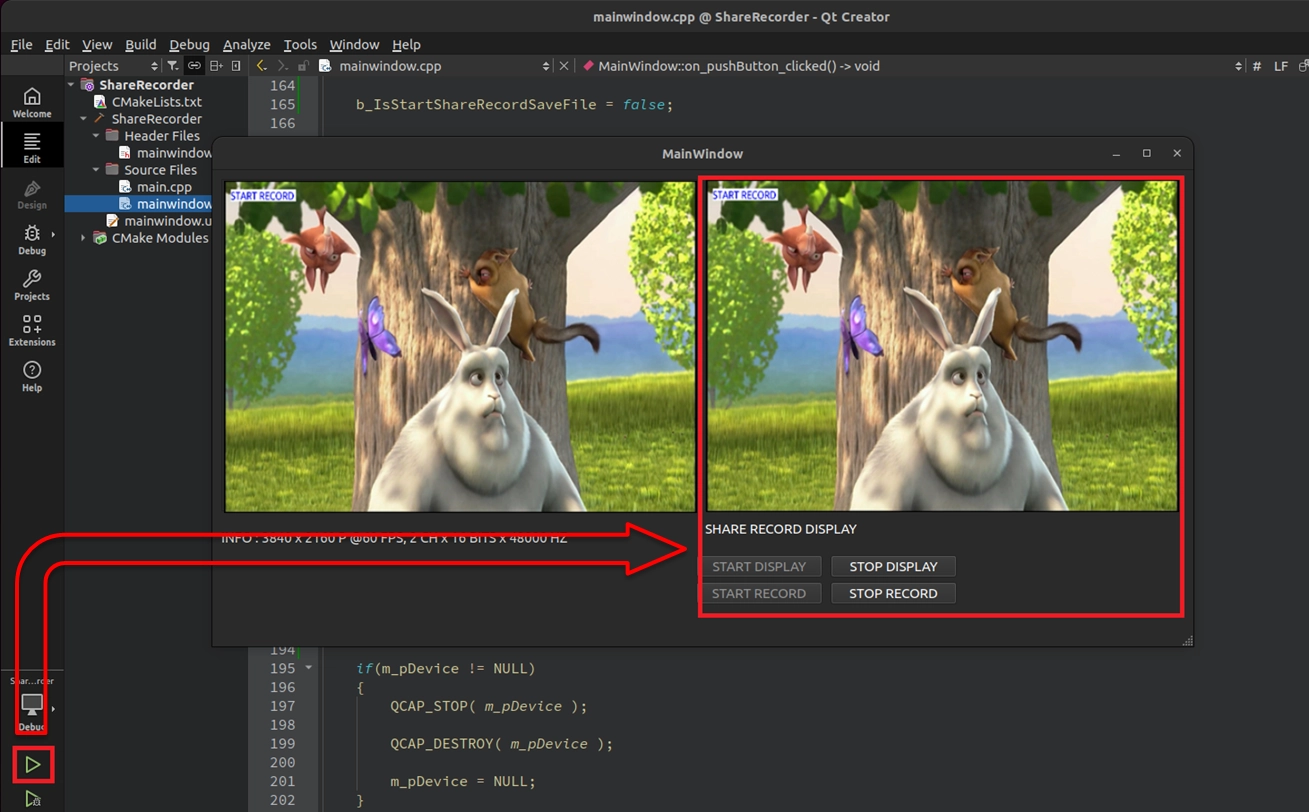
Building the UI Display Interface
With a strong understanding of the underlying APIs, let's first build a graphical interface that perfectly presents the "dual-window branching" feature. Please continue with the project foundation we built in 9-5, open your mainwindow.ui, and enter Design Mode:
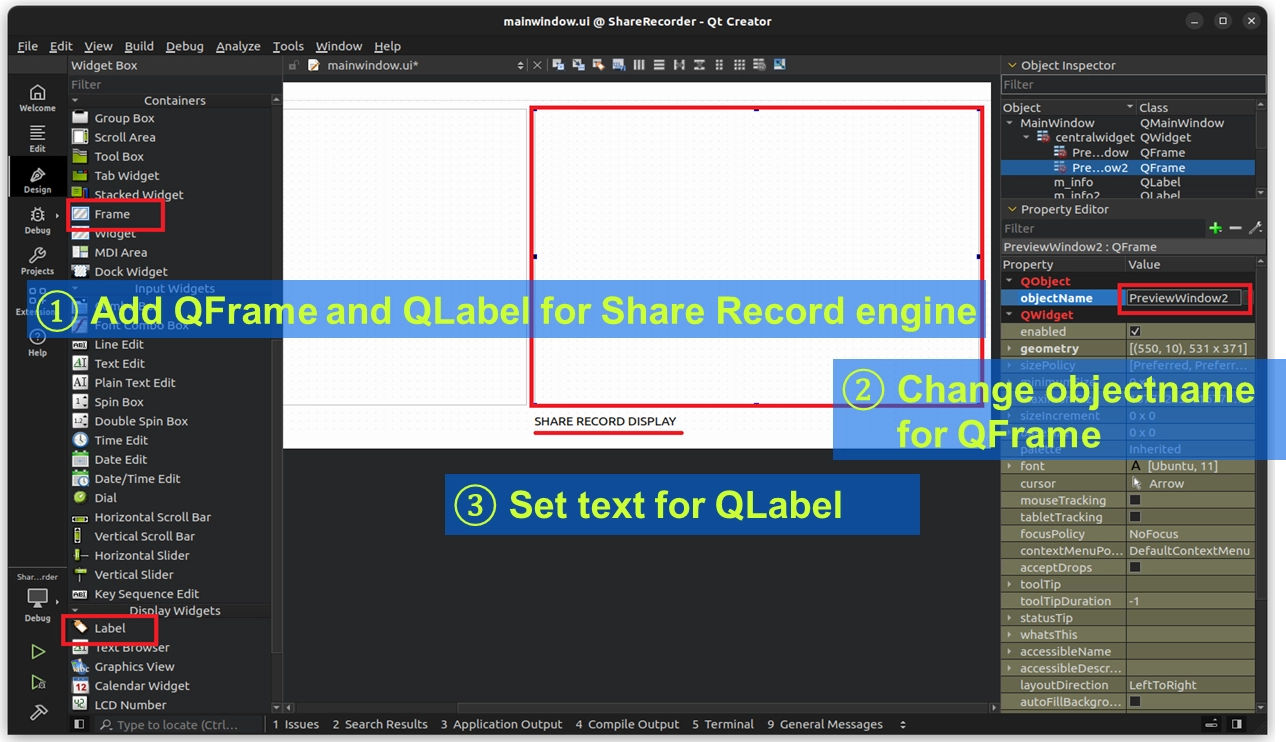
Adding a Second Display Canvas ( QFrame )
• Find the Frame container in the Widget Box on the left toolbar and drag it to the right side of the original preview canvas.
• In the Property Editor in the lower right corner, name the objectName of this new canvas as PreviewWindow2. This will be the exclusive branched display screen for our Share Record engine!
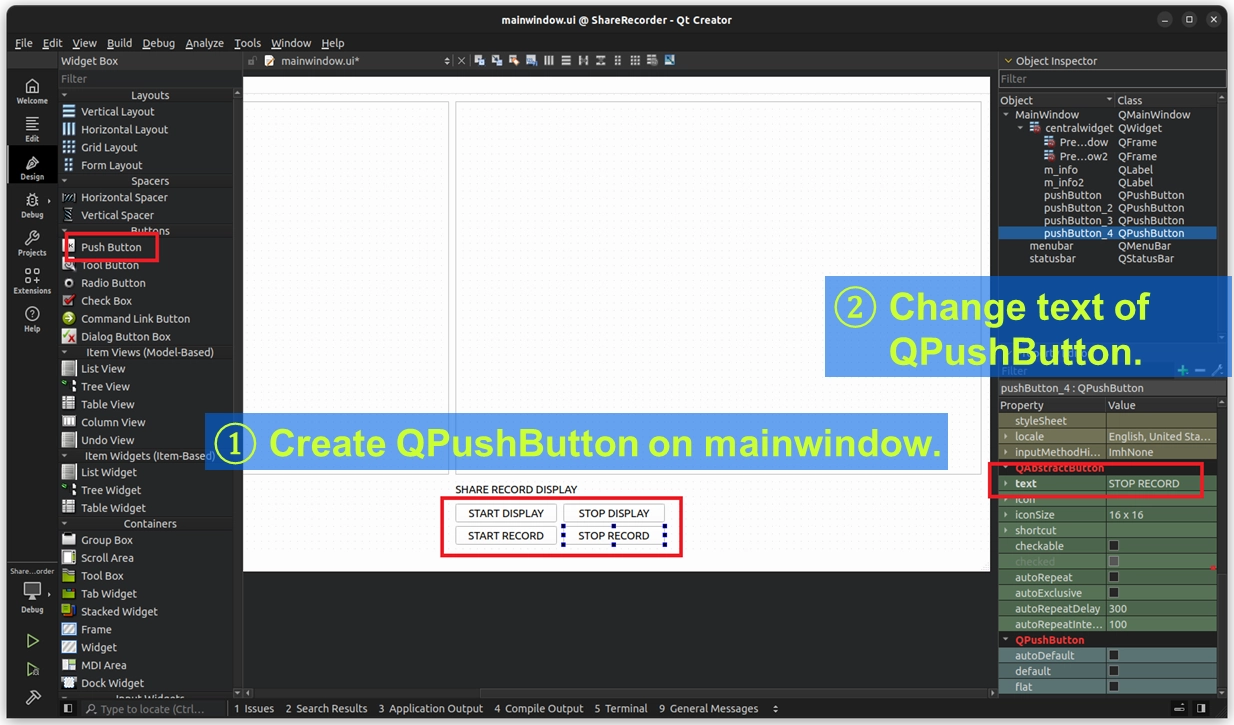
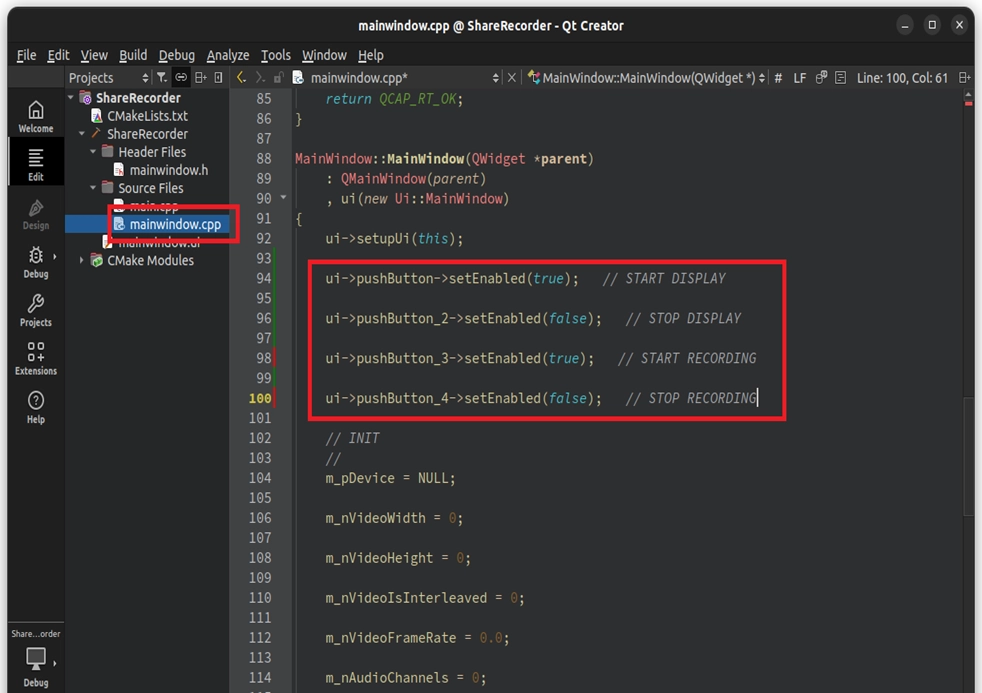
Creating Four Sets of Control Buttons ( QPushButton )
• Drag four Push Buttons from the toolbar and place them at the bottom of the screen.
• Change their display text ( text property ) respectively to : "START DISPLAY", "STOP DISPLAY", "START RECORD", and "STOP RECORD".
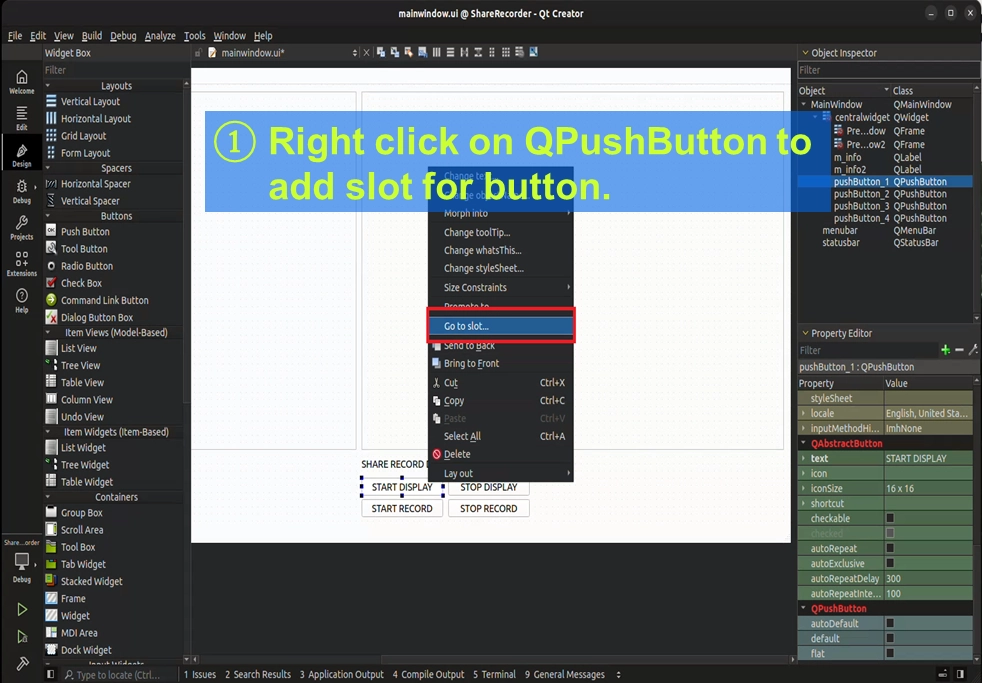
Creating Button Click Events ( Slots )
• Right-click on these four buttons individually, select "Go to slot..." ➔ choose clicked(), letting Qt Creator automatically create the corresponding code blocks for us in mainwindow.cpp .
Writing the Core Code
Once the UI is ready, we will first use channel 0 ( iRecNum = 0 ) to achieve the "synchronous dual-screen display" feature.
Variable Declaration and UI Fool-Proofing Mechanism
Before officially calling the Share Record engine, to ensure the stability of the program, we must do two things well : "record the current state of the engine" and "prevent users from clicking buttons randomly".
Please follow the steps below to build a strict safety net for our dual-window program:
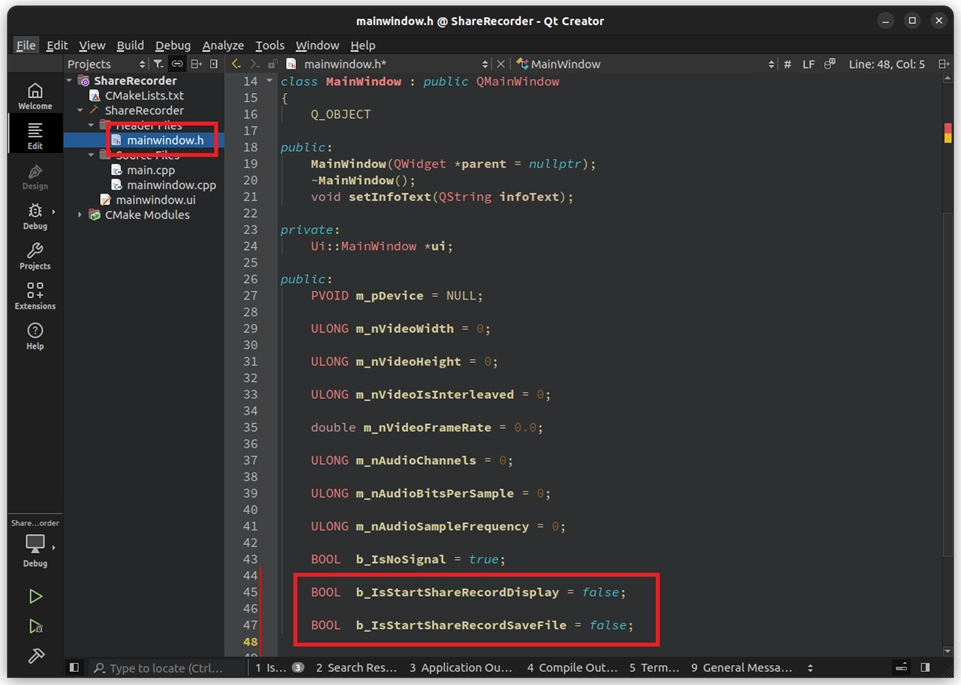
To let the program know the current operating status of the Share Record engine, please open mainwindow.h and declare two boolean variables in the public section :
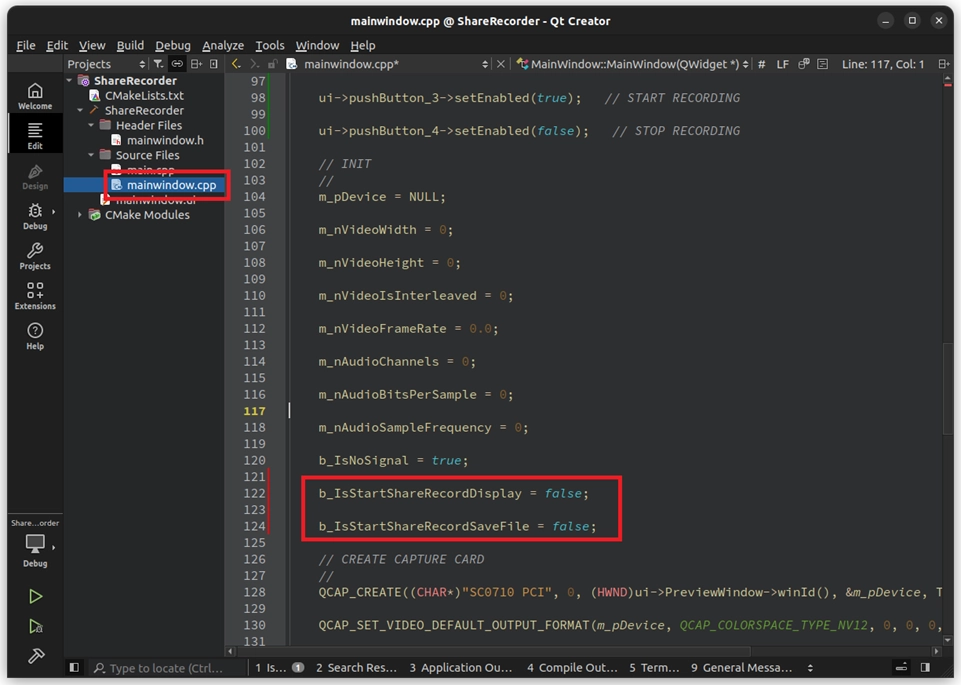
Next, open mainwindow.cpp. When the program just starts ( i.e., in the MainWindow::MainWindow constructor ), we need to initialize these two variables to false.
At the same time, to prevent users from pressing the "STOP" button before starting, we use Qt's built-in setEnabled() function to manage the available status of the buttons :
Switching Status in Button Click Events After the user clicks "START", we must immediately gray out ( disable ) the "START" button and light up the "STOP" button. Please add the following status switching logic to each of the four Slot functions just created :

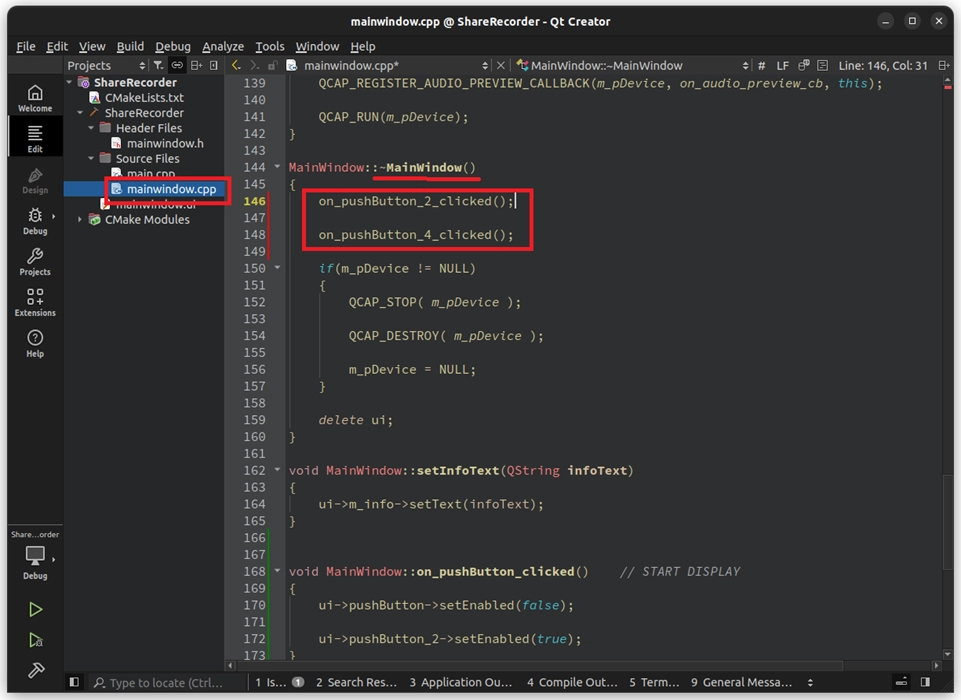
A Safe Exit Before Closing the Program, this is a step most frequently overlooked by beginners! When the user clicks the "X" in the upper right corner to close the window, if the Share Record engine is still recording or displaying, directly destroying the device will cause the program to crash. Please find the destructor ( MainWindow::~MainWindow ) in mainwindow.cpp. Before calling QCAP_STOP to close the underlying device, forcefully call the "STOP button" event we just wrote to ensure the engine is safely closed :
After completing the UI fool-proofing mechanism and the setting of status variables, we are finally entering the main highlight of this lesson! In the upcoming implementation phase, we will step-by-step awaken the powerful Share Record engine and perfectly integrate dynamic OSD text into our project.
Please open your mainwindow.cpp and follow the steps below to inject soul into the four buttons:
Implementation 1: Starting the "Pure Display" Branching Engine
First, we need to give life to the "START DISPLAY" and "STOP DISPLAY" buttons. The goal is that when "START DISPLAY" is clicked, Channel 0 (iRecNum = 0) is started exclusively to branch the video to the right window; clicking "STOP DISPLAY" will close it.
1. Implement START DISPLAY : Please bind PreviewWindow2 and set the engine flag to pure display ( FLAG_DISPLAY ) in on_pushButton_clicked() :

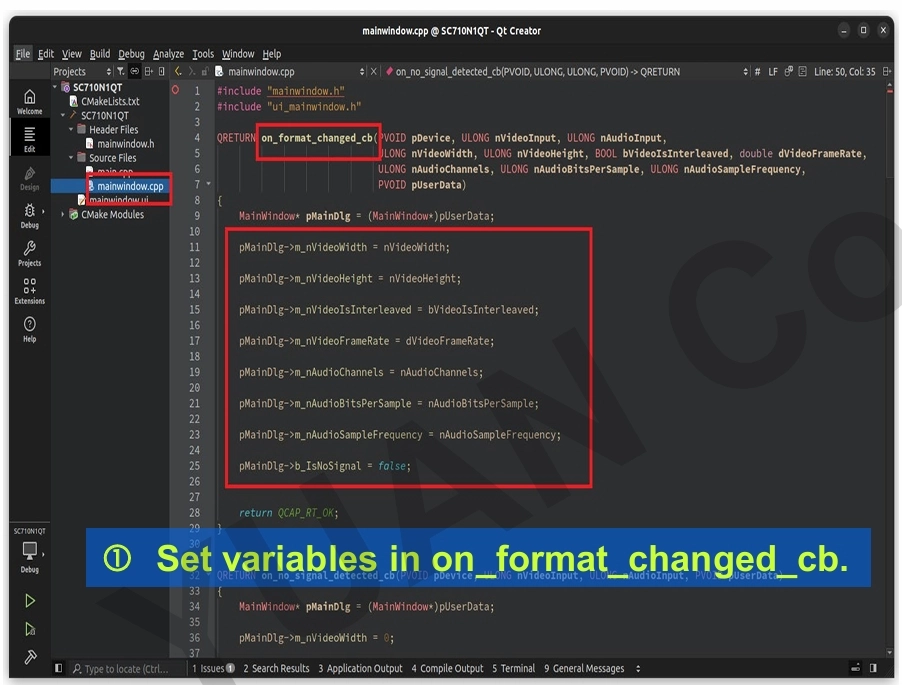
➤ Developer's Must-Learn "Parameter Linkage" Trick : In practical development, we strongly recommend that when the Format Changed Callback is triggered, you conveniently save the latest data into these variables. When you are ready to start the multi-stream engine and need to set complex codec parameters, you can directly feed these variables to the API! Doing this has three major benefits:
1. Complete manual fool-proofing : No need to "hardcode" width, height, and frame rate in the code.
2. Perfectly match the input source : Ensure the resolution received by the Encoder 100% matches the current hardware capture status.
3. Seamlessly adapt to dynamic changes : If the user switches to a camera with a different resolution halfway through, the parameters will automatically update on the next start!
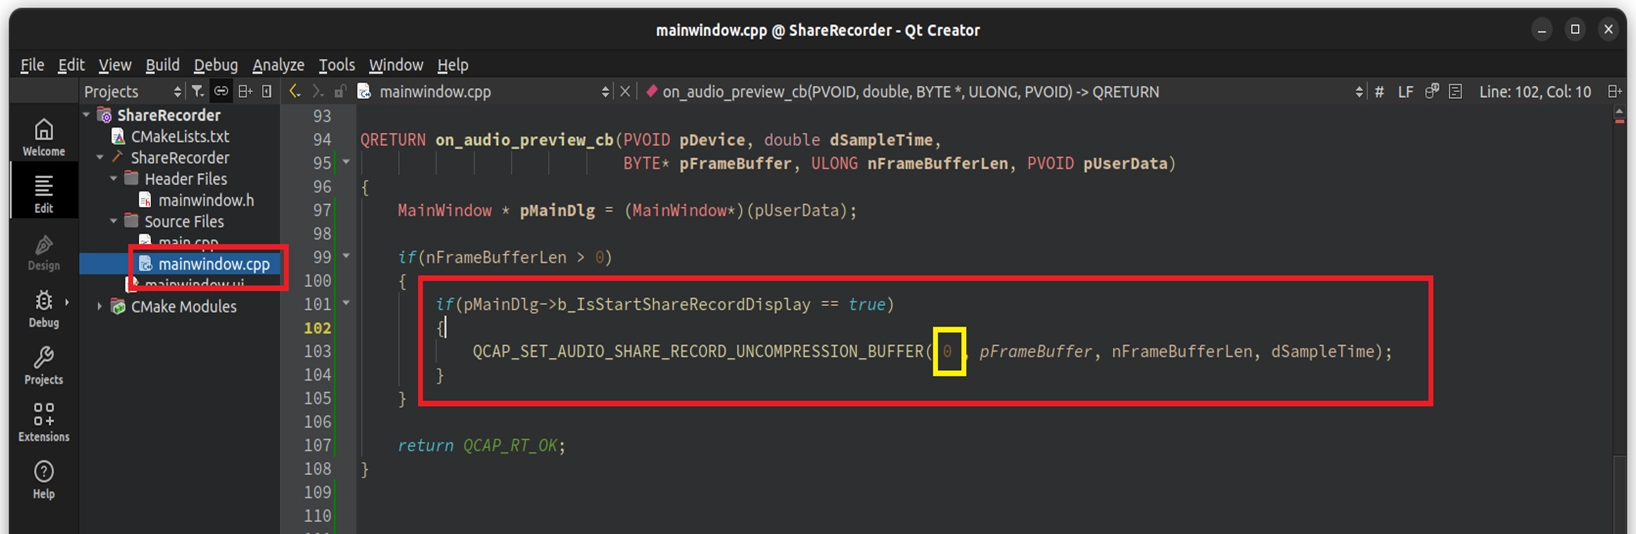
2. Provide Data to Channel 0 in the Callback
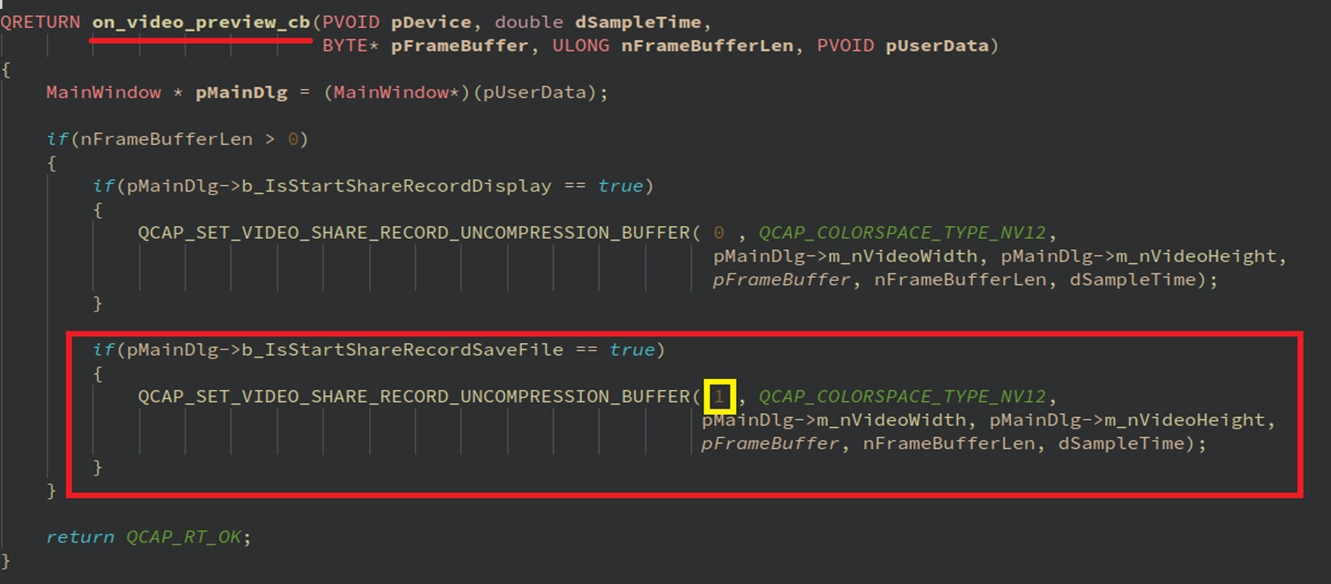
After the engine starts, it has no video frame itself. We must go to on_video_preview_cb and on_audio_preview_cb to feed the data captured by the hardware to Channel 0:
➤ For Callback concepts, you can review : 9-5 Callback and Image Snapshot example
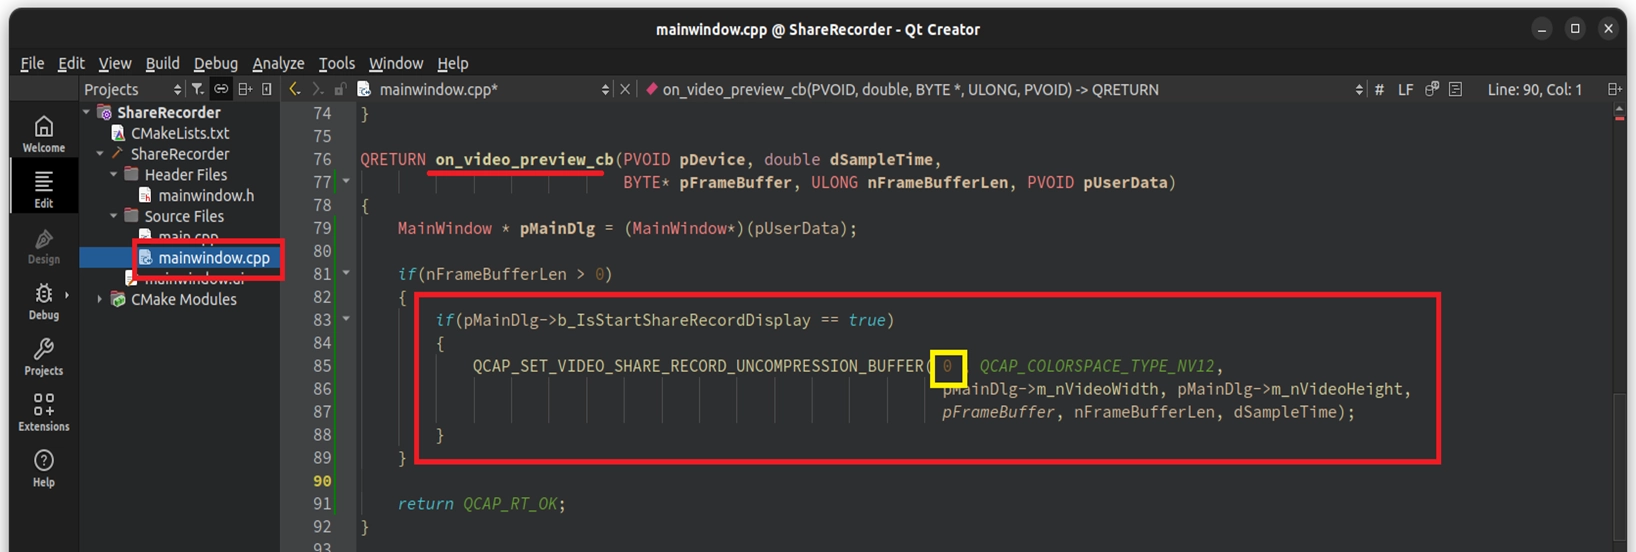
• Video Data : The uncompressed raw frame sent by the capture card in on_video_preview_cb defaults to the NV12 color space format. Therefore, when we call
QCAP_SET_VIDEO_SHARE_RECORD_UNCOMPRESSION_BUFFER, we must explicitly specify QCAP_COLORSPACE_TYPE_NV12 in the parameters so the engine can correctly interpret and render this frame!
• Audio Data : Similarly, the default audio sent by on_audio_preview_cb is in the uncompressed raw PCM format. ( If in future advanced development, the input audio format differs from the properties you set earlier, please remember to use the API version ending with _EX to inform the engine of the format difference! )
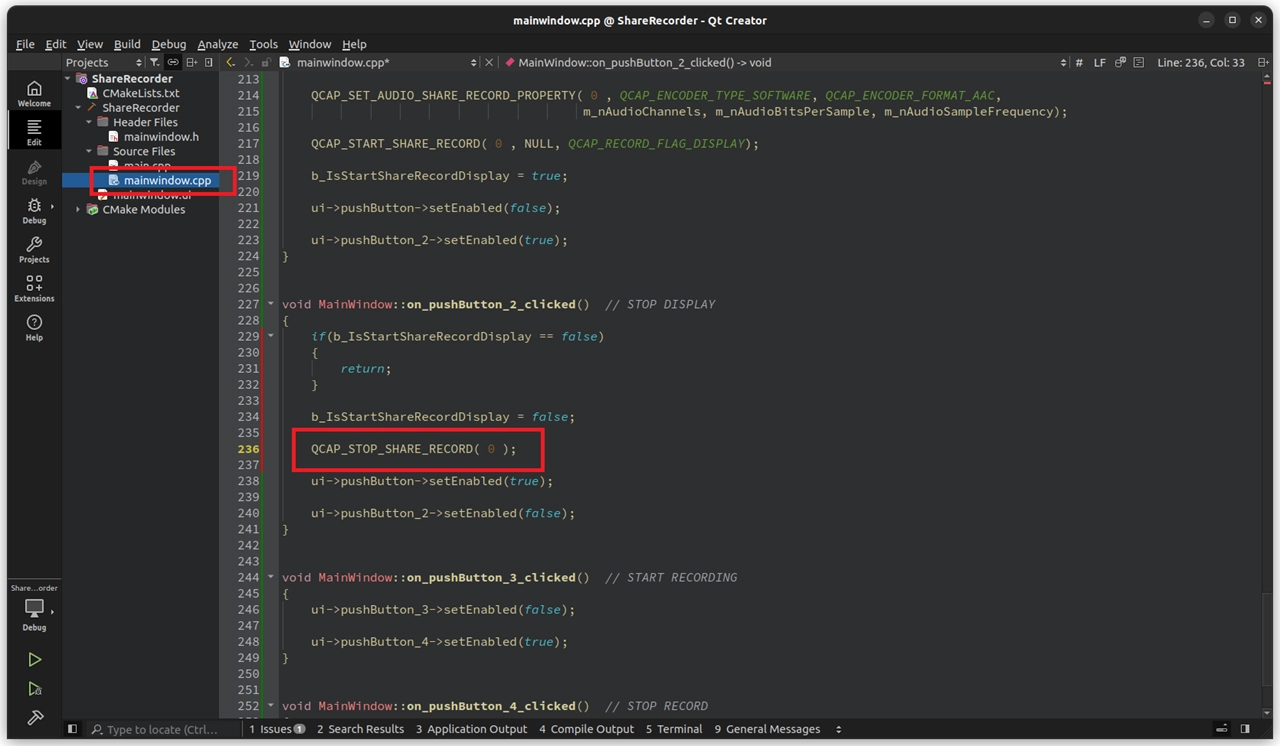
3. Implement STOP DISPLAY
Implementation 2: Building the "Independent Recording and OSD" Engine
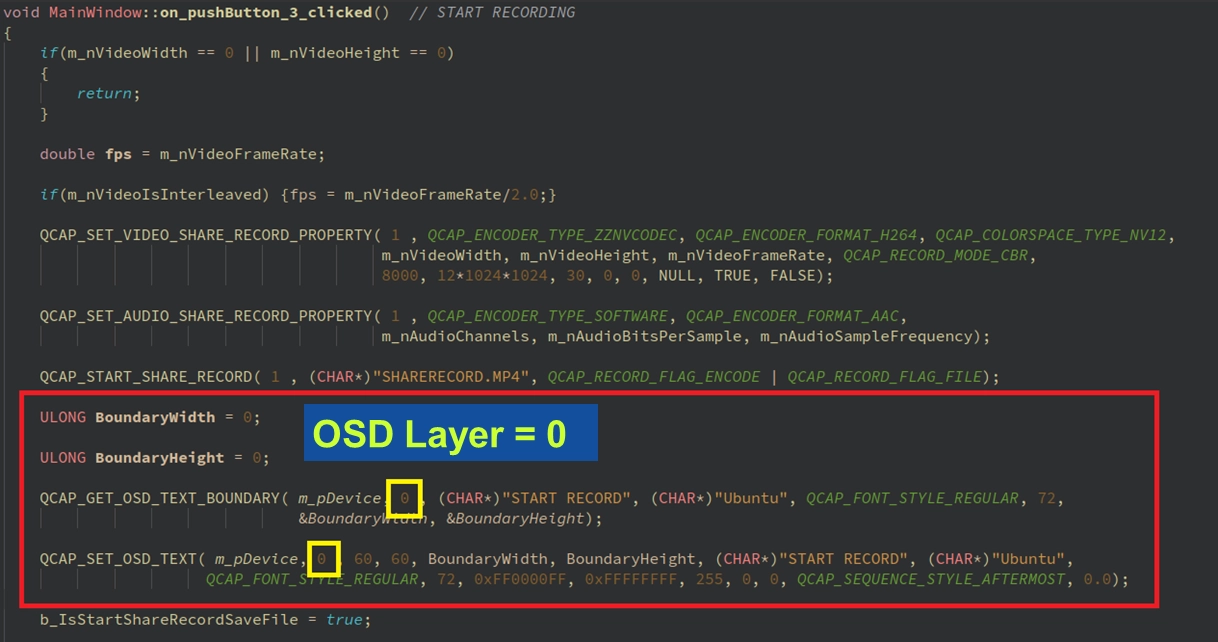
Next, we will handle the other two recording buttons. This time we use Channel 1 (iRecNum = 1), not only to save the video as an MP4 file but also to overlay the red prompt text "START RECORD" while recording!
1. Implement START RECORD ( Start Recording and OSD ) : Please add the following logic in on_pushButton_3_clicked() . Note that this time we do not bind a window ( fill in NULL ), and we add the dynamic calculation and drawing of the OSD :

➤ Review and Learn: Perfect Parameter Linkage Just like the trick we used in "Implementation 1", here we also feed variables like m_nVideoWidth caught by the Callback directly to the recording engine of iRecNum = 1.
2. Supplement "Channel 1" Signal in the Callback Switchboard Since the hardware capture card only has one Callback switchboard, we must go back to the on_video_preview_cb we just wrote, and right below the logic for "Channel 0", continue to add the logic assigned to Channel 1 :
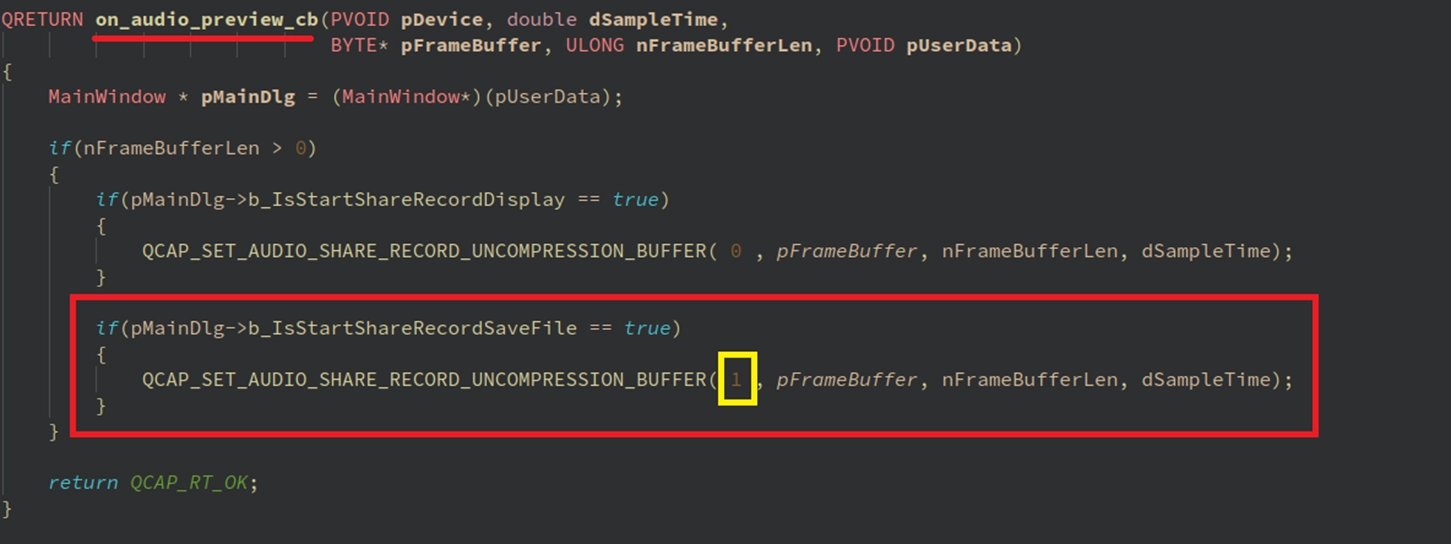
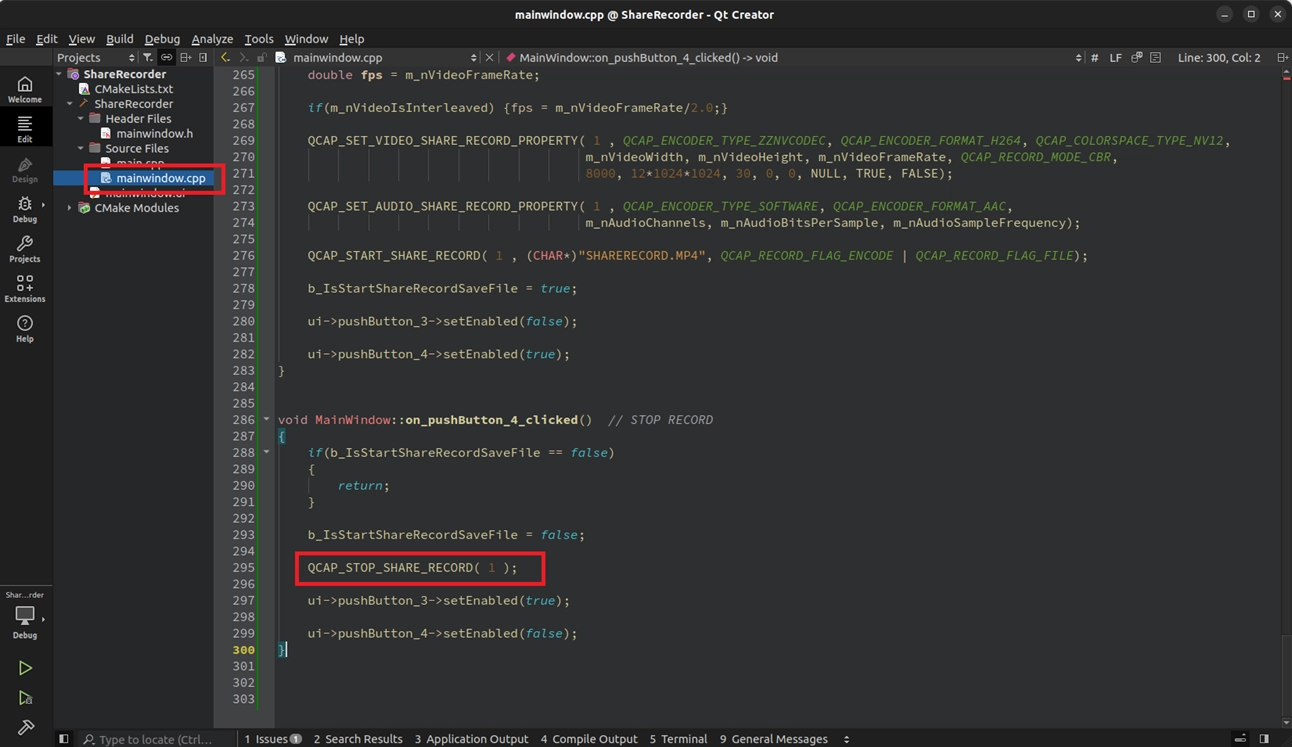
3. Implement STOP RECORD ( Stop Recording and Clear OSD ) When stopping the recording, besides closing Channel 1, the most critical part is to pass NULL to the string parameter in
QCAP_SET_OSD_TEXT to eliminate the prompt text on the screen :
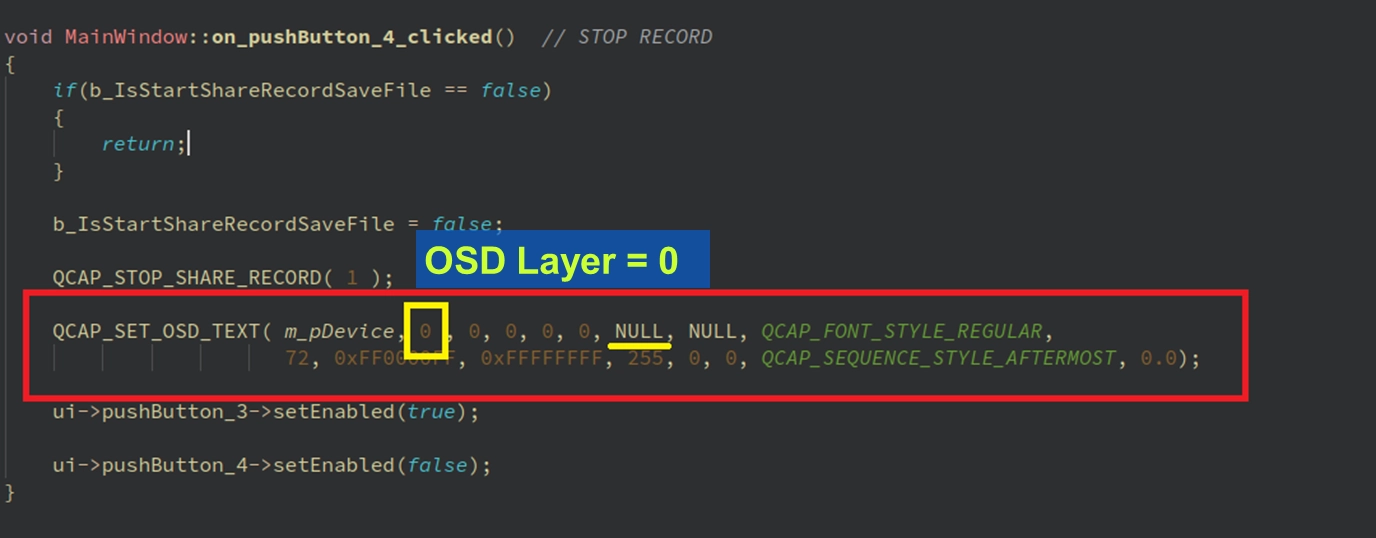
➤ [Developer Pitfall Guide: Don't confuse "Recording Channel" with "OSD Layer"!] When writing this OSD code, the most common mistake for beginners is getting fooled by the "0" and "1" in the parameters! Please be sure to clarify the difference between the two:
• Share Record Channel (iRecNum) : We specified using Channel 1 for dedicated recording, so when calling QCAP_START_SHARE_RECORD , the first parameter is 1。
• OSD Overlay Layer (iOsdNum) : The SDK provides 512 independent OSD canvases (0~511). OSD acts directly on the hardware device ( m_pDevice ) , so when we call QCAP_SET_OSD_TEXT , the 0 passed in the second parameter represents "OSD Layer 0", NOT recording Channel 0!
Final Verification
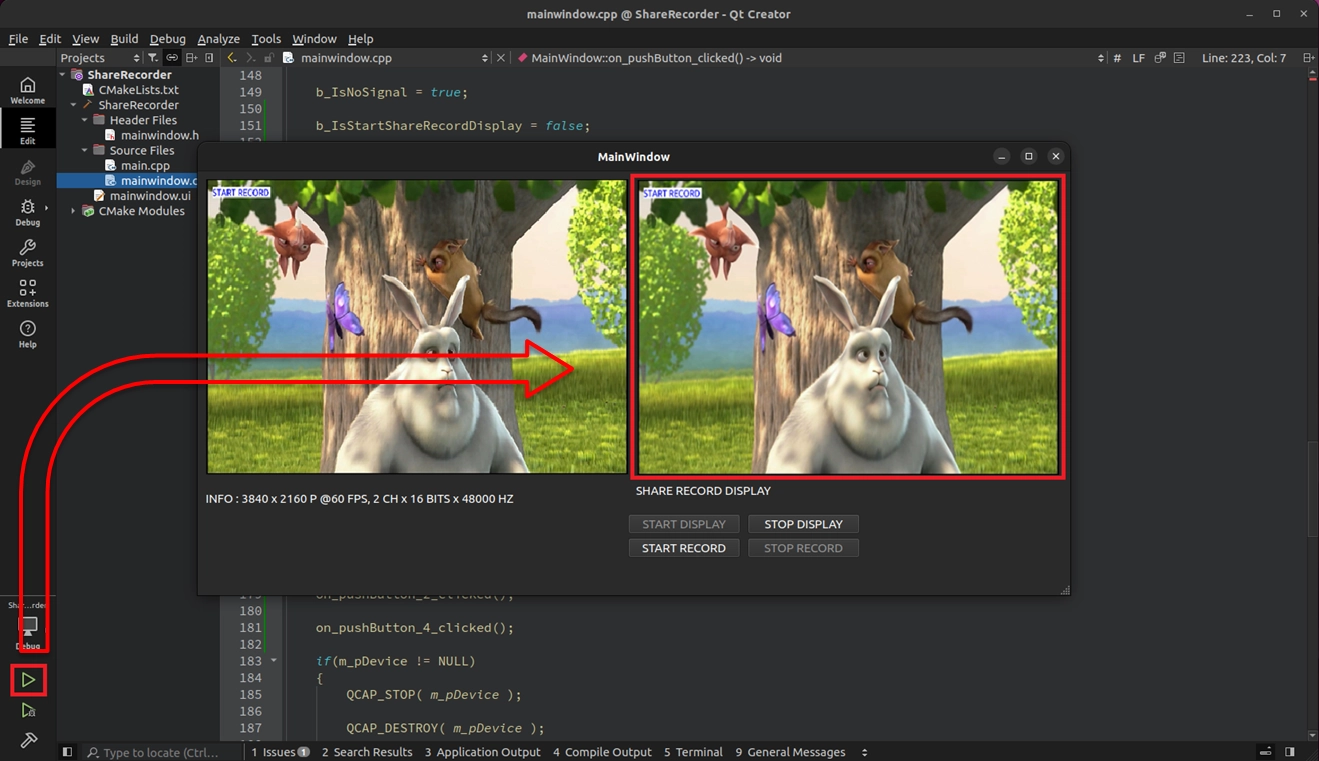
All the code is ready. Please click the "Build and RUN" ( green play button ) at the bottom left of Qt Creator to compile and execute your project.
Next, please follow the steps below to personally verify Implementation 1 and Implementation 2 :
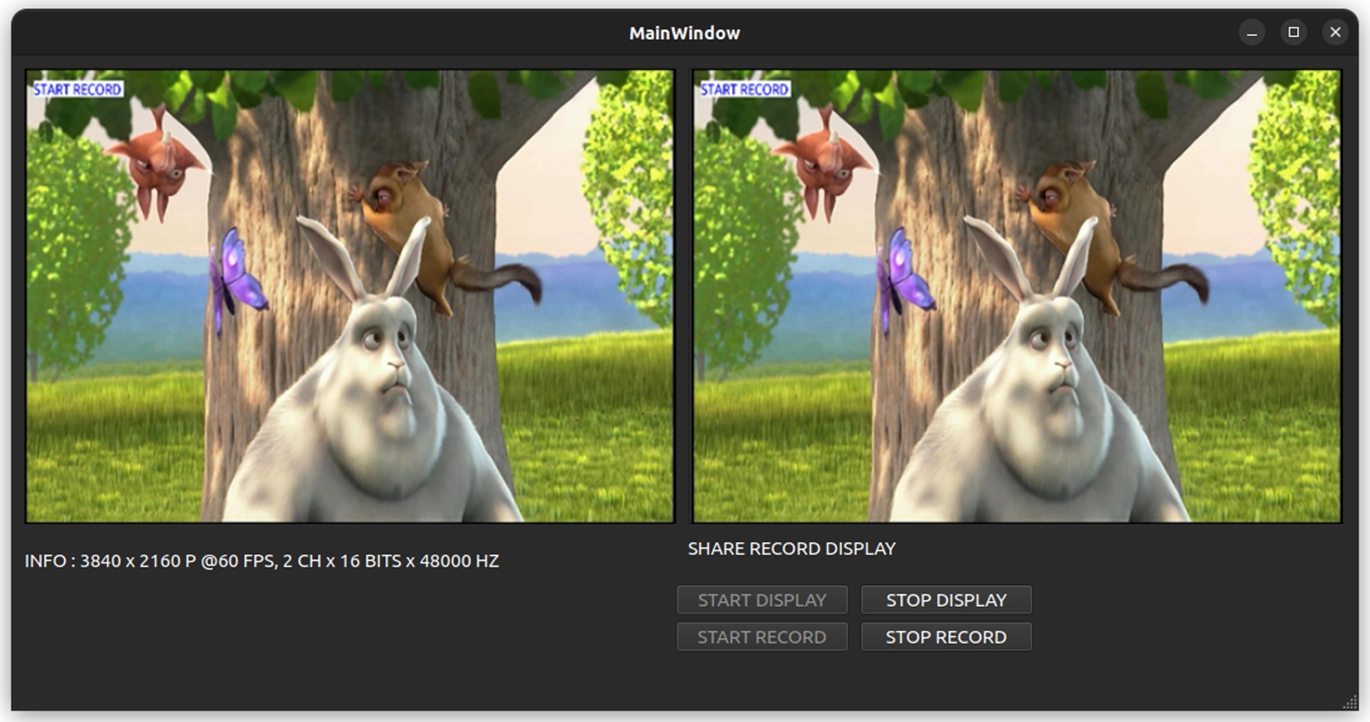
When the program successfully starts and captures the camera frame, please click the "START DISPLAY" button. At this time, you will see the originally completely black right PreviewWindow2 window instantly light up and smoothly play the branched video that is perfectly synchronized with the left main window, without any delay!
© Blender Foundation | Big Buck Bunny | CC BY 3.0
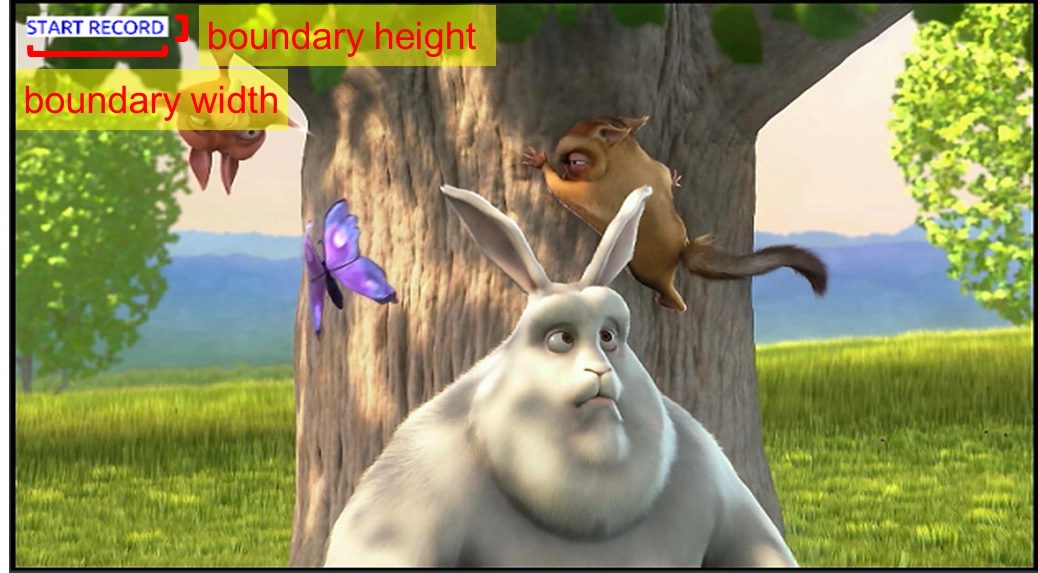
Then click the "START RECORD" button below. At this time, you will see the clear "START RECORD" OSD prompt text immediately pop up in the upper left corner of the screen!
© Blender Foundation | Big Buck Bunny | CC BY 3.0
Verify the final video file : After recording for a few seconds, click the "STOP RECORD" button, and you will find that the prompt text on the screen cleverly disappears ( because we successfully passed in NULL ). Finally, please go to the project's build folder, open the terminal, and enter :
➤ For ffmpeg installation, you can review : 9-6 Video/Audio Recording Example Tutorial
ffplay SHARERECORD.MP4
If you perfectly see the high-definition video with the OSD prompt text in the playing video—Congratulations! We have mastered the NexVDO SDK's Share Record engine and OSD overlay technology from scratch.
You are no longer just "recording the screen". You can freely decide which channel of video to display, which channel to record, and even what customized subtitles to add to the screen. Whether facing a security surveillance system that requires multi-channel independent recording in the future, or professional broadcasting live software that requires complex layer overlays, this underlying logic will become your most powerful development weapon!
Are you ready for the next challenge? See you in the next lesson!
Switching Status in Button Click Events After the user clicks