9-10 RTMP Web Portal Example Tutorial
In previous chapters, we learned how to build an RTSP Server and Client. The operating logic of RTSP is usually "the server waits in place, and the client actively initiates a connection to watch.”
However, in today's era of self-media and influencers, the scenario we encounter more often is : "How to live stream the game footage or camera video captured by the capture card directly to YouTube, Facebook, or Twitch?"
To solve this need, the NexVDO SDK provides a powerful RTMP Web Portal Server engine! RTMP ( Real-Time Messaging Protocol ) is currently the most widely supported communication protocol by major public cloud live streaming platforms. Unlike RTSP, the RTMP Web Portal acts as a "pusher," actively feeding audio and video data to YouTube's servers, allowing audiences worldwide to watch your live broadcast through webpages.

© Blender Foundation | Big Buck Bunny | CC BY 3.0
© Blender Foundation | Big Buck Bunny | CC BY 3.0
➤ Core Concept : The Key Difference Between RTMP Push and RTSP Pull

Before we start calling APIs, we must first establish a highly important concept of network architecture. Please recall the RTSP protocol we learned in 10-8 and 10-9, and compare it with the RTMP protocol we are learning today. They have a fundamental difference in the "directionality" of data transmission :
1. RTSP is "Passive Waiting ( Pull )" : In 10-8, the RTSP Server we built was like a restaurant open for business. After the server starts, it can only "stay in place and wait." A client ( such a ffplay, VLC, or the NetReceiver we wrote ourselves ) must actively come to connect and "Pull" the video over.
2. RTMP Web Portal is "Active Attack ( Push )" : Its behavior model is the exact opposite. It's like an energetic delivery driver! We don't need to wait for the audience to connect to our development board. Instead, our program "actively" pushes the compressed H.264 / AAC audio and video data continuously to the servers of global public clouds like YouTube, Facebook, or Twitch.
[Why use RTMP?] Because large platforms like YouTube, in order to cope with millions of people watching simultaneously worldwide, have deployed massive CDN ( Content Delivery Network ) nodes globally. They do not allow actively connecting to our personal computers. Therefore, we must play the role of the "Sending End," actively pushing the stream to their designated RTMP receiving URL and stream key. Once the push is successful, the heavy lifting of distributing the broadcast to viewers worldwide is entirely handed over to YouTube's servers to handle! This is also the underlying core technology that allows all streamers and influencers today to easily start broadcasting.
➤ Key Preparation: Obtaining YouTube Stream URL and Key
Therefore, before we start writing code ( using pushing to YouTube as an example ), we must first get the receiving URL and key of the YouTube server. Unlike an RTSP server that only needs to set a Port number, RTMP push streaming must accurately tell the SDK which URL to push to. Please carry out the following preparatory actions:
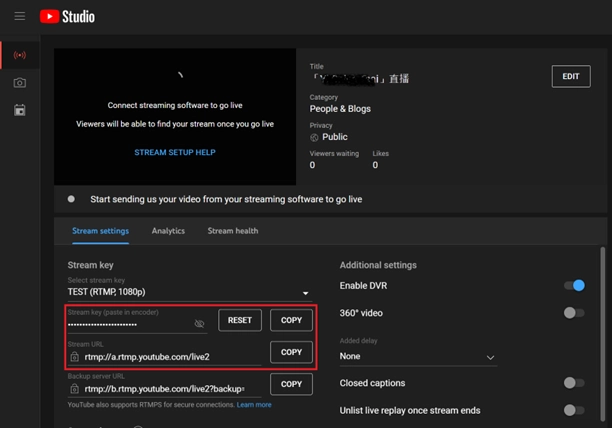
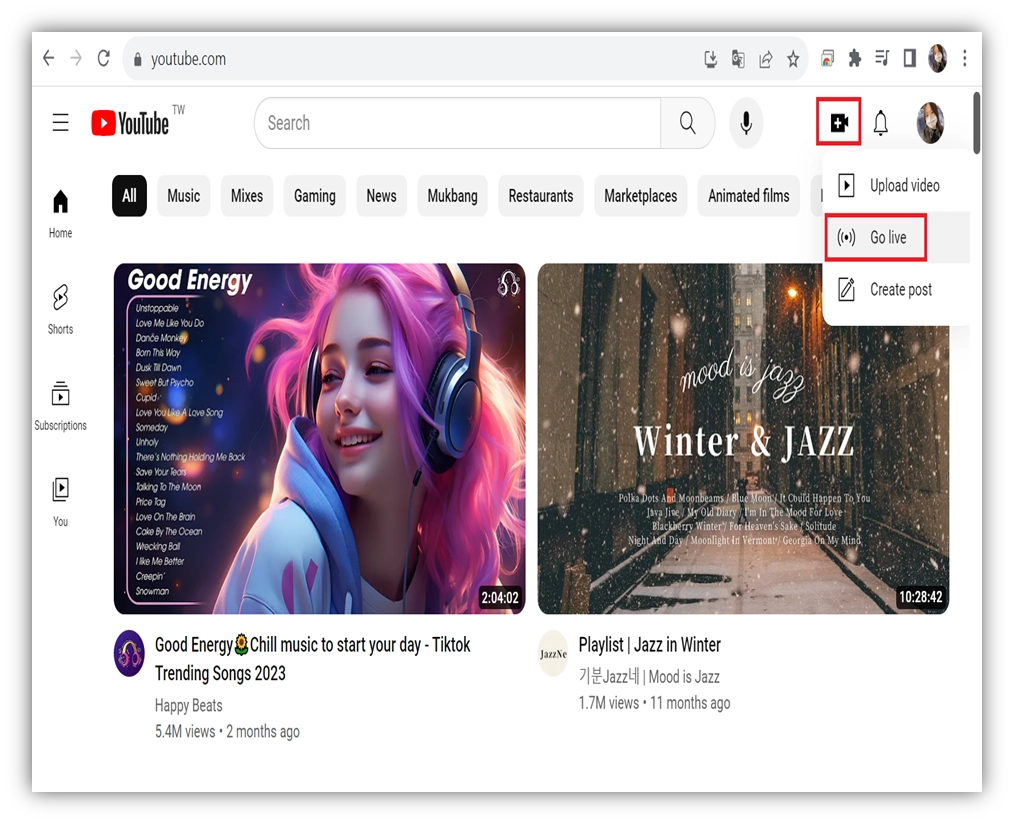
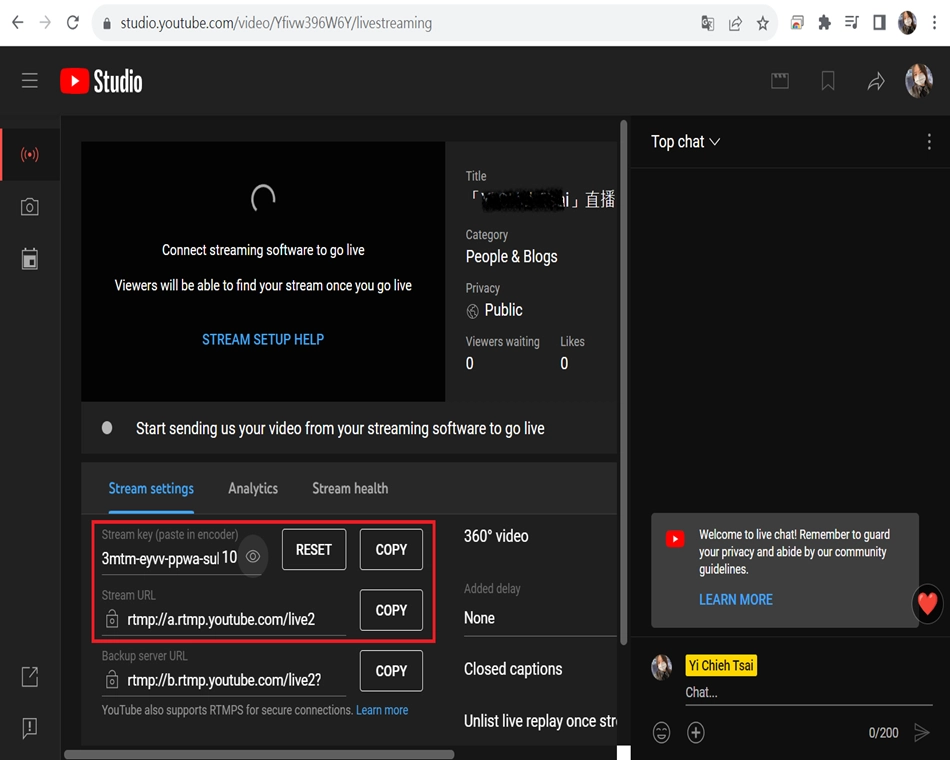
1. Log in to the YouTube Live Dashboard : Open your web browser, log in to your YouTube channel, and click "Create ➔ Go live" in the upper right corner to enter the YouTube Studio live dashboard.
2. Find the Stream URL : Under the "Stream settings" tab in the dashboard, you will see a field named Stream URL. It usually looks like this : rtmp://a.rtmp.youtube.com/live2
3. Find the Stream key : Above the URL, there is a hidden password field, which is your Stream key ( paste in encoder ). Click the "COPY" button next to it to copy it down. This key is your exclusive channel pass, absolutely do not leak it to others! ( The format is usually a string of random alphanumeric characters, e.g. : 3mtm-eyvv-ppwa-sub5-1tv2 ).
★ The Most Important Step : The NexVDO SDK API only needs to pass in "a single string". Therefore, you must manually "seamlessly connect" the two pieces of text you just copied ( adding a slash / in between ).
• Combination Formula :[Stream URL] + / + [Stream key]
• Combination Example :rtmp://a.rtmp.youtube.com/live2/3mtm-eyvv-ppwa-sub5-1tv2
Please paste this "combined ultimate URL" in Notepad first for standby! Later in our project implementation, this URL will be directly fed to our protagonist API —— QCAP_CREATE_BROADCAST_RTMP_WEB_PORTAL_SERVER.
Now, let's step-by-step build your exclusive live streaming push artifact!
Understanding Core APIs - RTMP Stream Push Engine
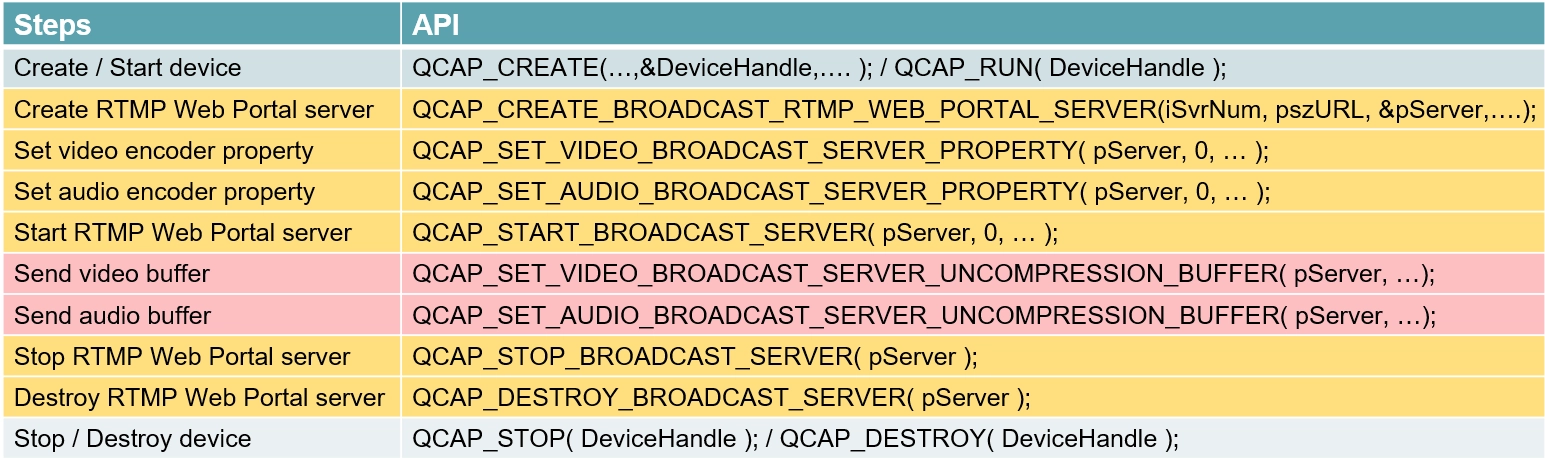
Before entering the detailed parameter settings, let's take a macro look at the "standard API calling sequence" of building an RTMP push engine. This is a perfect and rigorous lifecycle, please be sure to execute it according to the following steps :

The standard usage sequence is as follows :
1. QCAP_CREATE_BROADCAST_RTMP_WEB_PORTAL_SERVER :Create the RTMP push engine.
2. QCAP_SET_VIDEO_BROADCAST_SERVER_PROPERTY :Set the video compression properties of the server.
3. QCAP_SET_AUDIO_BROADCAST_SERVER_PROPERTY :Set the audio compression properties of the server.
4. QCAP_START_BROADCAST_SERVER :Start the RTMP push server engine.
5. QCAP_SET_VIDEO_BROADCAST_SERVER_UNCOMPRESSION_BUFFER :Continuously feed uncompressed video Buffers in the Callback.
6. QCAP_SET_AUDIO_BROADCAST_SERVER_UNCOMPRESSION_BUFFER : Continuously feed uncompressed audio Buffers in the Callback.
7. QCAP_STOP_BROADCAST_SERVER :Stop the RTMP push server engine.
8. QCAP_DESTROY_BROADCAST_SERVER :Destroy ( Release ) the RTMP push server engine.
After establishing the above process concepts, next we will break down the key parameters of the core APIs responsible for RTMP push one by one!
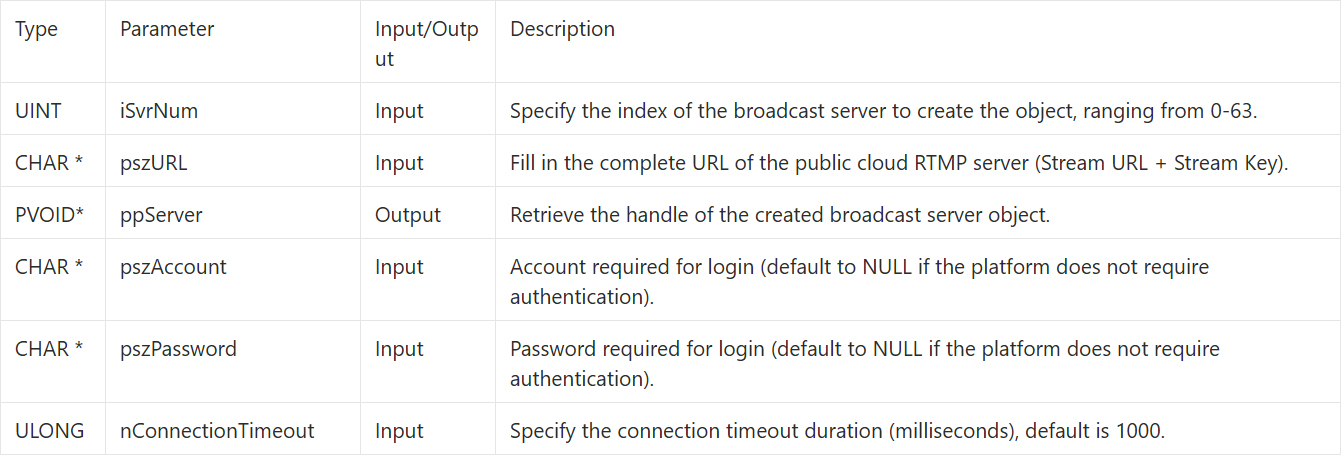
QCAP_CREATE_BROADCAST_RTMP_WEB_PORTAL_SERVER
This API is responsible for creating the RTMP push object. Unlike RTSP which only needs a Port number to be set, here we must combine the "Stream URL + Stream Key" obtained from YouTube or Facebook into a single string and feed it directly to the pszURL parameter.
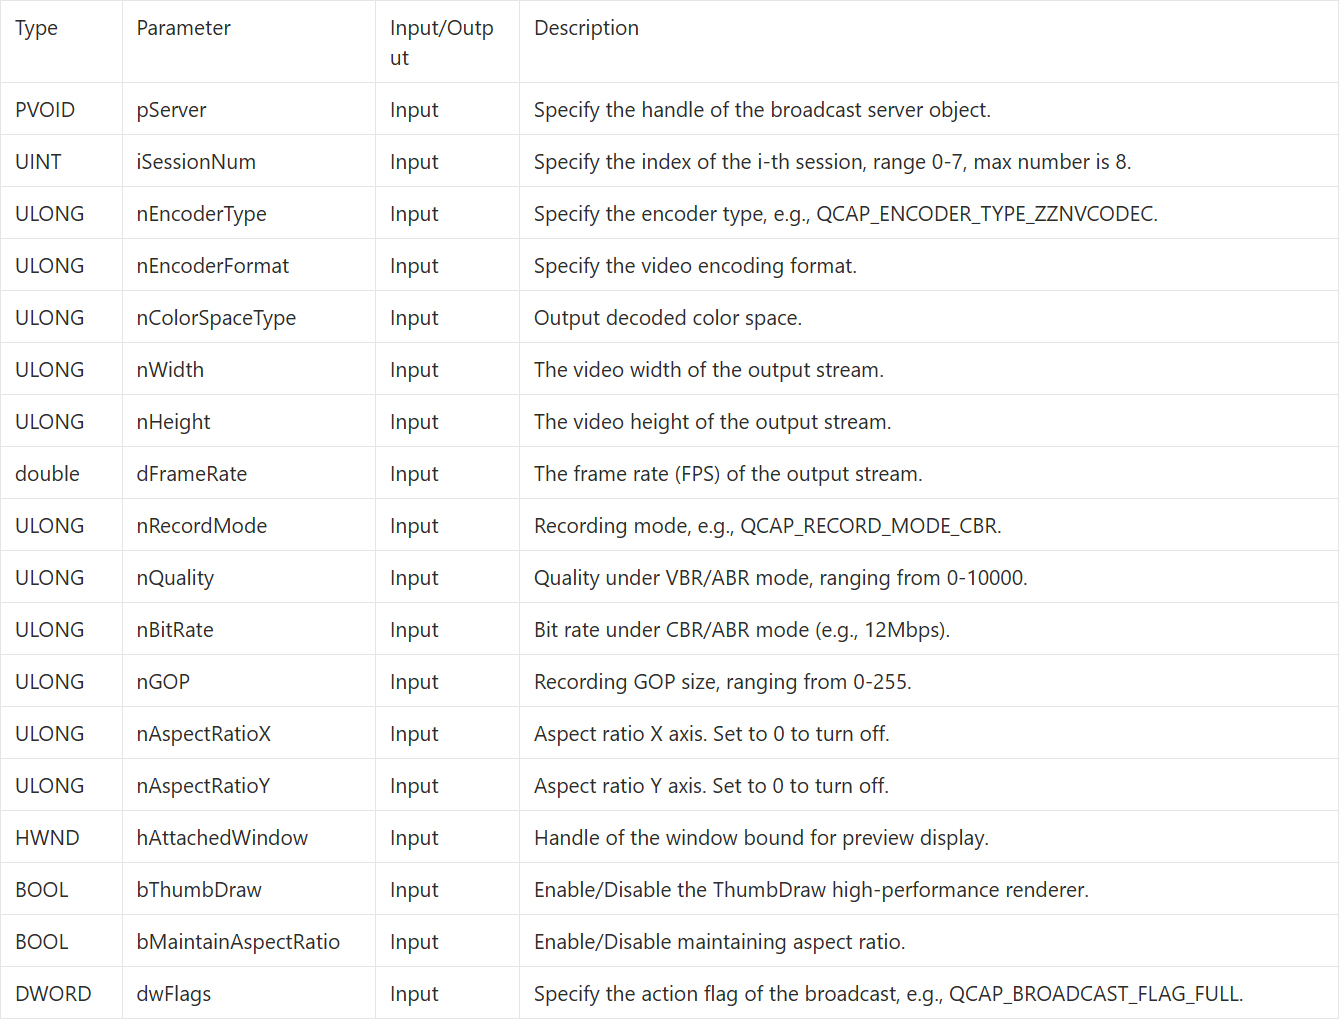
QCAP_SET_VIDEO_BROADCAST_SERVER_PROPERTY
Before the server broadcasts, you must set how the video will be compressed.
⚠️ Pitfall Guide: The RTMP protocol has very strict format limitations. The video encoding must be specified as H.264, otherwise YouTube will not be able to parse your video!
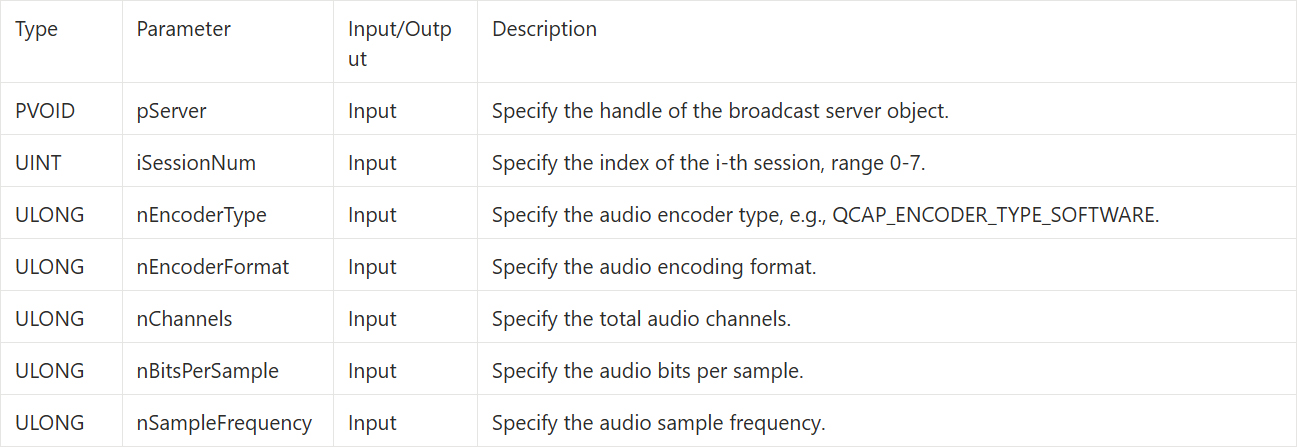
QCAP_SET_AUDIO_BROADCAST_SERVER_PROPERTY
Before the server broadcasts, you must set how the audio will be compressed.
⚠️ Pitfall Guide: The RTMP protocol has very strict format limitations. The audio encoding must be specified as AAC_ADTS, otherwise YouTube will not be able to parse your video!
QCAP_START_BROADCAST_SERVER
After setting the audio and video properties, use this API to officially start the engine and begin pushing data to platforms like YouTube.

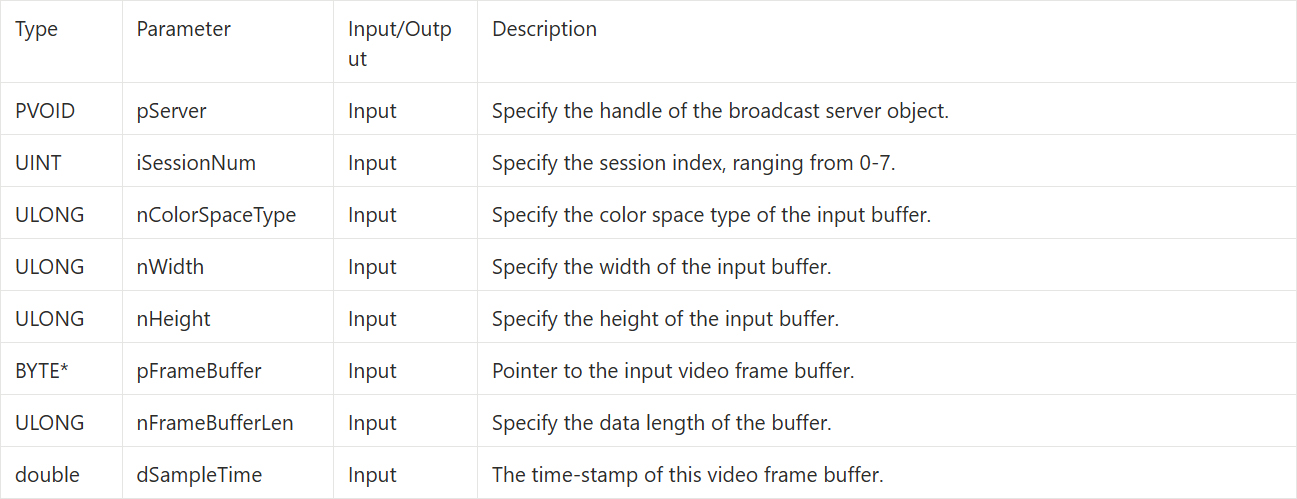
QCAP_SET_VIDEO_BROADCAST_SERVER_UNCOMPRESSION_BUFFER
➤ Developer Tip : If you need to crop the input video frame, please use the API version ending with _EX instead.
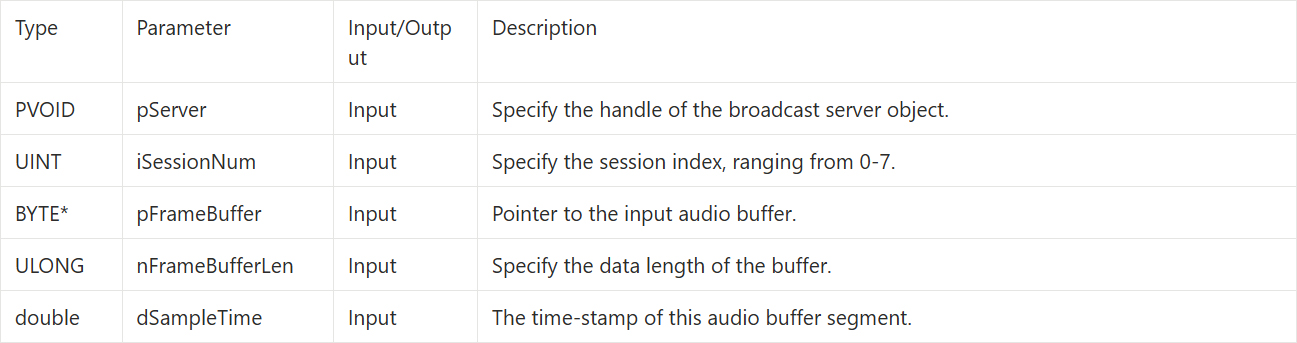
QCAP_SET_AUDIO_BROADCAST_SERVER_UNCOMPRESSION_BUFFER
➤ Developer Tip : If the audio format of the pFrameBuffer here differs from the format previously set in QCAP_SET_AUDIO_BROADCAST_SERVER_PROPERTY, the user must use the API version ending with _EX to tell the engine the actual format of the input audio!
QCAP_STOP_BROADCAST_SERVER
When you need to end the broadcast, call this API, and the SDK will stop pushing the stream.

QCAP_DESTROY_BROADCAST_SERVER
When you need to completely end the broadcast, call this API, and the SDK will release the server engine along with the system and network resources.

Building the UI Display Interface
Please open Qt Creator and refer to what we learned in 9-3 Building a Basic Template Project: Hello NexVDO SDK! We will lay out an interface that allows inputting the YouTube URL and has start/stop buttons.
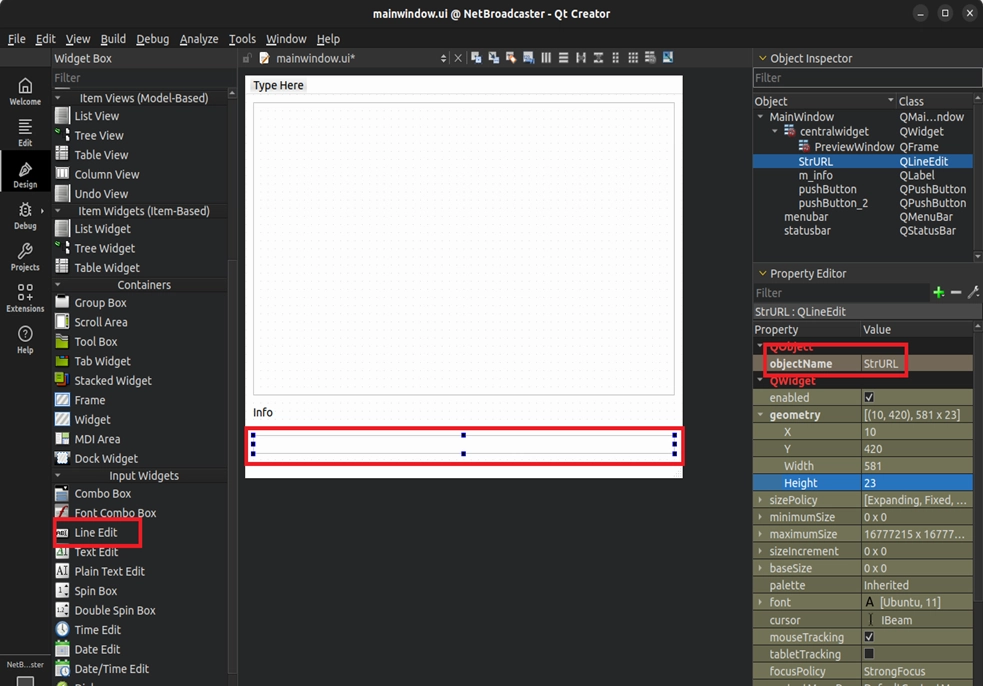
Creating the Project and Laying out Components
Open mainwindow.ui, drag a QLineEdit single-line input box, and name its objectName as StrURL. This will be used for the user to paste the long URL provided by YouTube.
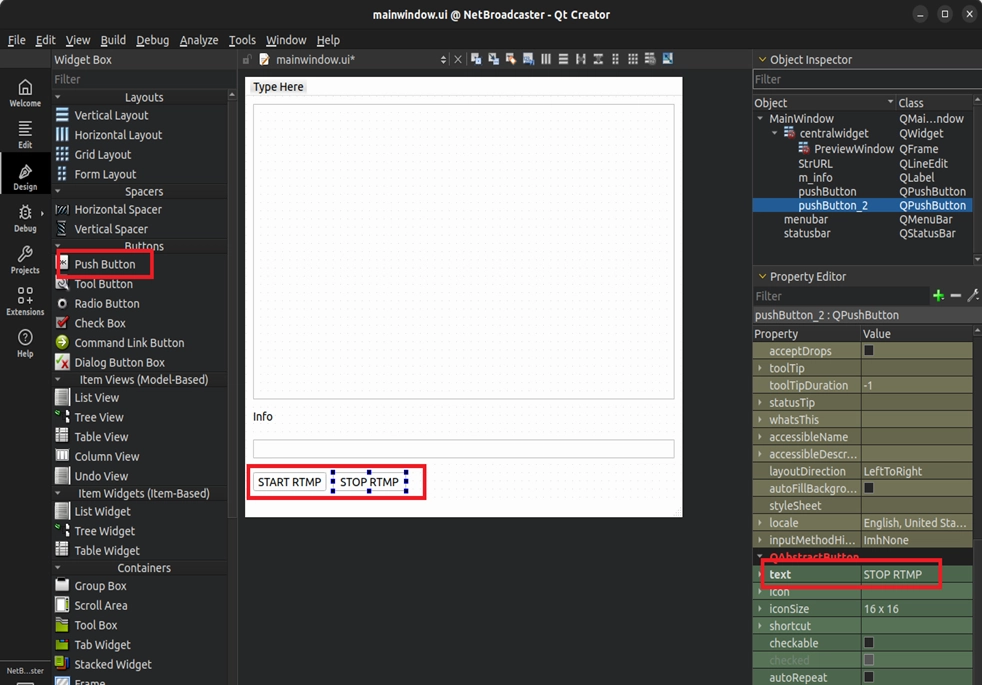
Creating RTMP Control Buttons ( QPushButton )
Drag two QPushButton and change their text to "START RTMP" and "STOP RTMP", respectively.
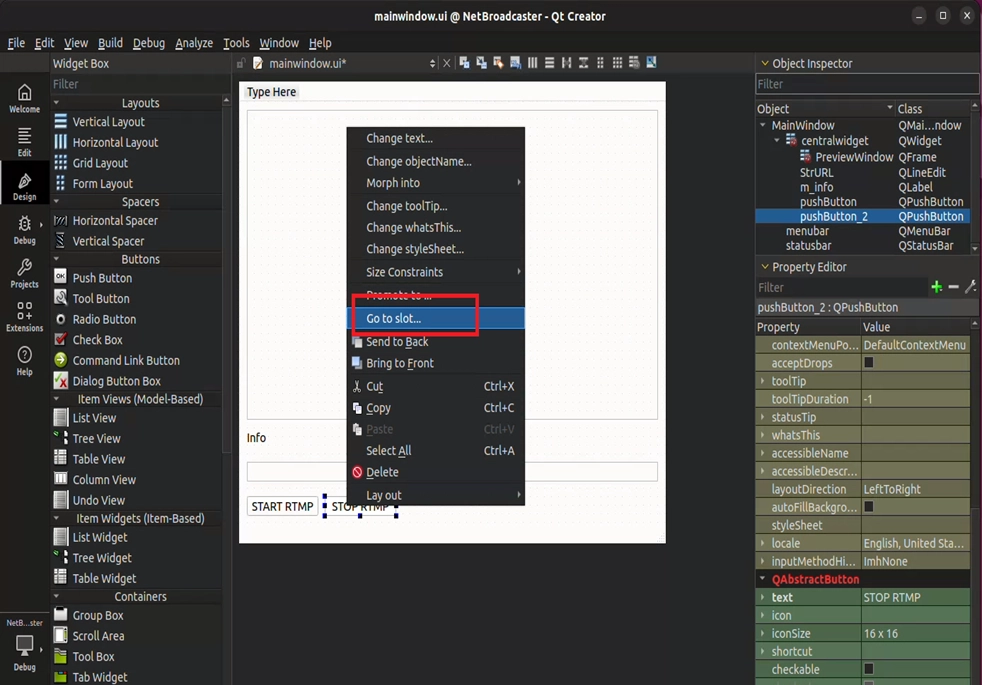
Binding Button Control Events
After completion, right-click on the buttons and select "Go to slot..." to create slot functions.
Writing the Core Code
Once the interface is laid out, we will enter mainwindow.cpp and mainwindow.h to write the core logic. This will be divided into four parts: "Header File and Variable Preparation", "Safe Exit Mechanism", "Starting and Stopping the Connection", and the most important "Callback Interception and Traffic Statistics".
Initial Button Fool-Proofing and Safe Exit Mechanism
With the buttons ready, we must add two very important protection measures to the code. First, when the program just starts, the server is not yet open, so the "STOP RTMP" button should be in an unclickable, grayed-out state. Please open the constructor MainWindow::MainWindow(...) in mainwindow.cpp, and add the initial fool-proofing state of the buttons below the port number initialization :
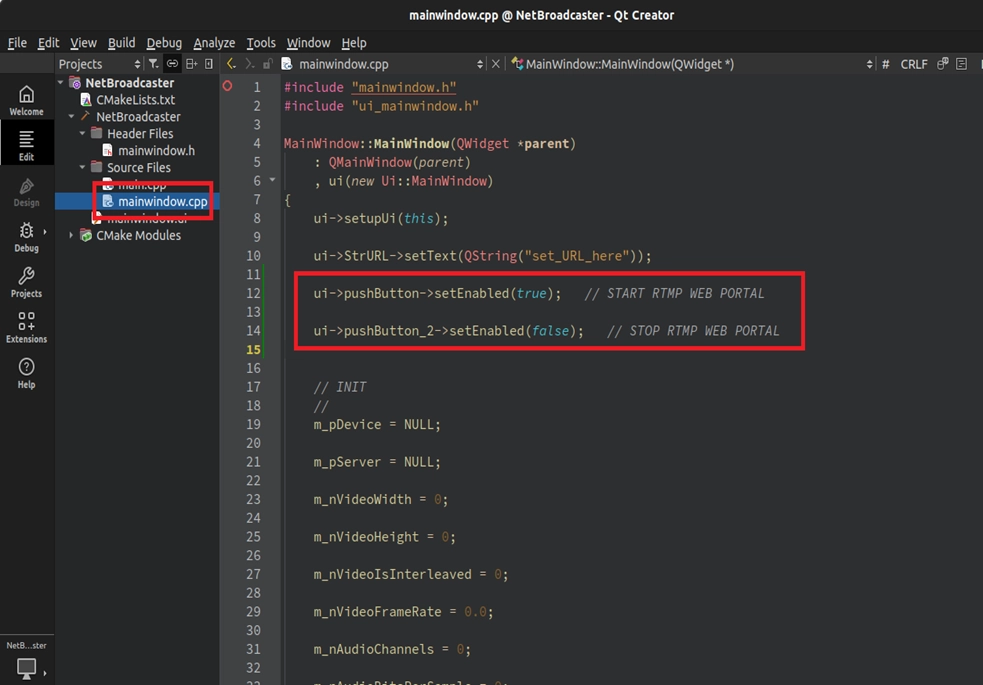
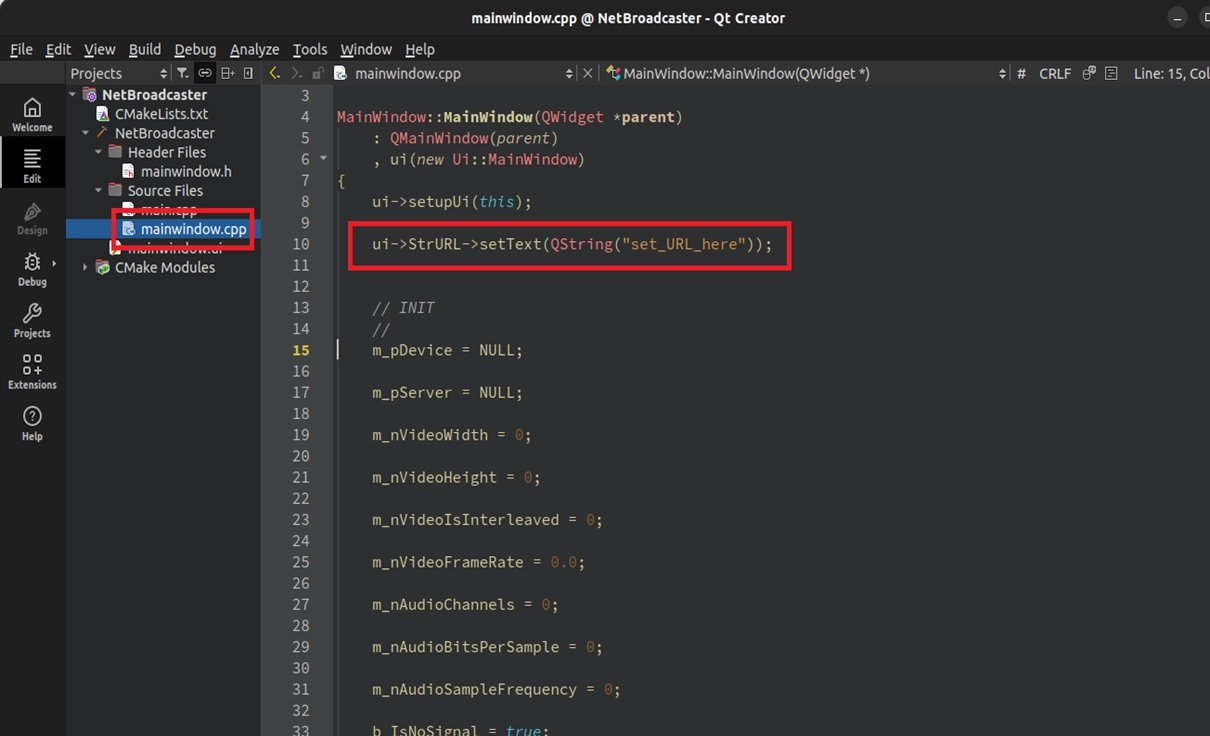
Setting the Default URL Prompt
In the constructor of mainwindow.cpp, to remind the user to paste the YouTube URL here, we set a default string "set_URL_here" for the input box :
Implementation: START RTMP Logic
In the START button, we will read the URL from the input box, set the H.264/AAC_ADTS properties, and start pushing the stream!
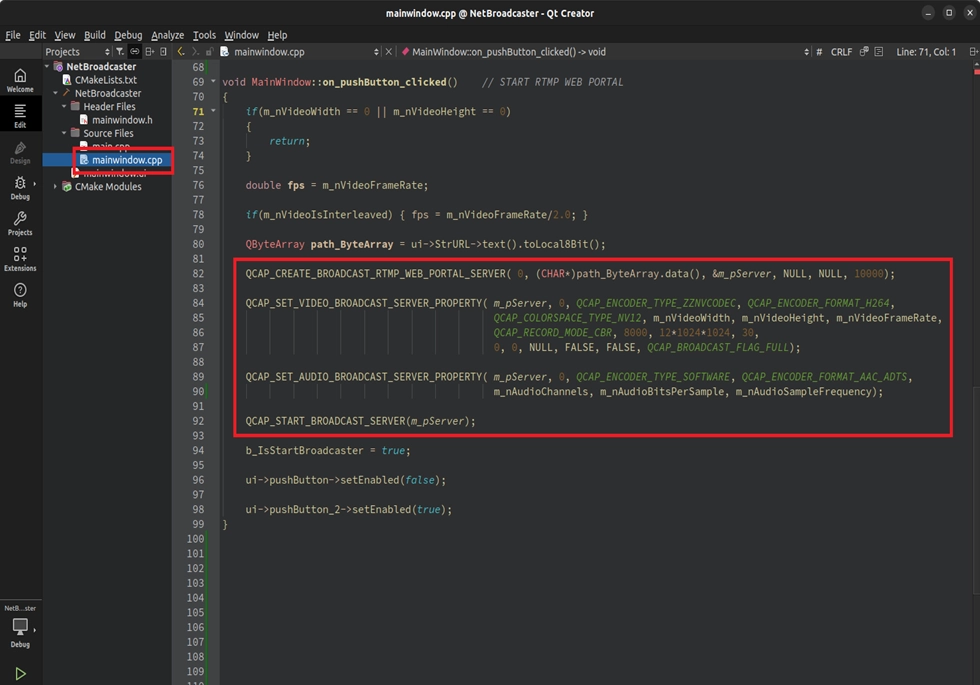
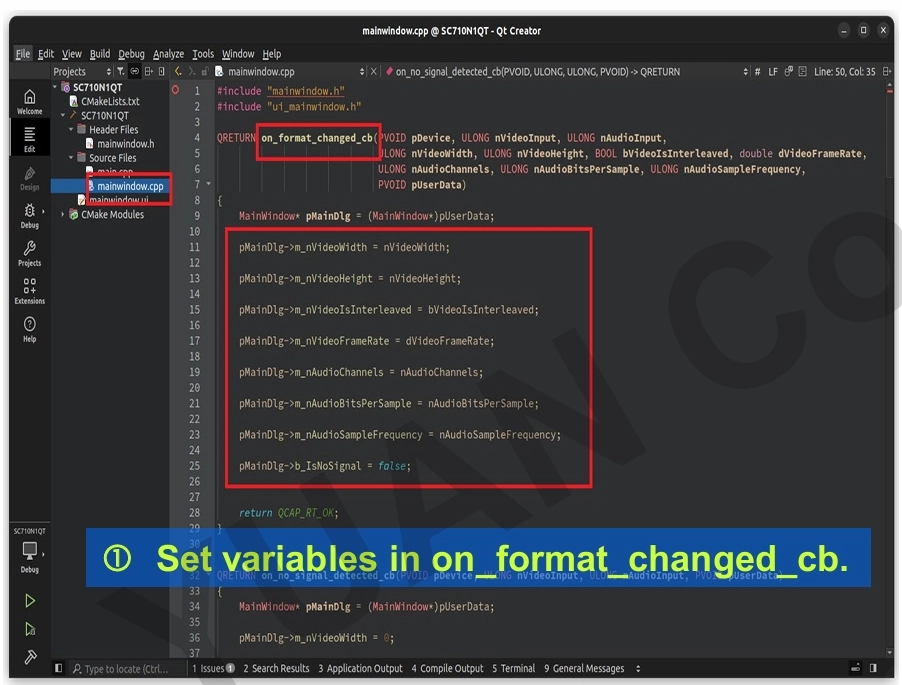
➤ Developer's Must-Learn "Parameter Linkage" Trick : In practical development, we strongly recommend that when the Format Changed Callback is triggered, you conveniently save the latest data into these variables. When you are ready to start the multi-stream engine and need to set complex codec parameters, you can directly feed these variables to the API! Doing this has three major benefits:
1. Complete manual fool-proofing : No need to "hardcode" the width, height, and frame rate in the code.
2. Perfectly match the input source : Ensure that the resolution received by the Encoder 100% matches the current hardware capture status.
3. Seamlessly adapt to dynamic changes : If the user switches to a camera with a different resolution halfway through, the parameters will automatically update on the next start!
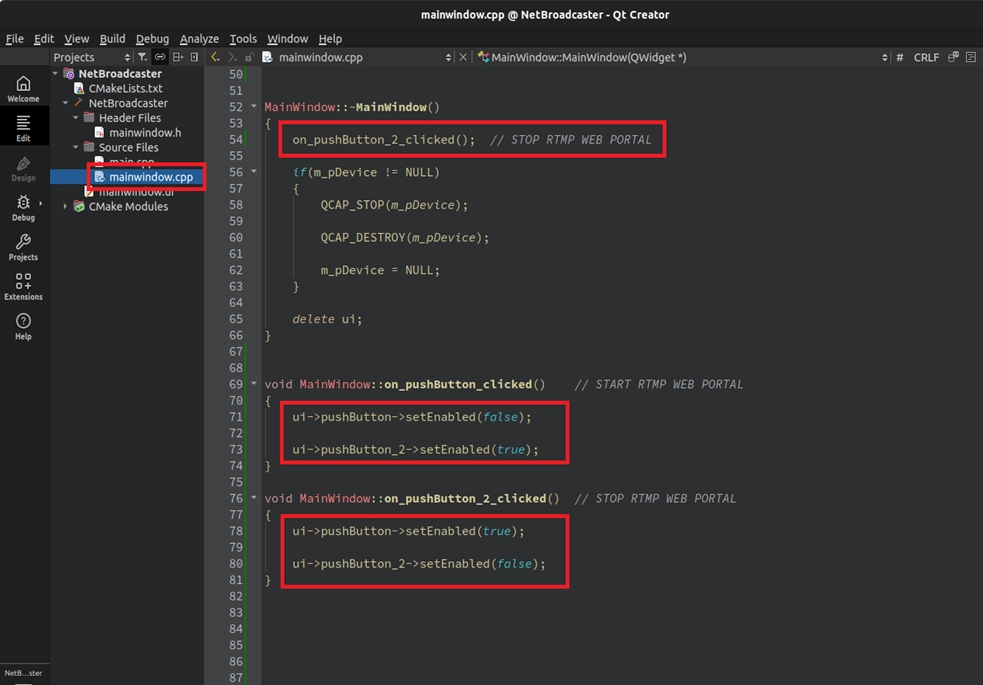
Implementation: STOP RTMP Logic
In the stop button, besides Stop, never forget to Destroy!

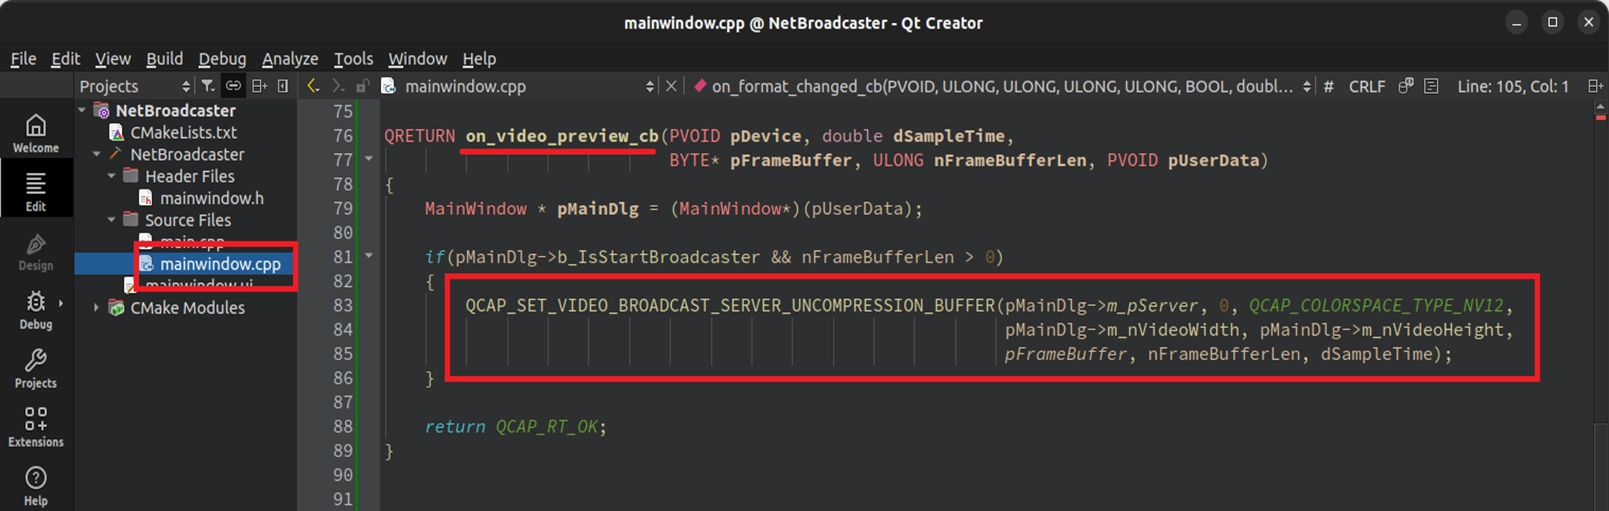
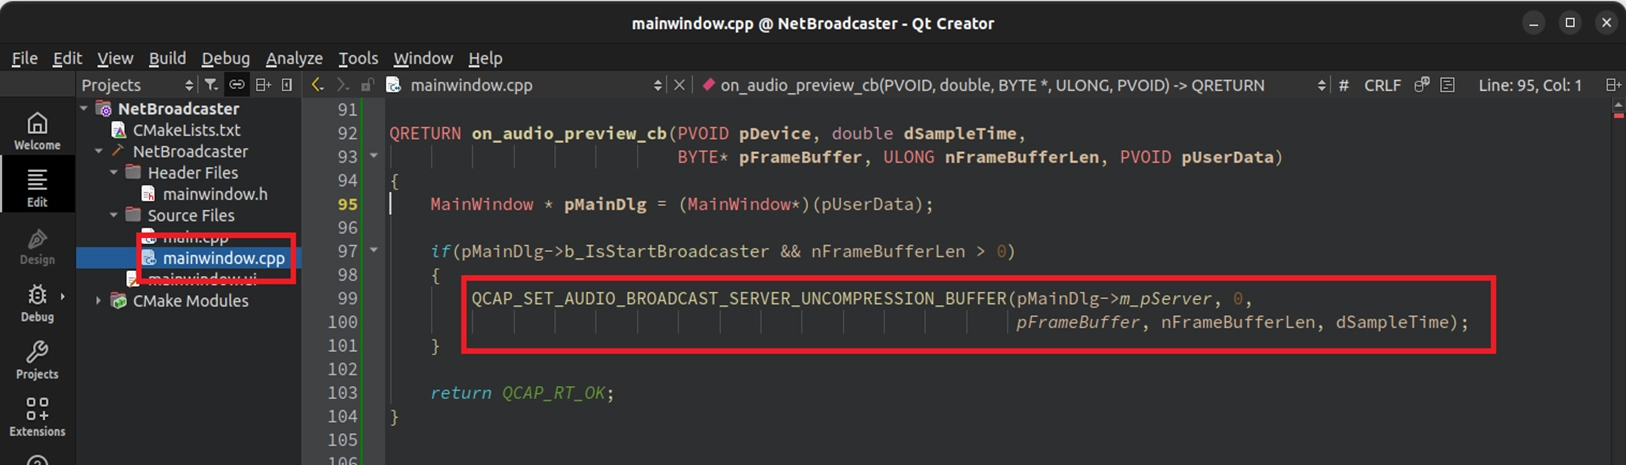
Feeding Network Video Frames in the Callback Switchboard
The server is set up, but there is no video frame inside it right now! We must return to the Callback switchboard dedicated to handling hardware signals and continuously feed every captured NV12 video frame and PCM audio to the server.
➤ For Callback concepts, you can review : 9-5 Callback and Image Snapshot Example
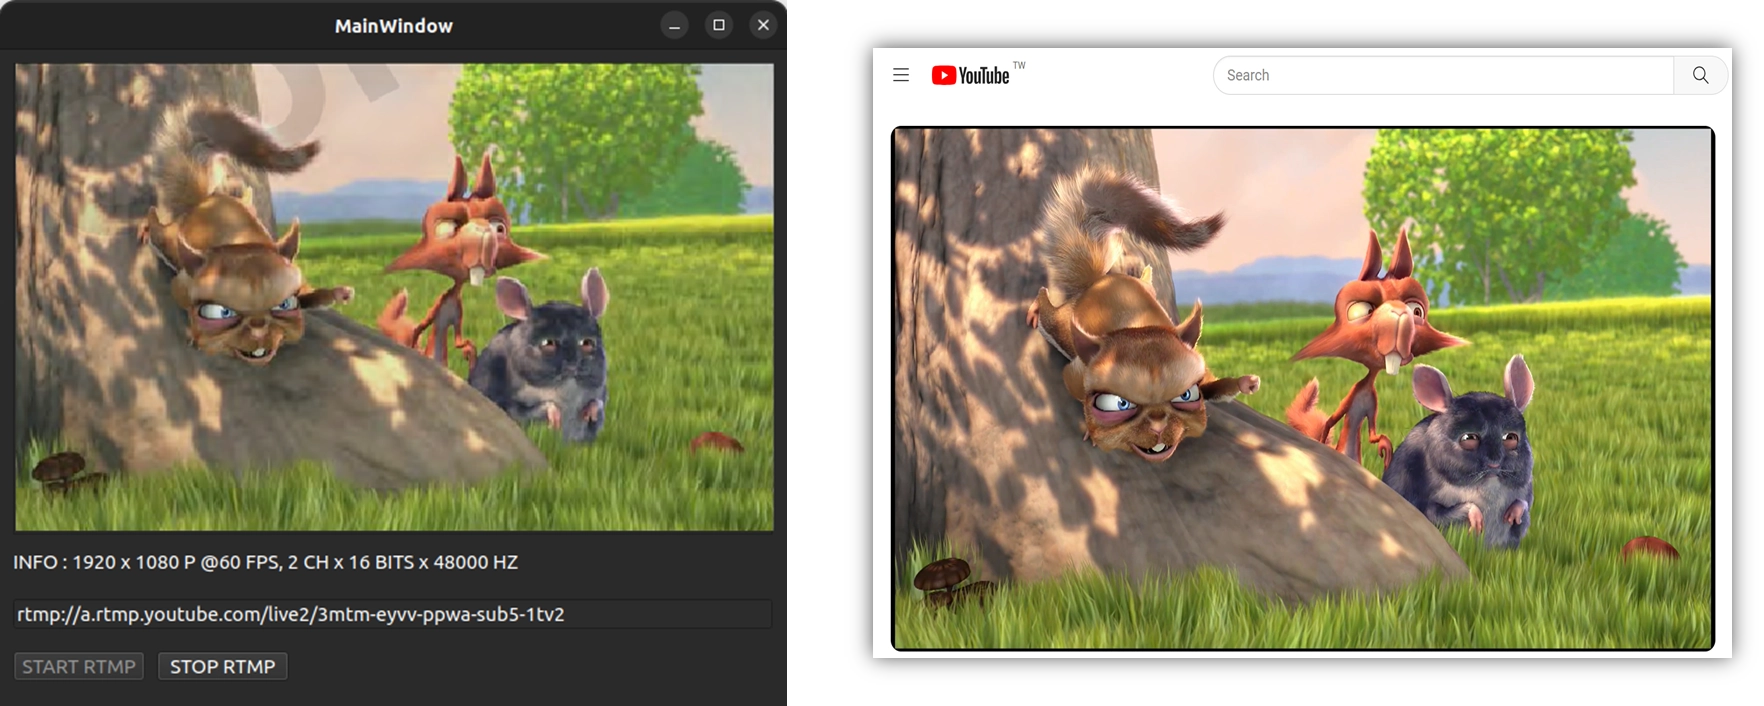
Final Verification
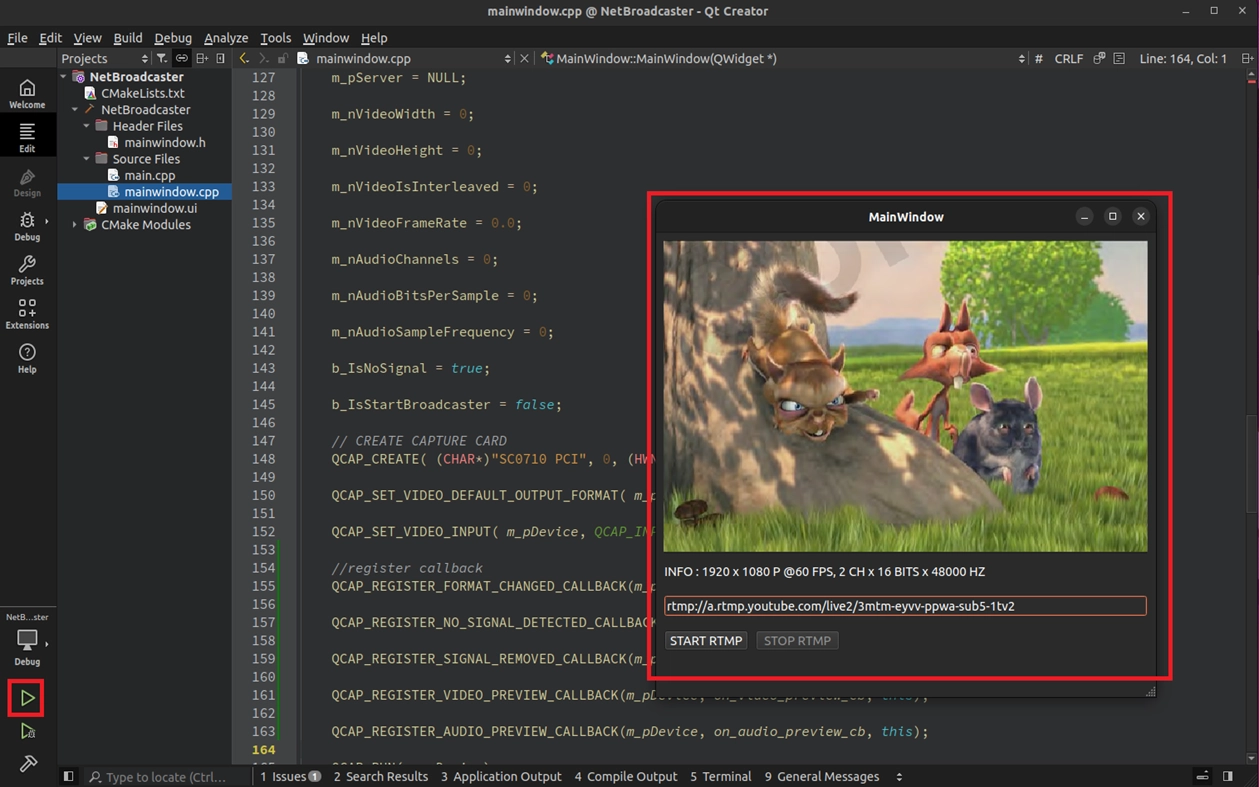
After writing the code, it is time to verify the results! Please compile and execute your NetBroadcaster project. After confirming that the camera video is displayed normally, follow the steps below:
1. Get the YouTube Live Stream Key : Please open your web browser, log in to your YouTube channel, and enter "YouTube Studio". Click "Go live" in the upper right corner.
2. Copy the Complete URL : In the live control panel, you will see the "Stream URL" and "Stream key". Please combine the two ( e.g.: rtmp://a.rtmp.youtube.com/live2/Stream key ).
3. Start Broadcasting with One Click! Return to our program interface, paste the newly combined URL into the StrURL field ( replacing the original set_URL_here ), and bravely press "START RTMP"!
© Blender Foundation | Big Buck Bunny | CC BY 3.0
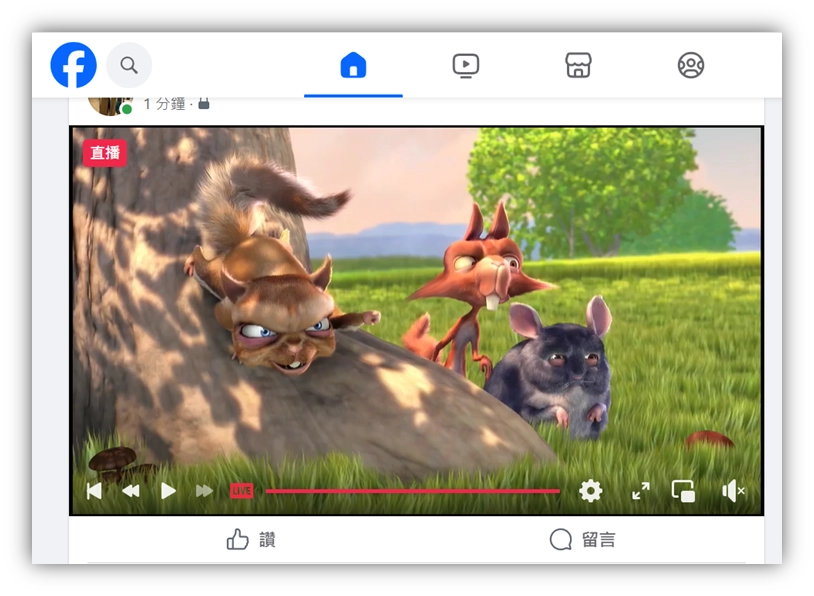
4. Enjoy the Results : Wait for about 10~20 seconds of network buffering time, and you will see "Excellent connection" in the YouTube live backend. Then, your camera video will smoothly appear on YouTube for audiences all over the world to watch!
 © Blender Foundation | Big Buck Bunny | CC BY 3.0
Congratulations! By following the tutorial all the way here, from the most basic video capture and recording to successfully pushing the video to YouTube Live today, you have actually silently learned the most core and most frequently used features in practical projects of the NexVDO SDK! With this foundation, no matter what kind of audio and video development needs you encounter in the future, I believe you will be more proficient and easily turn your ideas into actual software products!