8-10 DeepSeek VLM モデル
学習目標
Pythonプログラムを使用してHugging FaceプラットフォームからJanusモデルをダウンロードし、マルチモーダルデータ(テキスト+画像)を入力してJanusに質問し、回答を得る。

Janusとは?
Janus-Pro-1Bは、DeepSeek AIが開発した「マルチモーダル大規模言語モデル」です。テキストと画像の両方を理解・生成する能力を備えており、文章や画像を与えると、それを「理解」し、「話し続ける」か「絵を描く」ことができます。
Janusでできること
1. 画像を与えると、それを言葉で説明します。
2. テキストを与えると、その説明に合った画像を生成します。
使い始めるには?
1. GitHubから deepseek-ai/Janus プロジェクトのソースコードをダウンロードしてください。
git clone https://github.com/deepseek-ai/Janus.git
2. Janusフォルダ内のpyproject.tomlファイルを開き、以下の依存関係を削除します。
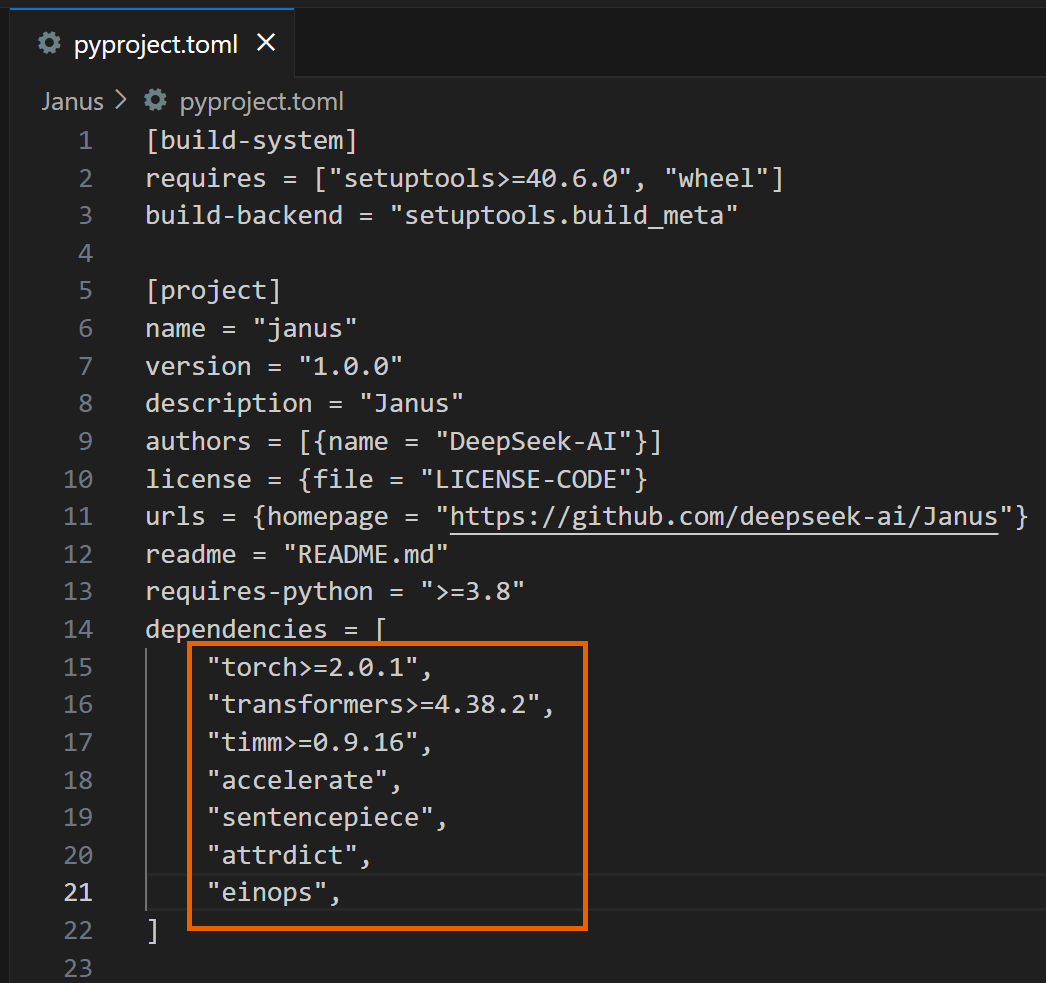
3. インストールを進めてください。
4. 以下のサンプルコードは、Janusに「画像の説明をしてください」という質問への応答を生成させます。
import os
import csv
import cv2
import time
import torch
from PIL import Image
from transformers import AutoModelForCausalLM
from janus.models import MultiModalityCausalLM, VLChatProcessor
from janus.utils.io import load_pil_images
# Specify the path of the model
model_path = "deepseek-ai/Janus-Pro-1B"
# Load the processor
vl_chat_processor: VLChatProcessor = VLChatProcessor.from_pretrained(model_path, cache_dir="./model")
tokenizer = vl_chat_processor.tokenizer
# Load the model
vl_gpt: MultiModalityCausalLM = AutoModelForCausalLM.from_pretrained(
model_path, trust_remote_code=True, torch_dtype=torch.bfloat16, cache_dir="./model",
)
vl_gpt = vl_gpt.to(torch.bfloat16).cuda().eval()
# Set up the conversation messages, roles, and content
img_path = "Janus/images/doge.png"
conversation = [
{
"role": "<|User|>",
"content": "
"images": [img_path],
},
{"role": "<|Assistant|>", "content": ""},
]
# Load the image and prepare input
frame = cv2.cvtColor(cv2.imread(img_path), cv2.COLOR_BGR2RGB)
pil_images = [Image.fromarray(frame)]
prepare_inputs = vl_chat_processor(
conversations=conversation, images=pil_images, force_batchify=True
).to(vl_gpt.device)
# Run the image encoder to get image embedding data
inputs_embeds = vl_gpt.prepare_inputs_embeds(**prepare_inputs)
# Run the model to get a response
outputs = vl_gpt.language_model.generate(
inputs_embeds=inputs_embeds,
attention_mask=prepare_inputs.attention_mask,
pad_token_id=tokenizer.eos_token_id,
bos_token_id=tokenizer.bos_token_id,
eos_token_id=tokenizer.eos_token_id,
max_new_tokens=512,
do_sample=False,
use_cache=True,
)
# Decode the generated text and output the result
answer = tokenizer.decode(outputs[0].cpu().tolist(), skip_special_tokens=True)
print(answer)
5. プログラムを実行すると、以下のような応答が表示されます。
完了したら、プログラムに入力した質問や画像を編集して、Janusを使って様々な質問に答えることができます!

6. 次のサンプルプログラムでは、Janus が「青い目と茶色の髪をした、赤と白の伝統的な衣装を着たカブールの美しい王女」の画像を生成し、generated_samples フォルダーに保存します。
import os
import PIL.Image
import torch
import numpy as np
from transformers import AutoModelForCausalLM
from janus.models import MultiModalityCausalLM, VLChatProcessor
# Specify the model path
model_path = "deepseek-ai/Janus-Pro-1B"
# Load the multimodal chat processor and specify cache directory
vl_chat_processor: VLChatProcessor = VLChatProcessor.from_pretrained(
model_path, cache_dir="./model"
)
# Get the tokenizer
tokenizer = vl_chat_processor.tokenizer
# Load the multimodal causal language model, allow remote code,
# specify cache directory
vl_gpt: MultiModalityCausalLM = AutoModelForCausalLM.from_pretrained(
model_path, trust_remote_code=True, cache_dir="./model"
)
# Convert model to bfloat16 type, move to CUDA GPU, and set to evaluation mode
vl_gpt = vl_gpt.to(torch.bfloat16).cuda().eval()
# Define the conversation content: first line is user input,
# second line is assistant's placeholder
conversation = [
{
"role": "<|User|>",
"content": "A stunning princess from kabul in red, "
"white traditional clothing, blue eyes, brown hair",
},
{"role": "<|Assistant|>", "content": ""},
]
# Apply the SFT (Supervised Fine-Tuning) template on conversation to
# generate a training format prompt
sft_format = vl_chat_processor.apply_sft_template_for_multi_turn_prompts(
conversations=conversation,
sft_format=vl_chat_processor.sft_format,
system_prompt="",
)
# Append the image start tag after the prompt
prompt = sft_format + vl_chat_processor.image_start_tag
# Define the image generation function,
# using torch.inference_mode to ensure no gradient calculation
@torch.inference_mode()
def generate(
mmgpt: MultiModalityCausalLM,
vl_chat_processor: VLChatProcessor,
prompt: str,
temperature: float = 1,
parallel_size: int = 1,
cfg_weight: float = 5,
image_token_num_per_image: int = 576,
img_size: int = 384,
patch_size: int = 16,
):
# Encode prompt into token IDs
input_ids = vl_chat_processor.tokenizer.encode(prompt)
input_ids = torch.LongTensor(input_ids)
# Create a tokens tensor with length parallel_size*2, repeat input_ids
tokens = torch.zeros((parallel_size*2, len(input_ids)), dtype=torch.int).cuda()
for i in range(parallel_size*2):
tokens[i, :] = input_ids
# Keep original prompt in even rows,
# pad with pad_id in odd rows for contrastive guidance
if i % 2 != 0:
tokens[i, 1:-1] = vl_chat_processor.pad_id
# Convert tokens to embeddings
inputs_embeds = mmgpt.language_model.get_input_embeddings()(tokens)
# Prepare tensor to store generated image tokens
generated_tokens = torch.zeros(
(parallel_size, image_token_num_per_image),
dtype=torch.int
).cuda()
# Generate each image token step by step
for i in range(image_token_num_per_image):
# Call the model and pass past_key_values to speed up generation
outputs = mmgpt.language_model.model(
inputs_embeds=inputs_embeds,
use_cache=True,
past_key_values=outputs.past_key_values if i != 0 else None
)
hidden_states = outputs.last_hidden_state
# Get logits split into conditional (cond) and unconditional (uncond) parts
logits = mmgpt.gen_head(hidden_states[:, -1, :])
logit_cond = logits[0::2, :]
logit_uncond = logits[1::2, :]
# Apply classifier-free guidance (CFG) weighting
logits = logit_uncond + cfg_weight * (logit_cond - logit_uncond)
probs = torch.softmax(logits / temperature, dim=-1)
# Sample the next token according to probabilities
next_token = torch.multinomial(probs, num_samples=1)
generated_tokens[:, i] = next_token.squeeze(dim=-1)
# Prepare input embeddings for next step;
# replicate tokens and convert to image embeddings
next_token = torch.cat(
[next_token.unsqueeze(dim=1), next_token.unsqueeze(dim=1)], dim=1
).view(-1)
img_embeds = mmgpt.prepare_gen_img_embeds(next_token)
inputs_embeds = img_embeds.unsqueeze(dim=1)
# Use the vision decoder to decode tokens into images
dec = mmgpt.gen_vision_model.decode_code(
generated_tokens.to(dtype=torch.int),
shape=[parallel_size, 8, img_size//patch_size, img_size//patch_size]
)
# Convert values to uint8 image format
dec = dec.to(torch.float32).cpu().numpy().transpose(0, 2, 3, 1)
dec = np.clip((dec + 1) / 2 * 255, 0, 255)
# Create blank array and fill with final images
visual_img = np.zeros((parallel_size, img_size, img_size, 3), dtype=np.uint8)
visual_img[:, :, :] = dec
# Create output folder and save images
os.makedirs('generated_samples', exist_ok=True)
for i in range(parallel_size):
save_path = os.path.join('generated_samples', f"img_{i}.jpg")
PIL.Image.fromarray(visual_img[i]).save(save_path)
# Call the generate function to start image generation
generate(
vl_gpt,
vl_chat_processor,
prompt,
)
7. 実行すると、以下のような応答が表示されます。
完了したら、プログラムのテキスト入力部分を変更して、Janus! を使って様々な画像を生成できます。

参考資料 :
[deepseek-ai/Janus-Pro-1B · Hugging Face](https://huggingface.co/deepseek-ai/Janus-Pro-1B)