8-10 DeepSeek VLM
Learning Objectives
Using a Python program to download the Janus model from the Hugging Face platform, and inputting multimodal data (text + images) to ask Janus questions and get answers.

What is Janus?
Janus‑Pro‑1B is a "multimodal large language model" developed by DeepSeek AI. It has the ability to understand and generate both text and images, meaning you can give it a sentence or a picture, and it can "comprehend" and then "continue speaking" or "create a drawing.”
What Can Janus Do?
1. Give it a picture, and it can describe it in words.
2. Give it a piece of text, and it can generate an image that matches the description.
How to Get Started?
1. Download the source code of the deepseek-ai/Janus project from GitHub.
git clone https://github.com/deepseek-ai/Janus.git
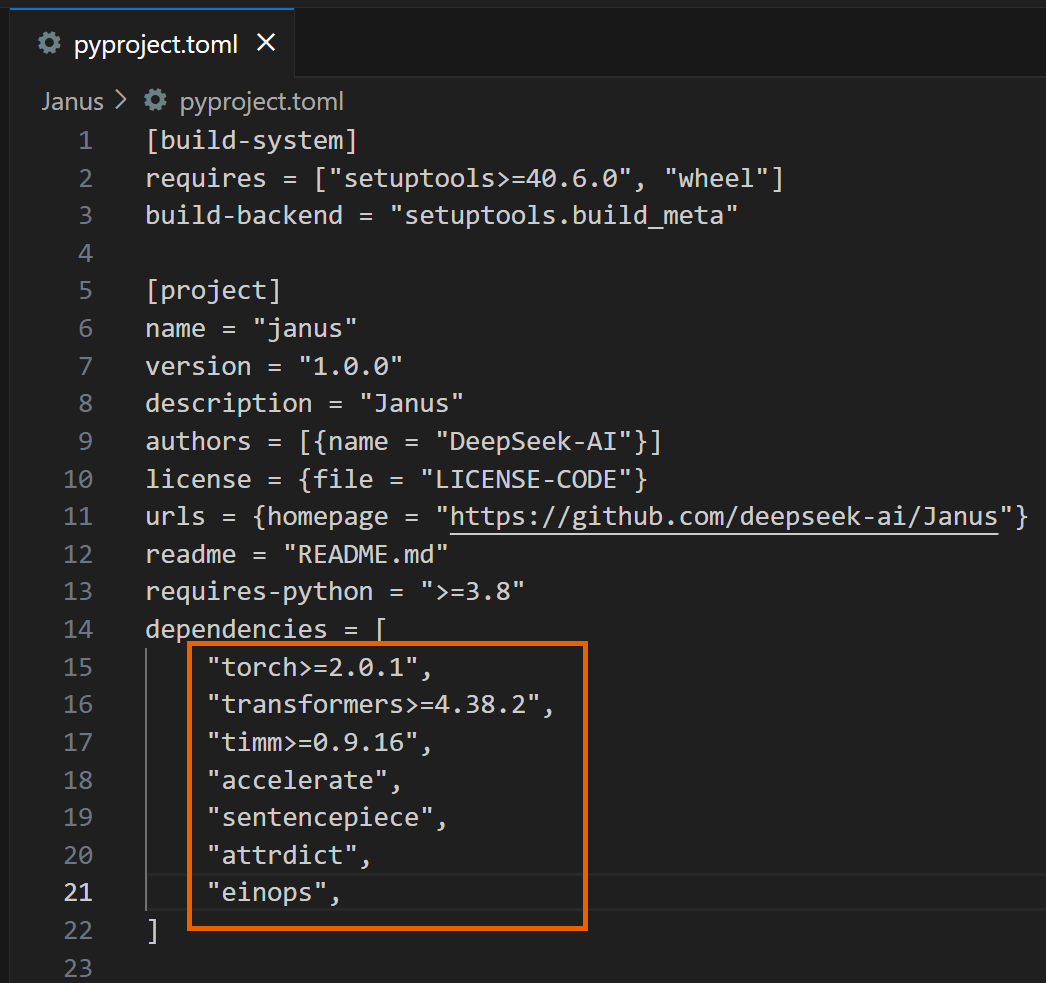
2. Open the pyproject.toml file in the Janus folder and delete the following dependencies.
3. Proceed with the installation.
4. The following example code will make Janus generate a response to "Describe the image.”
import os
import csv
import cv2
import time
import torch
from PIL import Image
from transformers import AutoModelForCausalLM
from janus.models import MultiModalityCausalLM, VLChatProcessor
from janus.utils.io import load_pil_images
# Specify the path of the model
model_path = "deepseek-ai/Janus-Pro-1B"
# Load the processor
vl_chat_processor: VLChatProcessor = VLChatProcessor.from_pretrained(model_path, cache_dir="./model")
tokenizer = vl_chat_processor.tokenizer
# Load the model
vl_gpt: MultiModalityCausalLM = AutoModelForCausalLM.from_pretrained(
model_path, trust_remote_code=True, torch_dtype=torch.bfloat16, cache_dir="./model",
)
vl_gpt = vl_gpt.to(torch.bfloat16).cuda().eval()
# Set up the conversation messages, roles, and content
img_path = "Janus/images/doge.png"
conversation = [
{
"role": "<|User|>",
"content": "
"images": [img_path],
},
{"role": "<|Assistant|>", "content": ""},
]
# Load the image and prepare input
frame = cv2.cvtColor(cv2.imread(img_path), cv2.COLOR_BGR2RGB)
pil_images = [Image.fromarray(frame)]
prepare_inputs = vl_chat_processor(
conversations=conversation, images=pil_images, force_batchify=True
).to(vl_gpt.device)
# Run the image encoder to get image embedding data
inputs_embeds = vl_gpt.prepare_inputs_embeds(**prepare_inputs)
# Run the model to get a response
outputs = vl_gpt.language_model.generate(
inputs_embeds=inputs_embeds,
attention_mask=prepare_inputs.attention_mask,
pad_token_id=tokenizer.eos_token_id,
bos_token_id=tokenizer.bos_token_id,
eos_token_id=tokenizer.eos_token_id,
max_new_tokens=512,
do_sample=False,
use_cache=True,
)
# Decode the generated text and output the result
answer = tokenizer.decode(outputs[0].cpu().tolist(), skip_special_tokens=True)
print(answer)
5. After running it, you will see a response similar to the following:
Once you're done, you can modify the questions and images entered in the program and use Janus to answer various questions!

6. The following example program will have Janus generate an image of "A stunning princess from Kabul in red and white traditional clothing, with blue eyes and brown hair," and save it in the generated_samples folder.
import os
import PIL.Image
import torch
import numpy as np
from transformers import AutoModelForCausalLM
from janus.models import MultiModalityCausalLM, VLChatProcessor
# Specify the model path
model_path = "deepseek-ai/Janus-Pro-1B"
# Load the multimodal chat processor and specify cache directory
vl_chat_processor: VLChatProcessor = VLChatProcessor.from_pretrained(
model_path, cache_dir="./model"
)
# Get the tokenizer
tokenizer = vl_chat_processor.tokenizer
# Load the multimodal causal language model, allow remote code,
# specify cache directory
vl_gpt: MultiModalityCausalLM = AutoModelForCausalLM.from_pretrained(
model_path, trust_remote_code=True, cache_dir="./model"
)
# Convert model to bfloat16 type, move to CUDA GPU, and set to evaluation mode
vl_gpt = vl_gpt.to(torch.bfloat16).cuda().eval()
# Define the conversation content: first line is user input,
# second line is assistant's placeholder
conversation = [
{
"role": "<|User|>",
"content": "A stunning princess from kabul in red, "
"white traditional clothing, blue eyes, brown hair",
},
{"role": "<|Assistant|>", "content": ""},
]
# Apply the SFT (Supervised Fine-Tuning) template on conversation to
# generate a training format prompt
sft_format = vl_chat_processor.apply_sft_template_for_multi_turn_prompts(
conversations=conversation,
sft_format=vl_chat_processor.sft_format,
system_prompt="",
)
# Append the image start tag after the prompt
prompt = sft_format + vl_chat_processor.image_start_tag
# Define the image generation function,
# using torch.inference_mode to ensure no gradient calculation
@torch.inference_mode()
def generate(
mmgpt: MultiModalityCausalLM,
vl_chat_processor: VLChatProcessor,
prompt: str,
temperature: float = 1,
parallel_size: int = 1,
cfg_weight: float = 5,
image_token_num_per_image: int = 576,
img_size: int = 384,
patch_size: int = 16,
):
# Encode prompt into token IDs
input_ids = vl_chat_processor.tokenizer.encode(prompt)
input_ids = torch.LongTensor(input_ids)
# Create a tokens tensor with length parallel_size*2, repeat input_ids
tokens = torch.zeros((parallel_size*2, len(input_ids)), dtype=torch.int).cuda()
for i in range(parallel_size*2):
tokens[i, :] = input_ids
# Keep original prompt in even rows,
# pad with pad_id in odd rows for contrastive guidance
if i % 2 != 0:
tokens[i, 1:-1] = vl_chat_processor.pad_id
# Convert tokens to embeddings
inputs_embeds = mmgpt.language_model.get_input_embeddings()(tokens)
# Prepare tensor to store generated image tokens
generated_tokens = torch.zeros(
(parallel_size, image_token_num_per_image),
dtype=torch.int
).cuda()
# Generate each image token step by step
for i in range(image_token_num_per_image):
# Call the model and pass past_key_values to speed up generation
outputs = mmgpt.language_model.model(
inputs_embeds=inputs_embeds,
use_cache=True,
past_key_values=outputs.past_key_values if i != 0 else None
)
hidden_states = outputs.last_hidden_state
# Get logits split into conditional (cond) and unconditional (uncond) parts
logits = mmgpt.gen_head(hidden_states[:, -1, :])
logit_cond = logits[0::2, :]
logit_uncond = logits[1::2, :]
# Apply classifier-free guidance (CFG) weighting
logits = logit_uncond + cfg_weight * (logit_cond - logit_uncond)
probs = torch.softmax(logits / temperature, dim=-1)
# Sample the next token according to probabilities
next_token = torch.multinomial(probs, num_samples=1)
generated_tokens[:, i] = next_token.squeeze(dim=-1)
# Prepare input embeddings for next step;
# replicate tokens and convert to image embeddings
next_token = torch.cat(
[next_token.unsqueeze(dim=1), next_token.unsqueeze(dim=1)], dim=1
).view(-1)
img_embeds = mmgpt.prepare_gen_img_embeds(next_token)
inputs_embeds = img_embeds.unsqueeze(dim=1)
# Use the vision decoder to decode tokens into images
dec = mmgpt.gen_vision_model.decode_code(
generated_tokens.to(dtype=torch.int),
shape=[parallel_size, 8, img_size//patch_size, img_size//patch_size]
)
# Convert values to uint8 image format
dec = dec.to(torch.float32).cpu().numpy().transpose(0, 2, 3, 1)
dec = np.clip((dec + 1) / 2 * 255, 0, 255)
# Create blank array and fill with final images
visual_img = np.zeros((parallel_size, img_size, img_size, 3), dtype=np.uint8)
visual_img[:, :, :] = dec
# Create output folder and save images
os.makedirs('generated_samples', exist_ok=True)
for i in range(parallel_size):
save_path = os.path.join('generated_samples', f"img_{i}.jpg")
PIL.Image.fromarray(visual_img[i]).save(save_path)
# Call the generate function to start image generation
generate(
vl_gpt,
vl_chat_processor,
prompt,
)
7. After running it, you will see a response similar to the following:
Once you're done, you can modify the text input in the program to generate various images using Janus!

Reference:
[deepseek-ai/Janus-Pro-1B · Hugging Face](https://huggingface.co/deepseek-ai/Janus-Pro-1B)